

User Manual of Non-Removable GPS Tracking Bracelet C05 (Huatenglobal)
2025-12-08 Click:465
Note: Please read this user manual carefully before use to ensure correct installation and quick use. Due to product upgrades, some functional configurations may be adjusted. Please refer to the actual product.
1. Before Use
1.1 Accessories Checking
Check that the device model is correct and that all accessories are completed.
| C05 Tamperproof watch | X 1 | USB charging cable | X 1 |
| Power bank | X 1 | Screwdriver | X 1 |
| User manual | X 1 | Accessories bag | X 1 |
1.2 SIM Card Select
Please select one frequency bands supported SIM card from your carrier. The SIM card model should be NANO (sameas the iPhone 12).

Figure-1 C05 tamperproof watch NANO SIM Card
1.3 Electrical Parameters
- Charging Input: DC/5V 500mA
- Operating Temperature: -20°C to 70°C
- 4G Network Bands: B1/B3/B8/B38/B39/B40/B41
- Watch Battery Capacity: 830mAh
- Standby Time: 72-96 hours
- Working Time: 48-72 hours
- Power Bank Battery Capacity: 1,200mAh
- Waterproof Rating: IP68
- Screen: 1.4 inches colorful screen
2. Hardware Functions
2.1 Watch interface
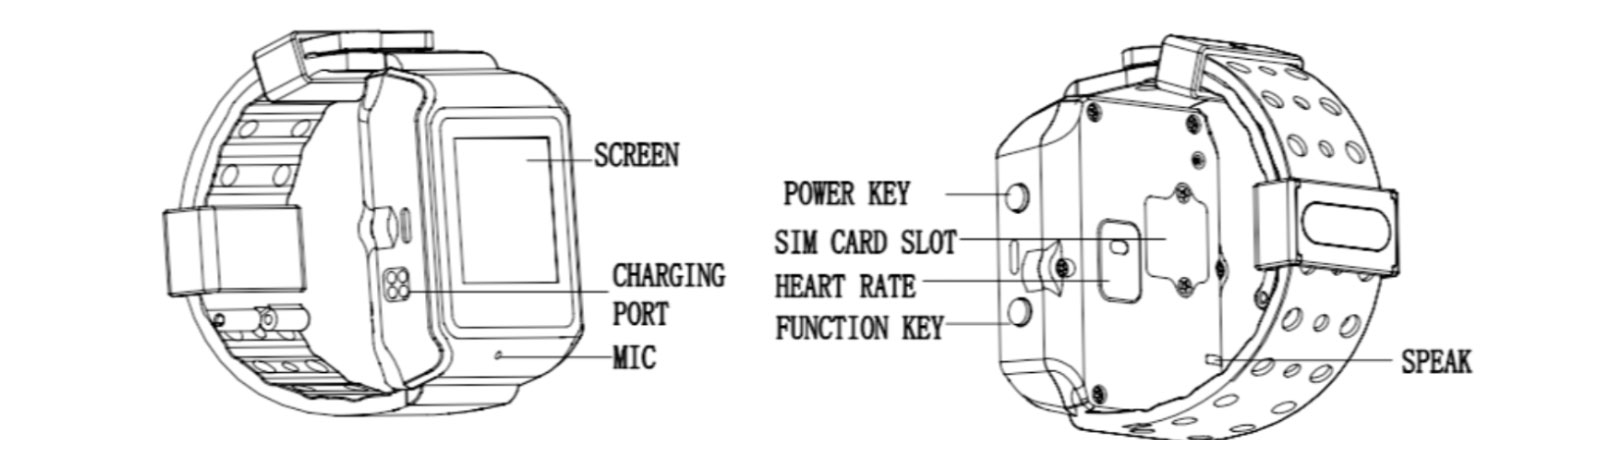
Figure-2 watch interface
2.2 SIM Card Installation and Wearing Operation
Use the accessories screwdriver to unscrew the two cover screws, open the cover, install the SIM card into the SIM card slot in the correct orientation, then put the cover and tighten the two screws.
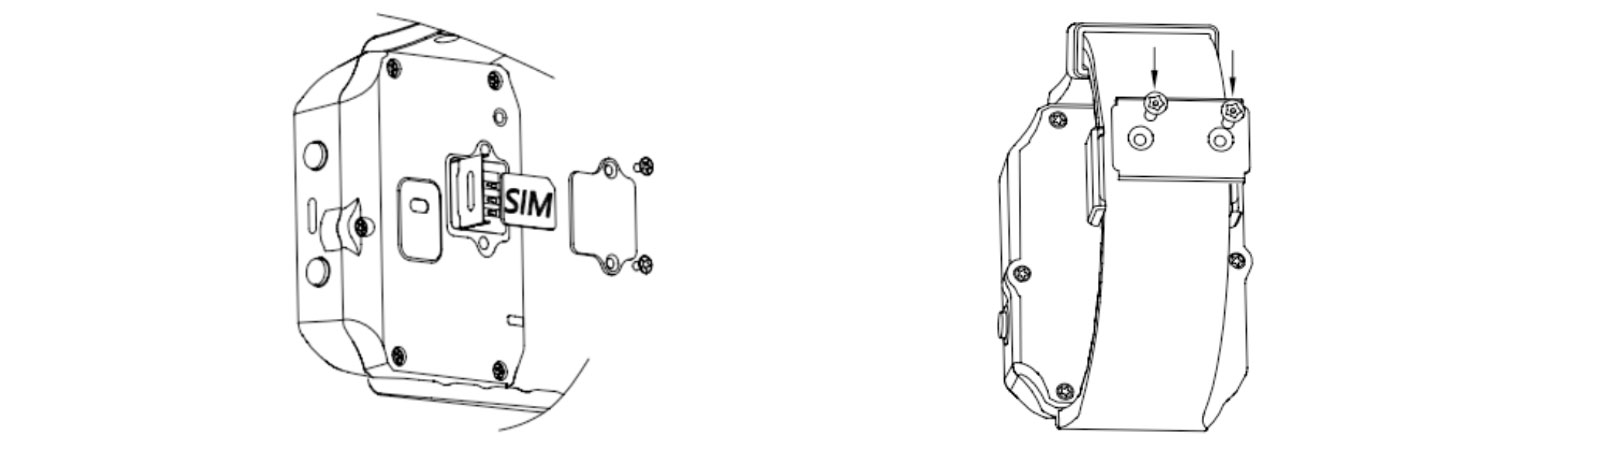
Figure-3 SIM card installation and screw put on
Note: Once the watch is locked correctly, an icon ![]() will appear in the upper left corner of the watch interface, message "Watch was locked" will pop up on the watch screen. And web platform and apps get the alarm “Watch was Locked”.
will appear in the upper left corner of the watch interface, message "Watch was locked" will pop up on the watch screen. And web platform and apps get the alarm “Watch was Locked”.
2.3 Charging

Figure-4 Attached power bank and Plug in charging cable
2.3.1 Charging the watch
Attach the power bank to the watch as shown in the picture of figure-4 to charge it. The power bank's indicator light will illuminate to show the remaining battery level.
2.3.2 Charging the power bank
Plug the USB charging cable into the charging port shown in the picture figure-5 to charge the power bank. The indicator lights will flash sequentially. Once fully charged, all indicator lights will be on.
Note: Please do not connect the charging cable to charge power bank while the power bank charging the watch!
2.4 Button and Screen Operation
2.4.1 Power Key
(1) Under power off status: Press and hold for 3 seconds to power on (automatic power on while charging)
(2) Under standby status: Press and hold for 5 seconds to call for help (refer to the app instructions for details)
2.4.2 Function Key
Switch functions and return
2.4.3 Screen Left Swipe Operation
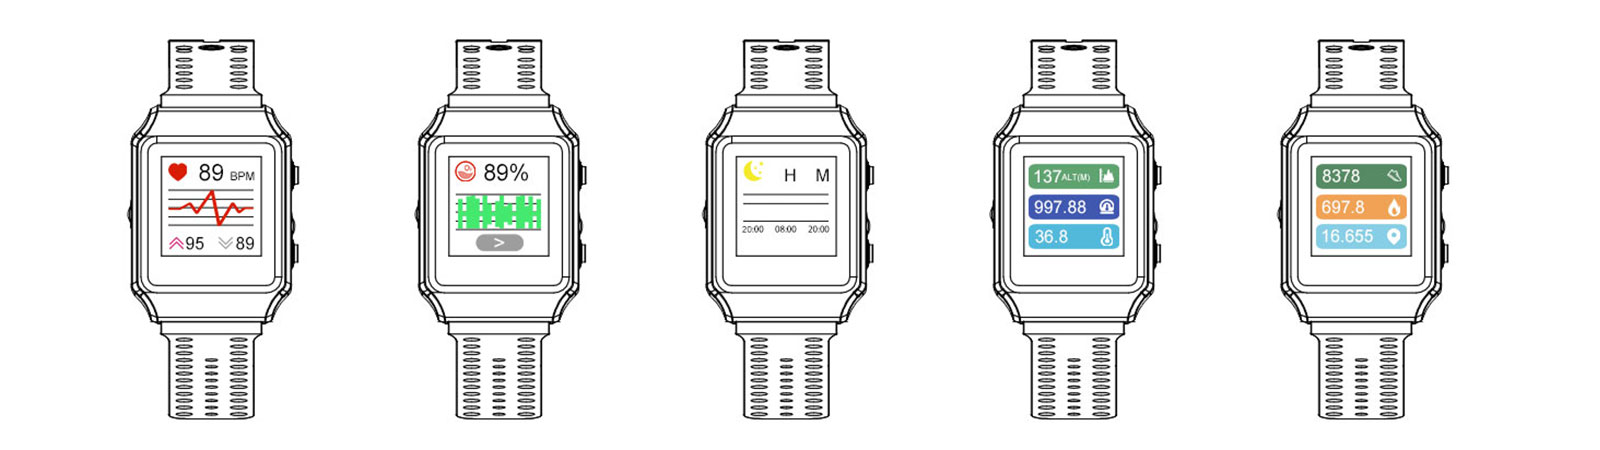
Figure-5 C05 tamperproof watch left sliding
- Heart rate monitoring
- Blood oxygen monitoring
- Sleep monitoring
- Altitude, atmospheric pressure and body temperature monitoring
- Pedometer, calorie consumption, distance
Note: Data accuracy is based on the testing environment and conditions and should not be used as a medical reference.
2.4.4 Screen Drop-down Operation
Drop-down menu to view time display, battery percentage, signal values, connection status, and access the main menu.
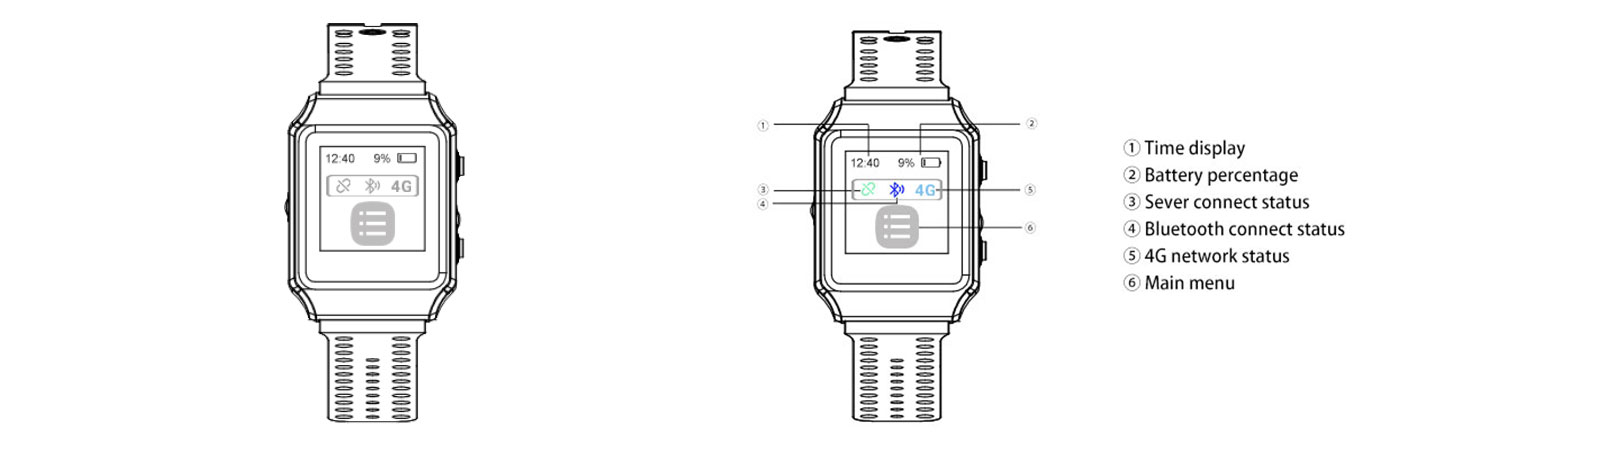
Figure-6 C05 tamperproof watch Screen drop-down operation
① Time display
② Battery percentage
③ Server connect status: Grey color: no connect; Green color: connected.
④ Bluetooth status: Grey color: no connect; Blue color: connected.
⑤ 4G network status: Grey color: no connect; Light blue color: connected.
⑥ Main menu
- System message: Push message from management system.
- Contacts: Phone book
- Device ID: Watch’s IMEI number an QR code
- About: Device name, model, IMEI number, IMSI, ICCID, BLE address, firmware version, complie time.
Note (Important!):
① After inserting the SIM card, the 4G network connection icon changes from gray to blue, and then the server connection icon changes from gray to green, indicating the watch has recognized the SIM card, correctly registered with the network, and connected to the server.
② If these two icons remain grayed out, it means the SIM card cannot be recognized correctly, and you will need to provide the SIM card's APN information, including (APN name, MCC, and MNC).
3. Web Platform and Application
3.1 Web Platform Operation
The web platform only for distributor partners to manage multiple devices, kindly contact with our sales to get web platform account when you place sample order and bulk order.
3.2 Application Operation
3.2.1 Download Application
By searching name called “Trackin360” from Google Play or Apple store.
3.2.2 Register Account
Register account by email or phone when the first time, save the account and password. Check below figure-7.
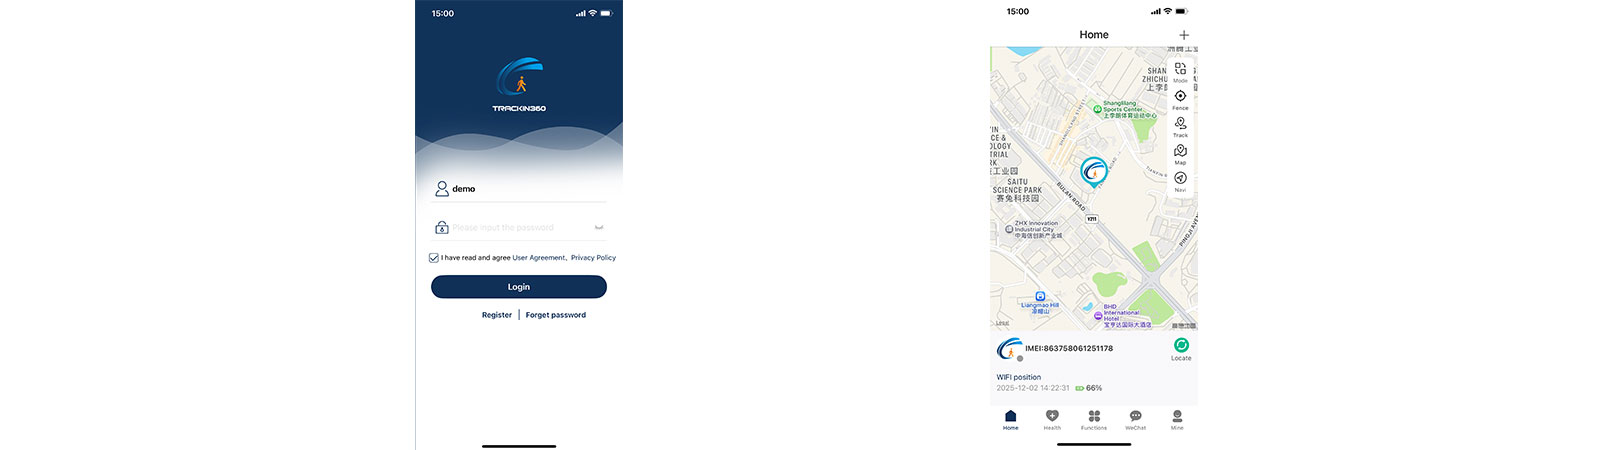
Figure-7 Trackin360 App Register
3.2.3 Binding devices
Click “Mine”, then click “Device list”, then click “Add device”. You can add device by scan device core or Input IMEI number manually. Click “Relationship” select the role and relationship, then input the wearer basic information such as nickname, watch number, height, etc. (figure-8)
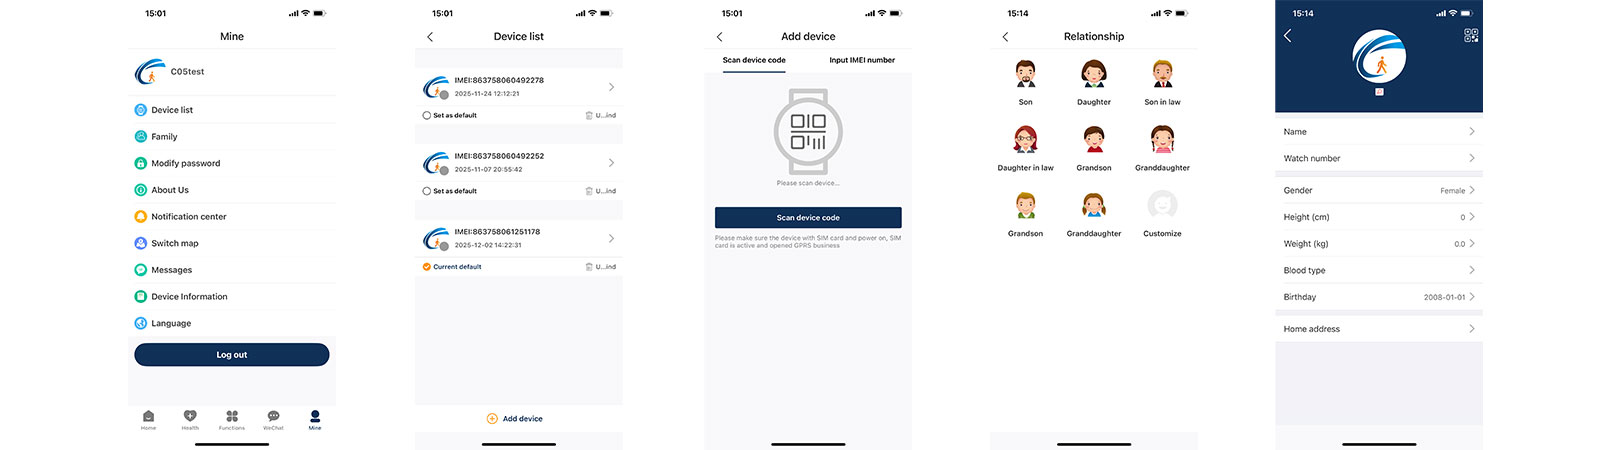
Figure-8 Trackin360 App Binding Devices
3.2.4 Main Operation
3.2.4.1 Home page

Figure-9 Trackin360 App Home Page
Note:
- The dot color green means offline, green means online.
- Outdoor GPS, LBS and Wi-Fi location, indoor LBS or Wi-Fi location only.③ It takes around 10~45 seconds to search the newest location after click.
3.2.4.2 Geo-fence setting
Click “Fence” on the home page, enter Geo-fence setting page.
Click top right corner “+“, select the location and radius of the electronic fence, then click “✔” on the top right corner, confirm the fencing ways (enter, out and enter/out 3 types) (figure-10).
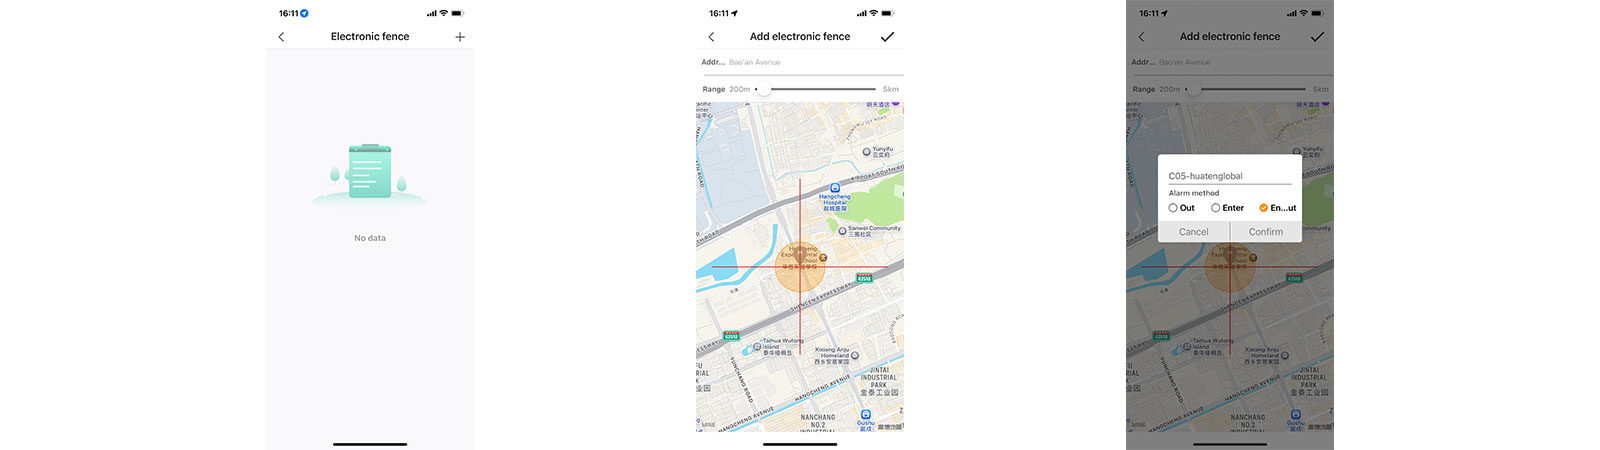
Figure-10 Trackin360 App Geo-fencing Setting
3.2.4.3 Historical trajectory replay
Click “Track” on the home page, enter Historical trajectory playback page. Click ① to select the playback time, Click ② to select the display mode (figure-22), then click ③ to playback. Check the figure-11.
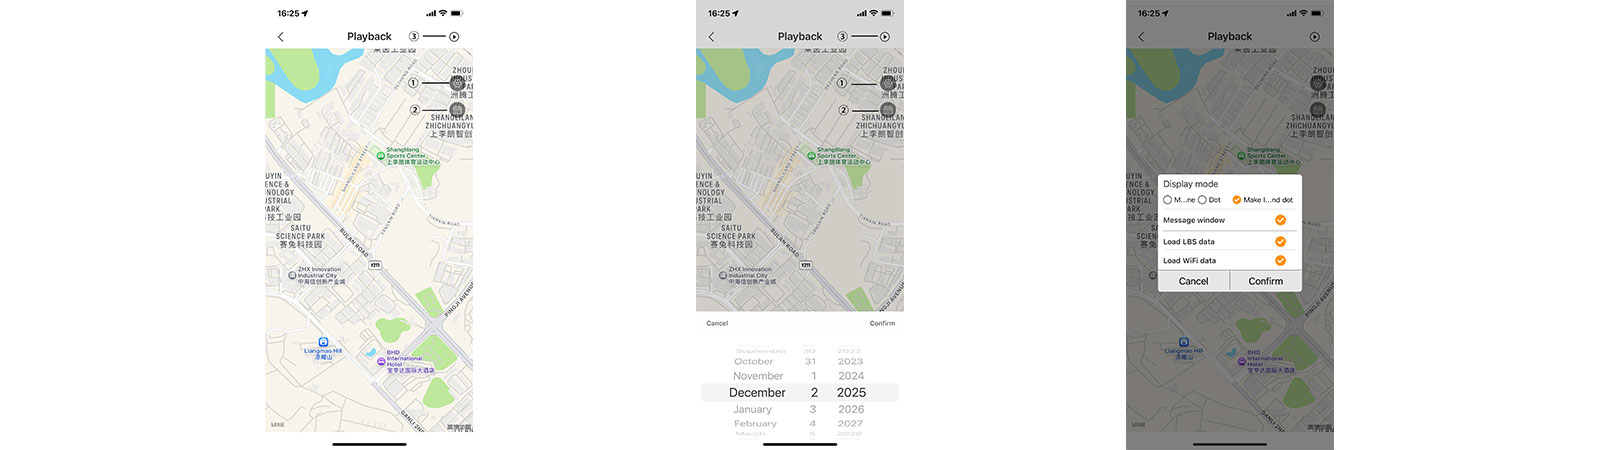
Figure-11 Trackin360 App Historical trajectory replay
3.2.4.4 Health Monitoring
In this section, you can monitoring the wearer heart rate, blood temperature, blood oxygen pressure, pedometer health data by click the corresponding button. Check on below Figure-12.
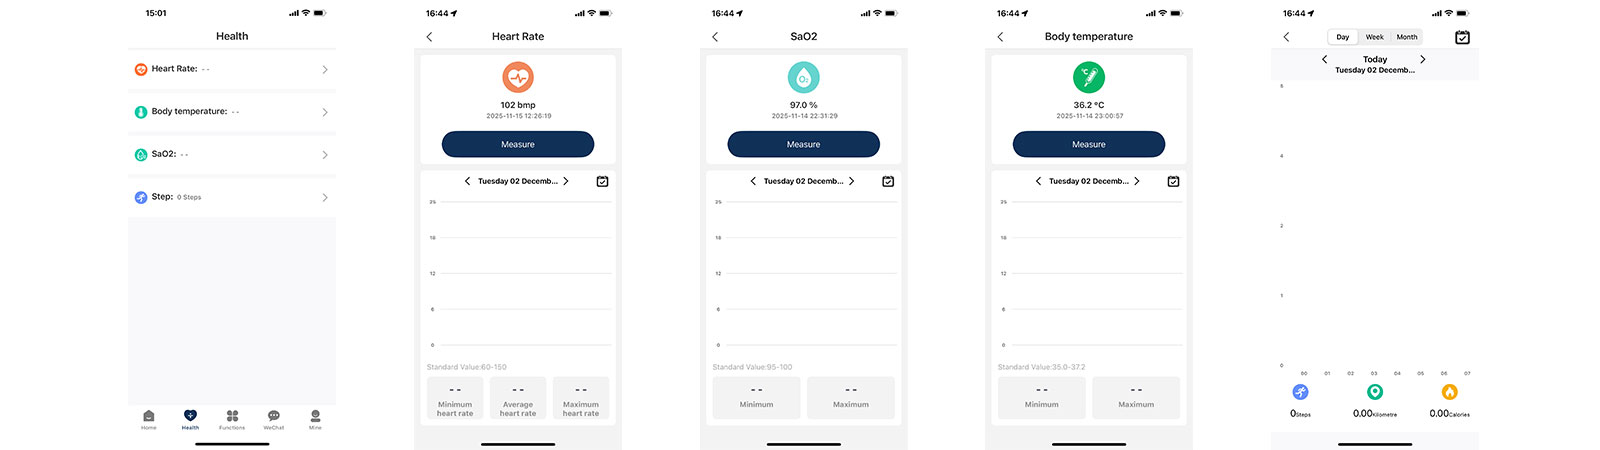
Figure-12 Trackin360 App Health Monitoring
Note: On this page, the wearer needs to issue the command to start measurement, for timed measurements, the test interval needs to be set on the “Function” section.
3.2.4.5 Functions
In this section, you can do fucntion setting as you want (figure-13), details check below:
- SOS Number: up to 3 SOS emergency numbers.
- Restart: Click to restart the watch remotely (under online status)
- Real-time Position: Click to searching signal and update newest position.
- Upload Interval: From 1~600 minutes available.
- Set Phone Book: Up to 10 numbers available.
- Text Push: Pushing any message from management platform to wearer.
- Heart rate Time Interval Setting: 300-65,535 seconds available.
- Measuring Temperature: Click to start measuring wearer temperature.
- Temperature Upload Interval: 1~12 hours avaiable
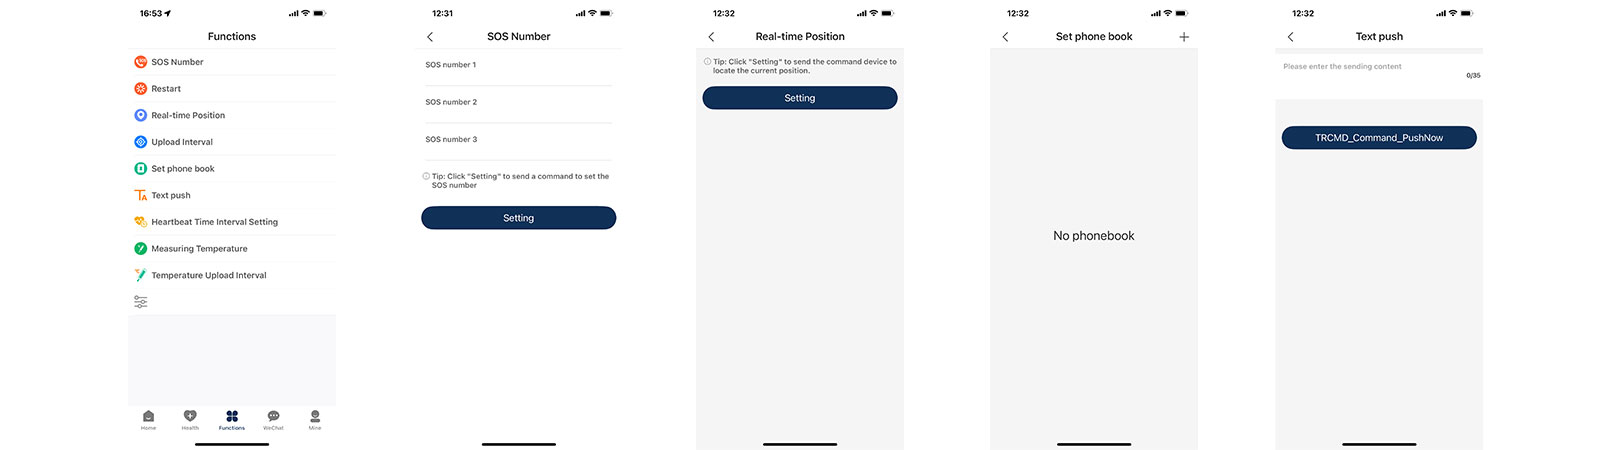
Figure-13 Trackin360 App Functions
3.2.4.6 WeChat
In this section, the management member (such as management platform admin, caregiver, familay member, parents, ect.) who monitoring this wearer able to send message to the weraer and other monitoring members. Check on (figure-13).
3.2.4.7 Mine
In this section, you can do some setting as you want (figure-28), details check below:
- Profile: click profile icon to change avtor, name, email and phone number.
- Device list: click to check, bind and unbind devices.
- Modify Password: change password.
- About US: About Trackin360 App.
- Notification Center:Set the notification methods sounds or non disturb.
- Switch Map: Google map and other maps switch.
- Message: Check message and offline, battery low, lock and tamper alarms.
- Device information: Wearer basic information.
- Languages: Select languages of application.
4. Troubleshooting
This is the 4G cellular network IoT device, the basic working logic is getting location from satellites, base stations and Wi-Fi routers MAC address, plus watch sensors health data, transmit safe and health information to cloud server by 4G network, then display on web management platform and apps.This is the 4G cellular network IoT device, the basic working logic is getting location from satellites, base stations and Wi-Fi routers MAC address, plus watch sensors health data, transmit safe and health information to cloud server by 4G network, then display on web management platform and apps.
| No | Fault symptoms | Problem location | Solution |
| 1 | Watch interface 4G network icon grey | Network register failed | Replace another frequency bands compliance telecom operator’s SIM card |
| 2 | Call the watch SIM card but couldn’t get through | Watch didn’t identify the SIM card properlyz |
a. Whether the SIM card is installed correctly. b. Change another frequency bands compliance telecom operators. c. Whether SIM has balance. |
| 3 | 4G network icon turns blue but server connect icon grey | Not connect with server | Please check the server IP and Port are correct |
| 4 | Not get accurate GPS location | Indoor or basement or some places not open sky area | Please go outside open area |
| 5 | LBS location not accurate | Nearby less cell towers | LBS accurate from 100m to 2km are normal |
| 6 | Device offline | If the watch not detect any moment in 10 minutes, it will into sleep mode | Shake the watch and wait 10~45 seconds |
Note: Please feel free contact with us if there any question you have during sample testing, visit our website: www.huatenglobal.com or contact with us via email: Jason.huang@huatenglobal.com to get technical support, thanks


