




 Landscape
Trackin360 Web GPS Tracking Platform Operation Guide
Admin 2026-07-14 560
Read Before Start Operation Note:
1. This manual describes operations bases on Administrator role.
2. Sections "Ⅵ. Access Configuration" and "Ⅶ. System Settings" only to Administrator accounts;
3. Distributor and End-User accounts do not support these functions.
4. Distributors and End-Users should primarily refer to sections I, II, III, VIII, and IX.
5. Please contact us to have the demo account if you want to try it, thanks
Ⅰ. Login Interface
Trackin360 tracking platform can be accessed via: https://mgr.trackin360.com/
Demo acc: Demo
Password: 123456
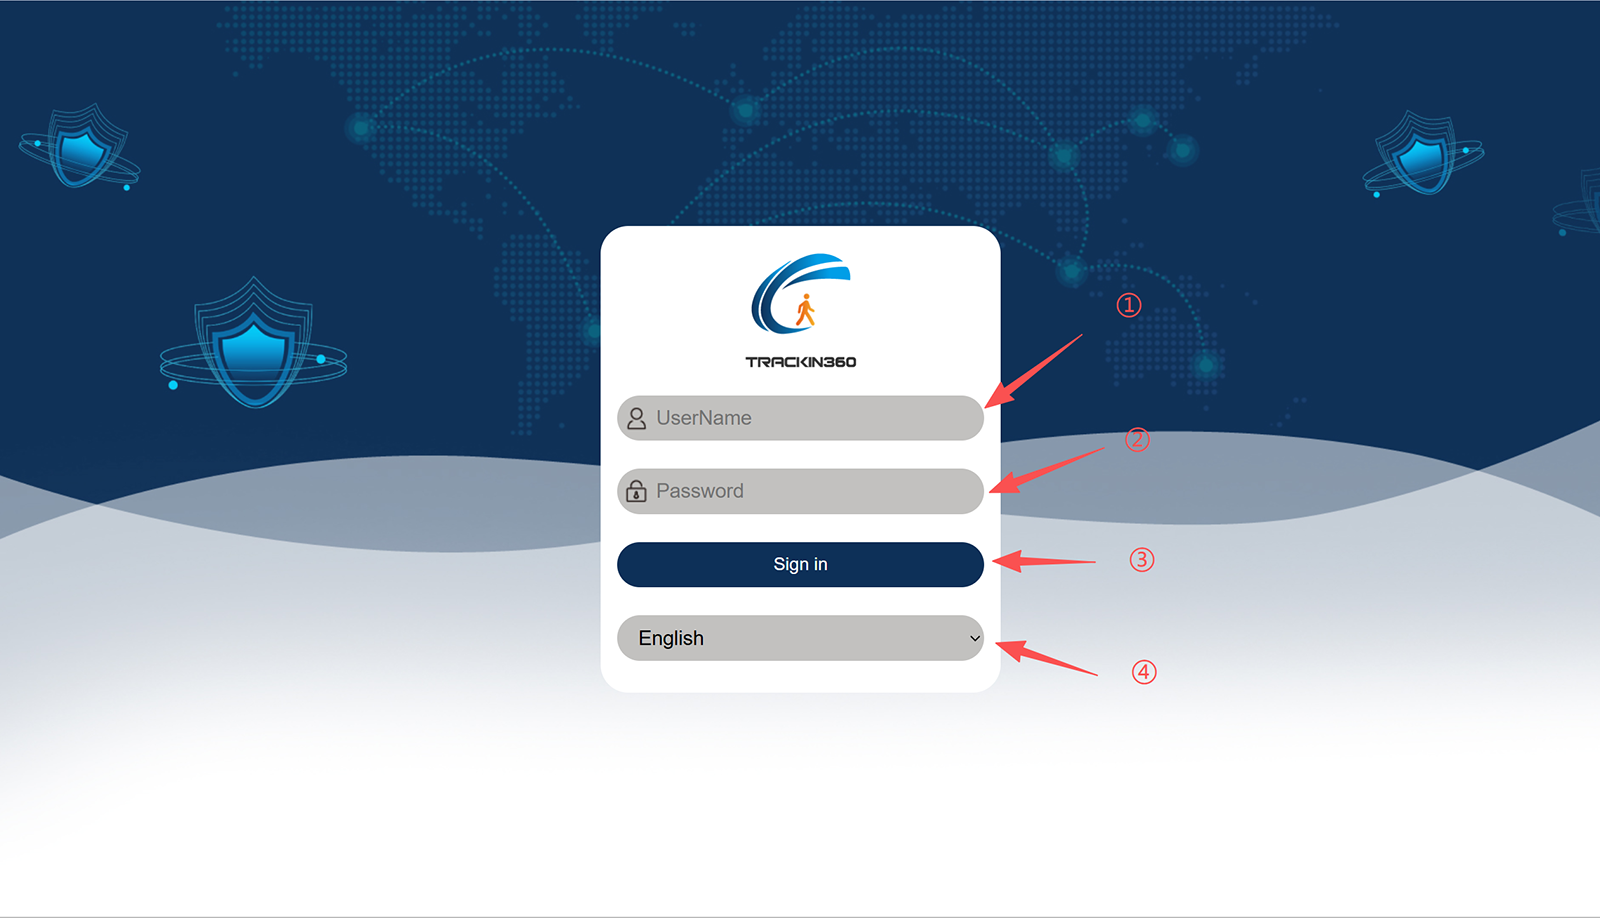
① Enter account
② Enter password
③ You can switch languages according to your language needs
④ Click "Sign in"
Ⅱ. Enter Homepage
After logging in, you will enter the system's main interface.
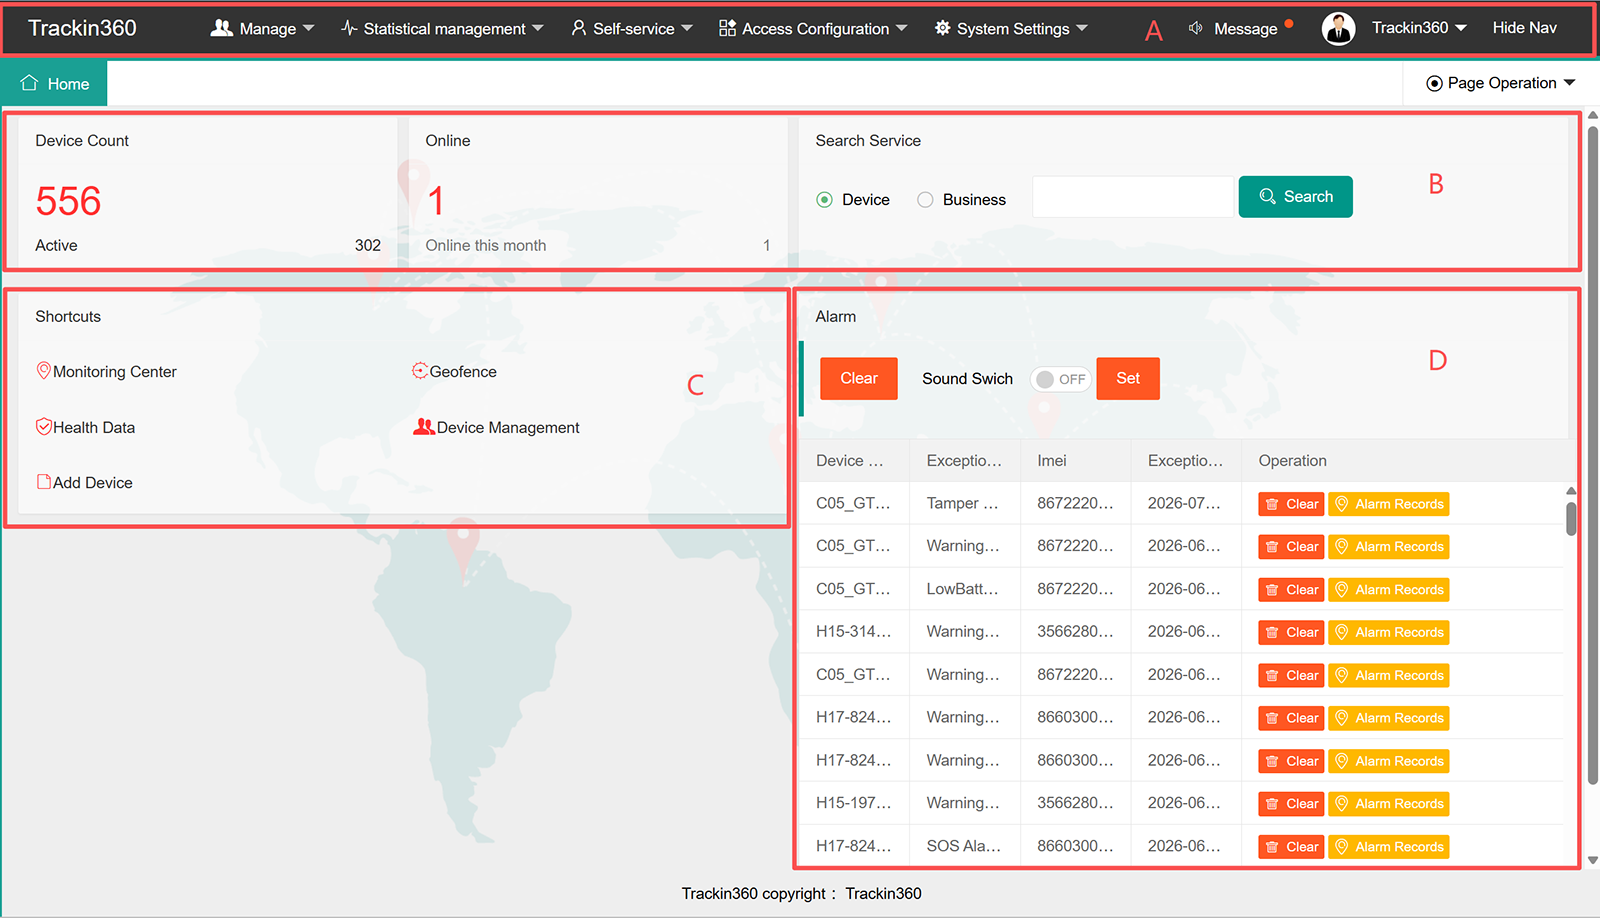
A. Management, Statistics Center, Self-service, Information Center, and Trackin360 Test Login Account.
B. Total number of devices and the number of online devices, as well as the online search function.
C. The third column allows quick access to the menu page.
D. Viewing of abnormal alarm information section and setting.
Ⅲ. Manage
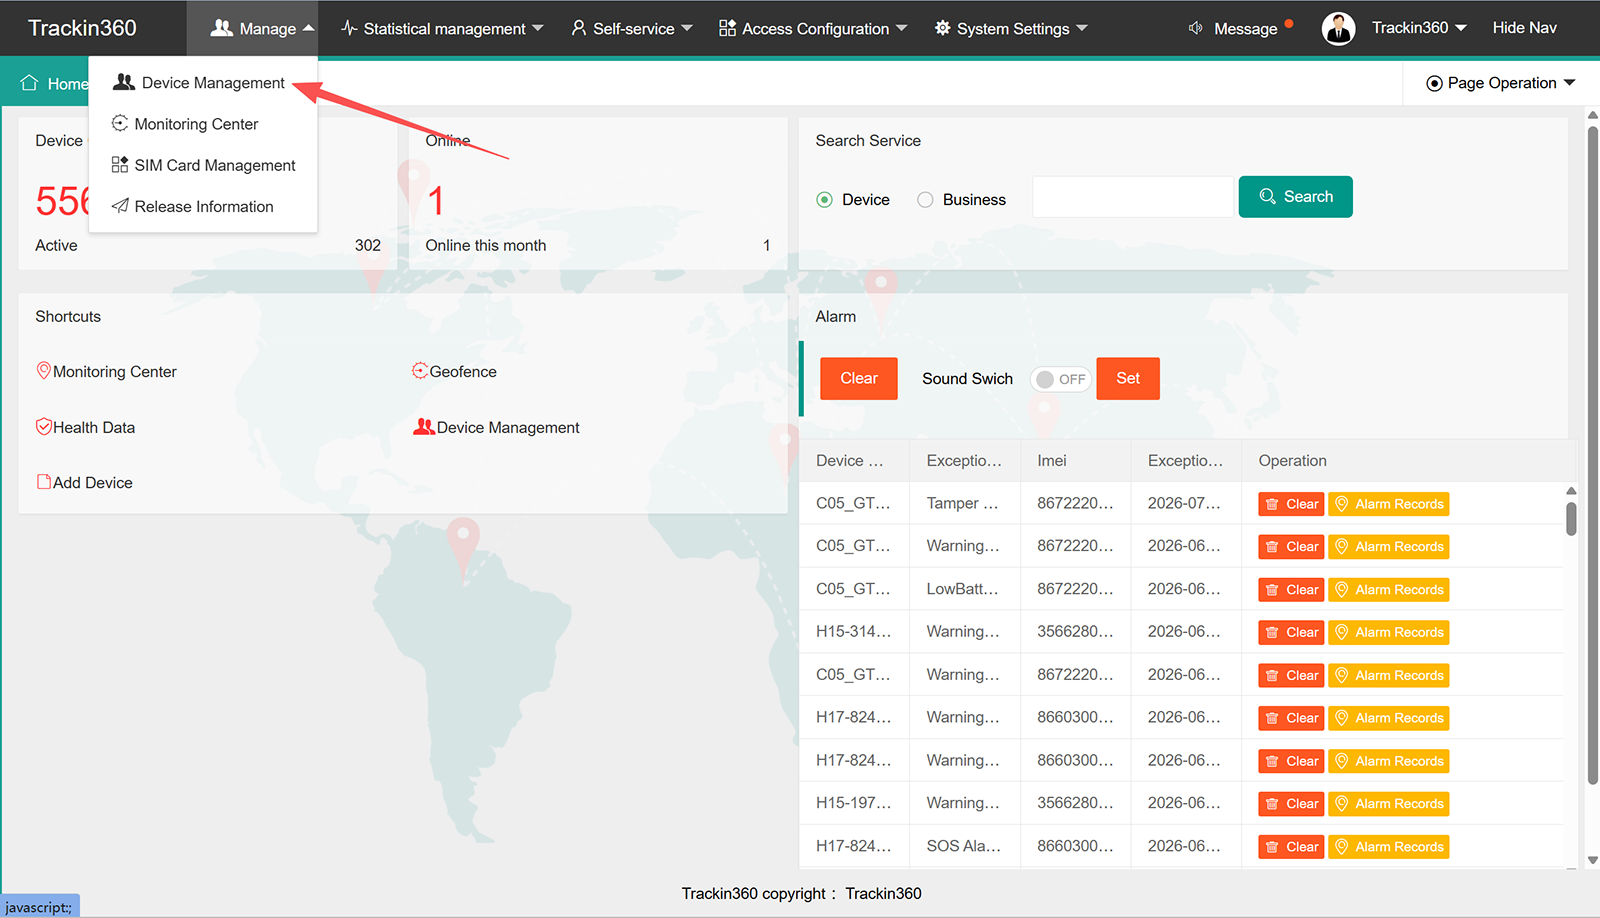
3.1 Device Management
Once logged in, you can view information and data status of all devices under the company's name.
Note: Creation time refers to the time when the device was added to the background, and activation time refers to the time when the device was activated after being connected to the Internet.
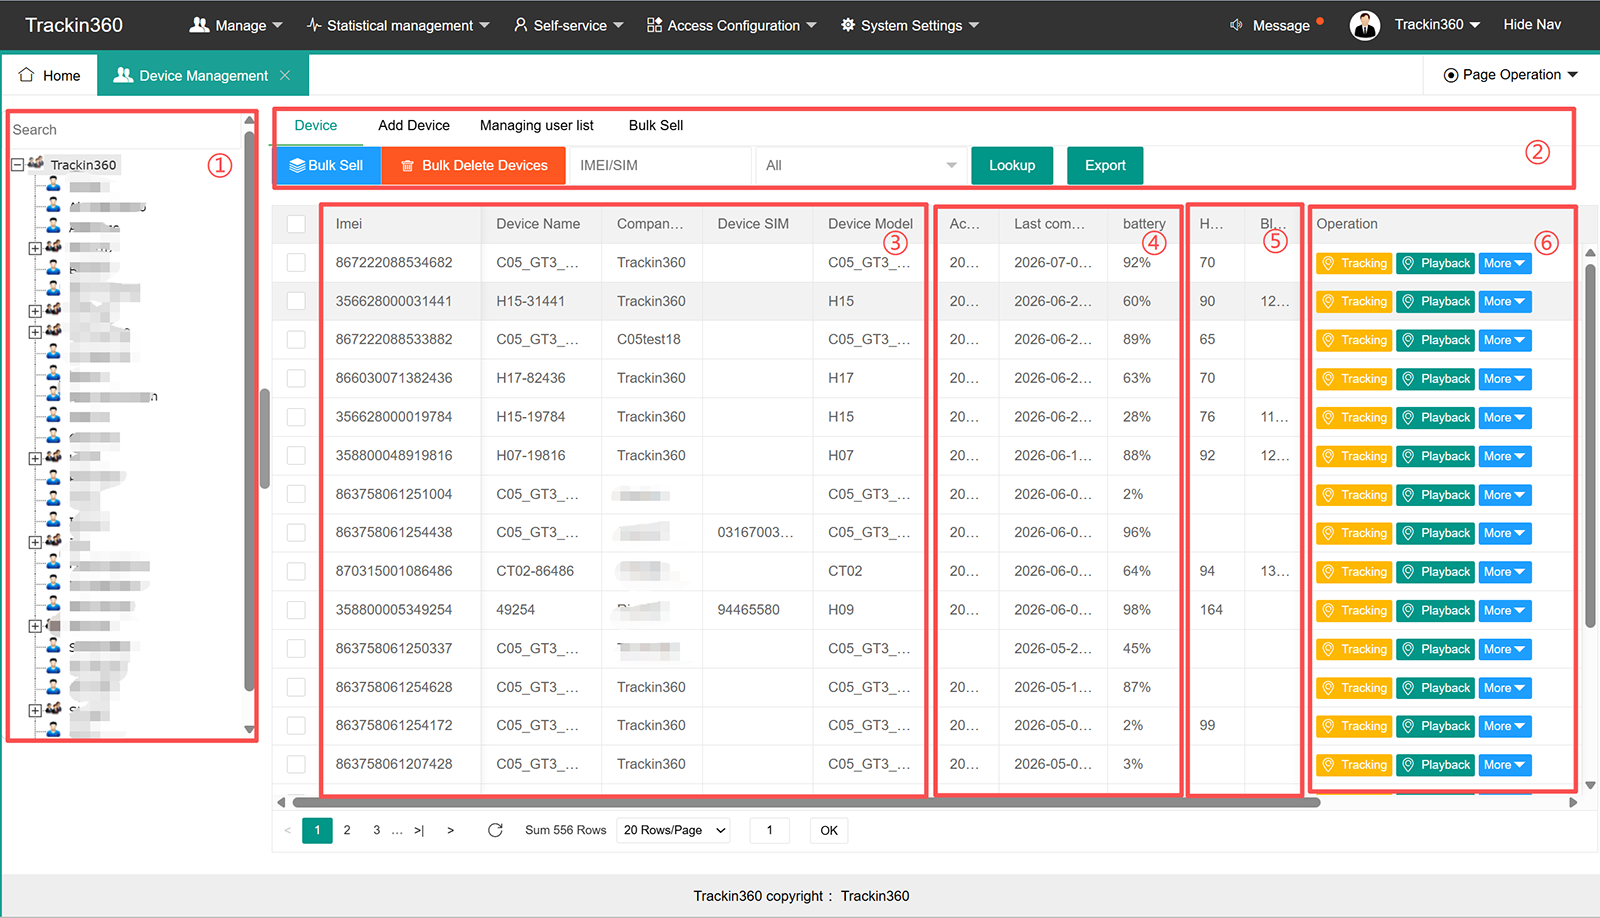
① Account name (Distributor and End-user two roles)
Distributor account able to
1) crease add unlimited sub-distributors account and end-user accounts and
2) management all sub-distributors and devices under account,
3) bind/unbind unlimited device;
End-user account able to
1) couldn't create sub-end-users but
2) management all devices under account
3) support add unlimited devices,
4) if customer register by themselves on application, it will create end-user role in web platform system automatically.
② Device list, Add device, Management user list, bulk sell management
③ Device list under selected account, include IMEI number, device name, belongs company, SIM card, model.
④ Device status includes active time, last communication with platform, battery level
⑤ Health data such as heartrate, blood pressure, temperature… different model support different health data.
⑥ Operation includes real-time tracking, playback, more (delete, edit device info, person profile, relation, instruction, health data homepage)
3.1.1 Add Sub-Account
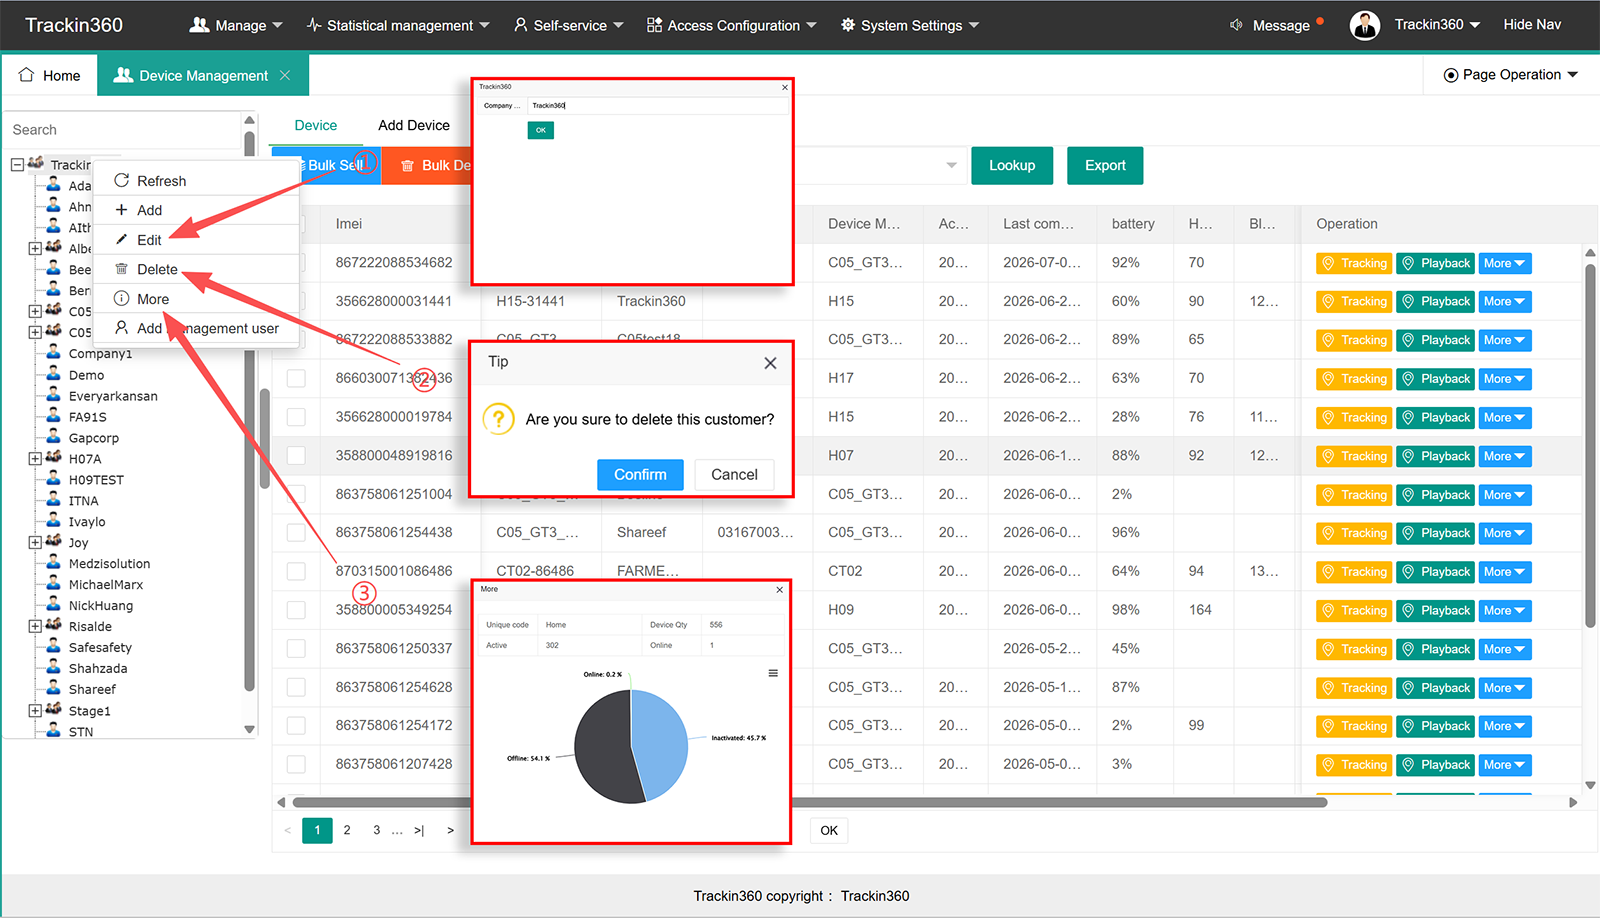
A. To add a sub-account, click "Add" to add the company name of the sub-account. The unique code is randomly generated and cannot be modified arbitrarily.
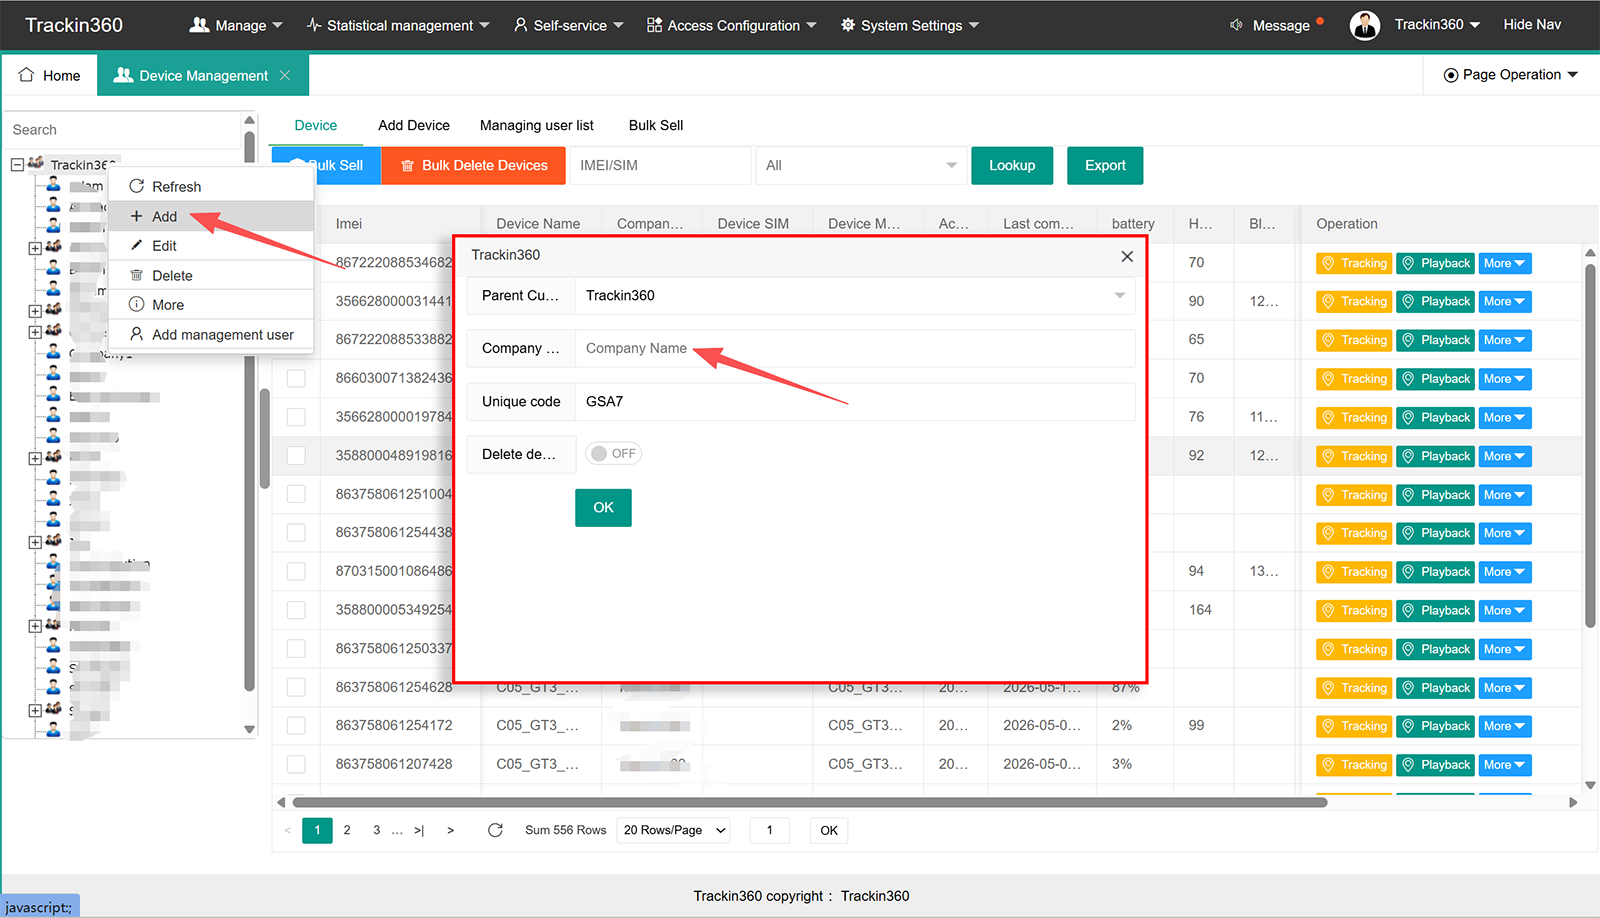
B. If you need to set an account and password, click "Create Management User" and follow the instructions to set the account and password.
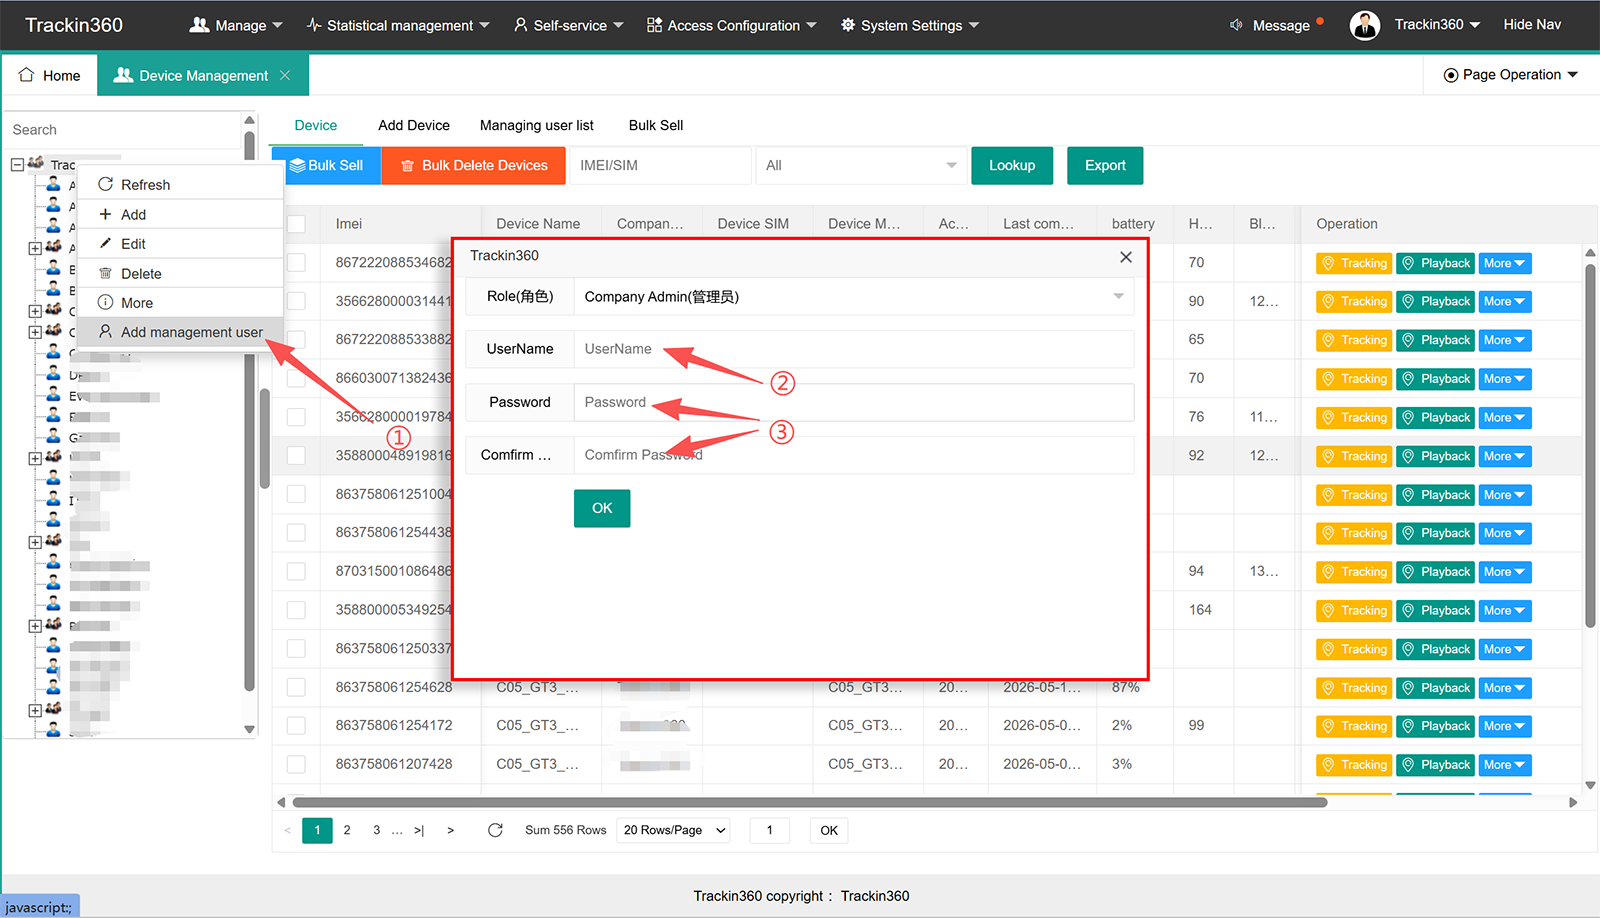
C. Three steps to confirm
① Click "Edit" to change the account name.
② Click "Delete" to remove the current list of company names.
③ Click "More" to view the company's sales report.
3.1.2 Query Equipment
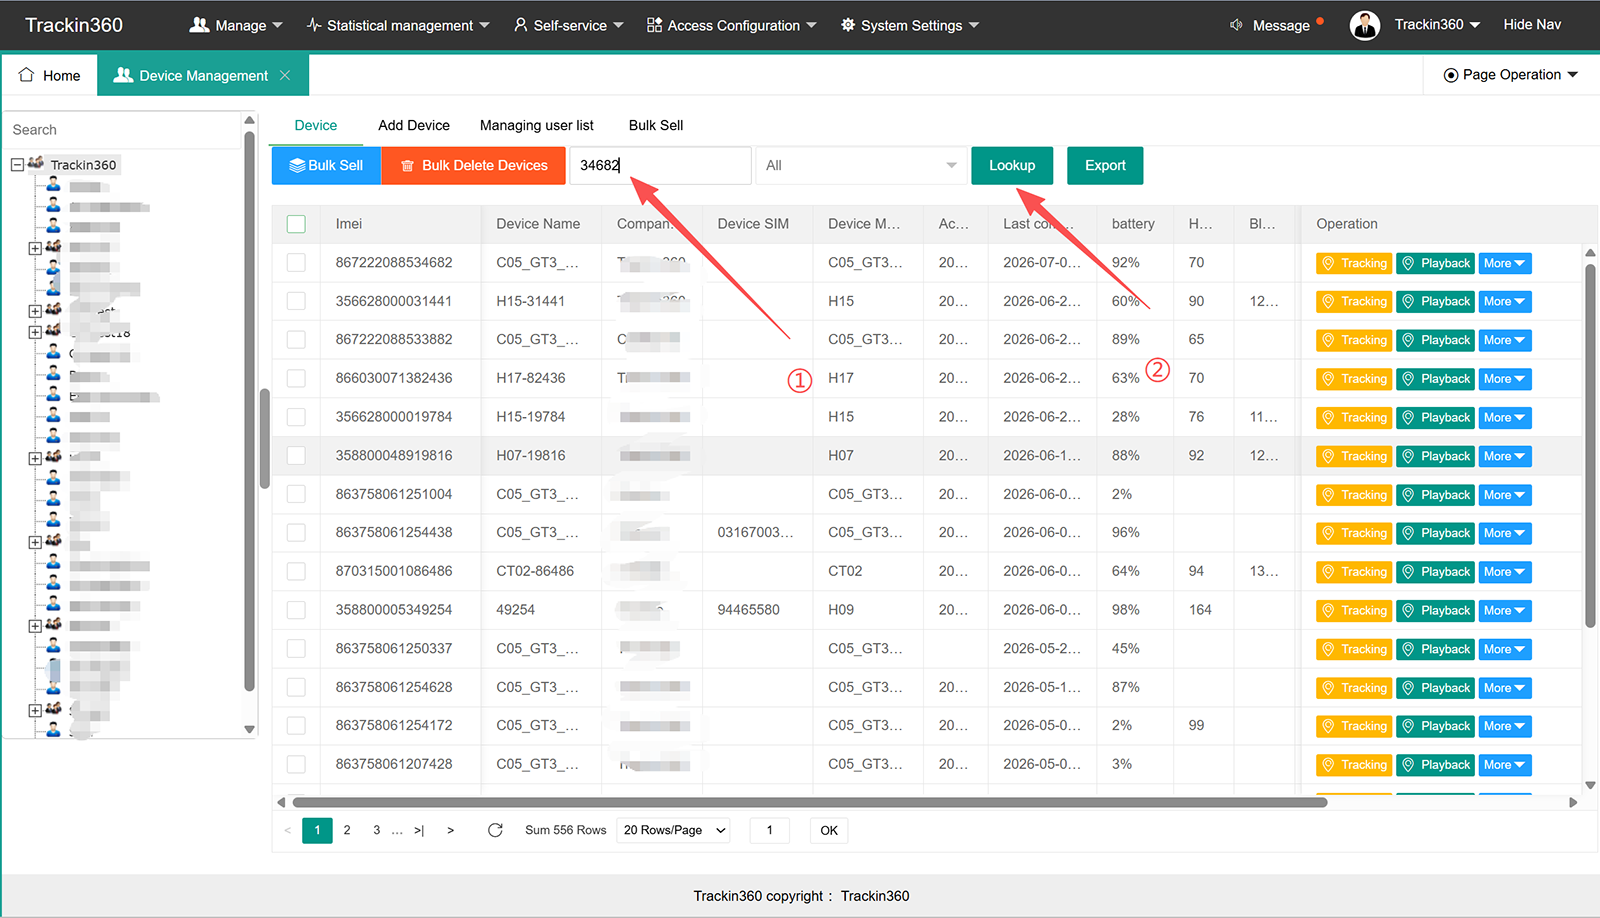
① Input IMEI number or ID, or SIM mobile number, that you want to query, and click query.
② Click “Lockup”, the device list information will appear.
3.1.3 Device Export
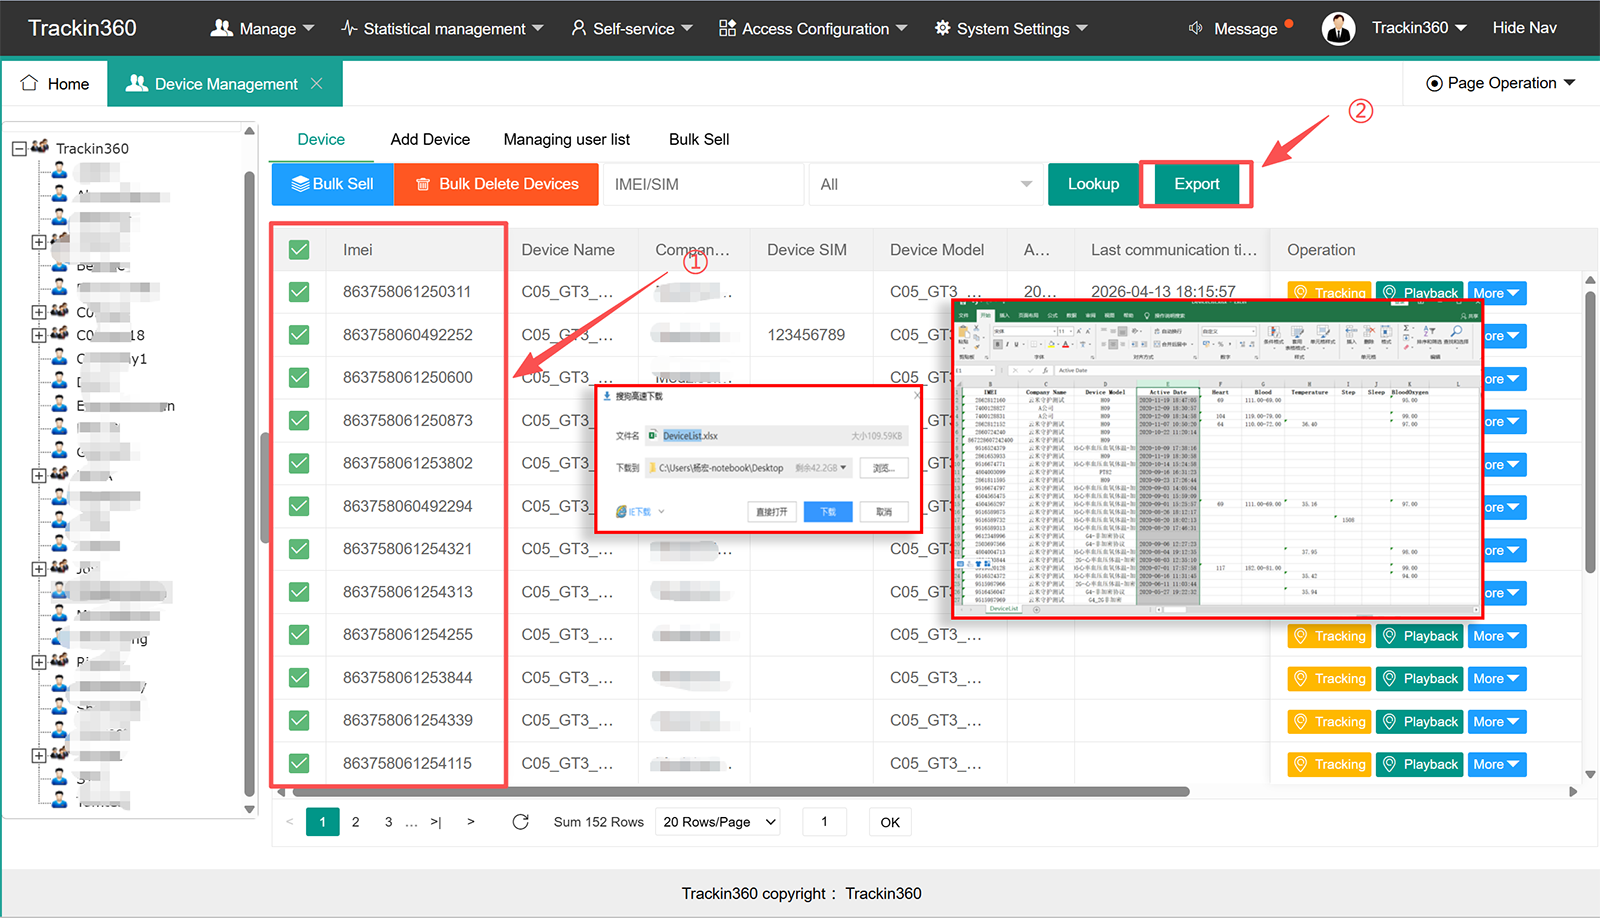
① Select the list of devices you want to export.
② Click “Export”, an Excel spreadsheet containing the device list information will be generated.
3.1.4 Bulk Sales
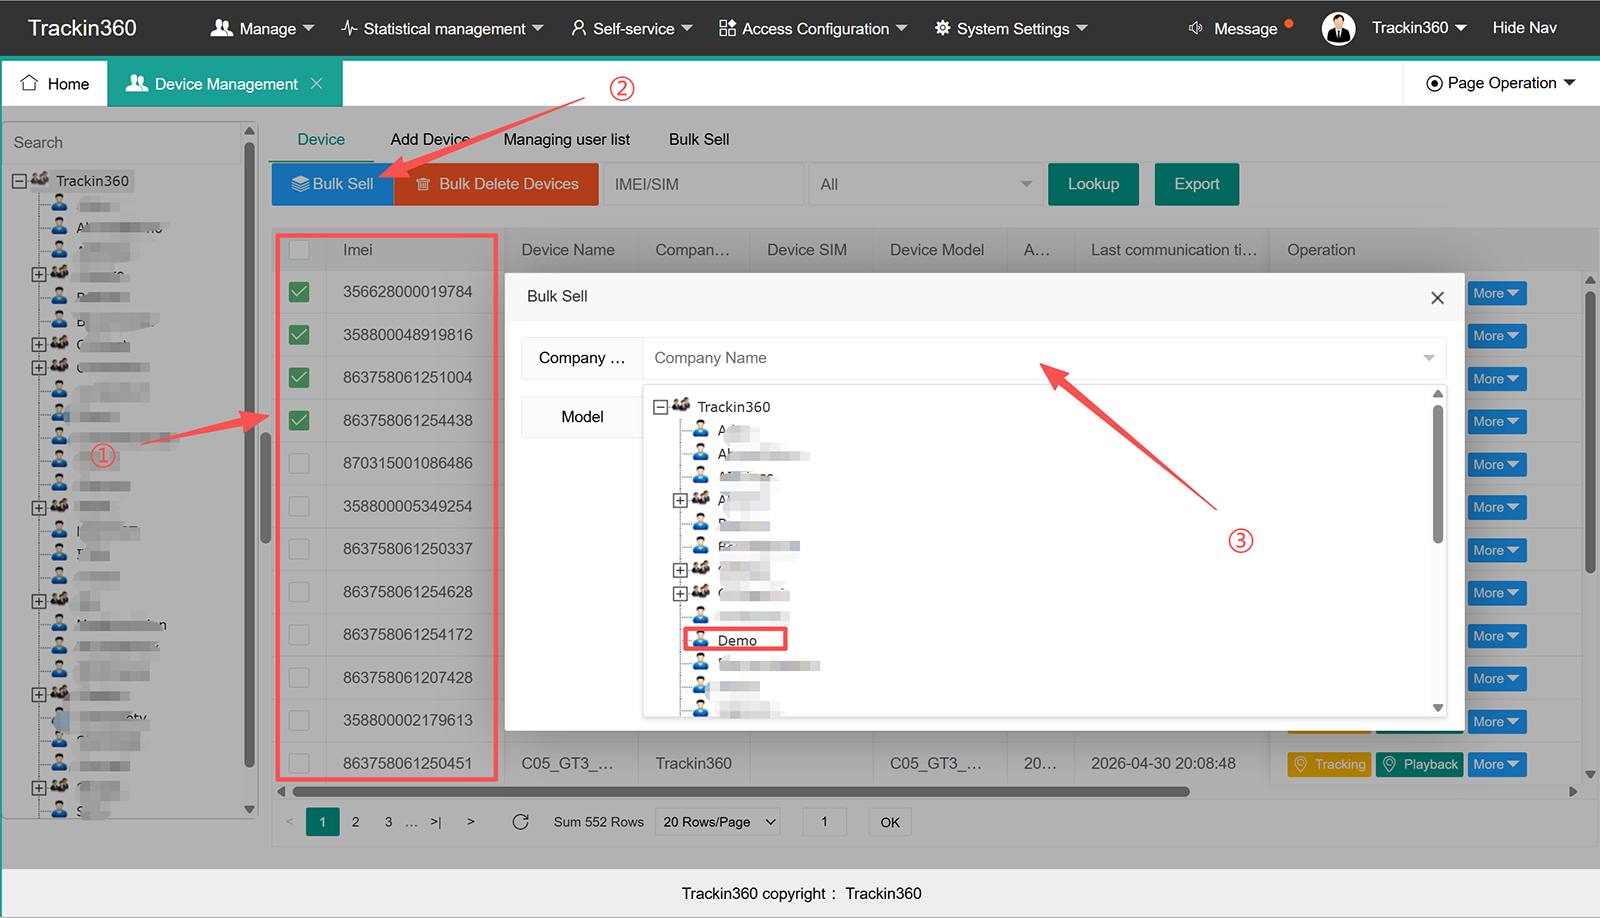
① Select the devices to be operated on from the list (you can select in batches).
② Click "Bulk Sales" to remove the devices.
③ Select the account name which you want to remove into (The Model is the system default, no need to change, if the model has changed, select the corresponding model. If the model has not changed, please select "Ignore").
3.1.5 Bulk Delete Device
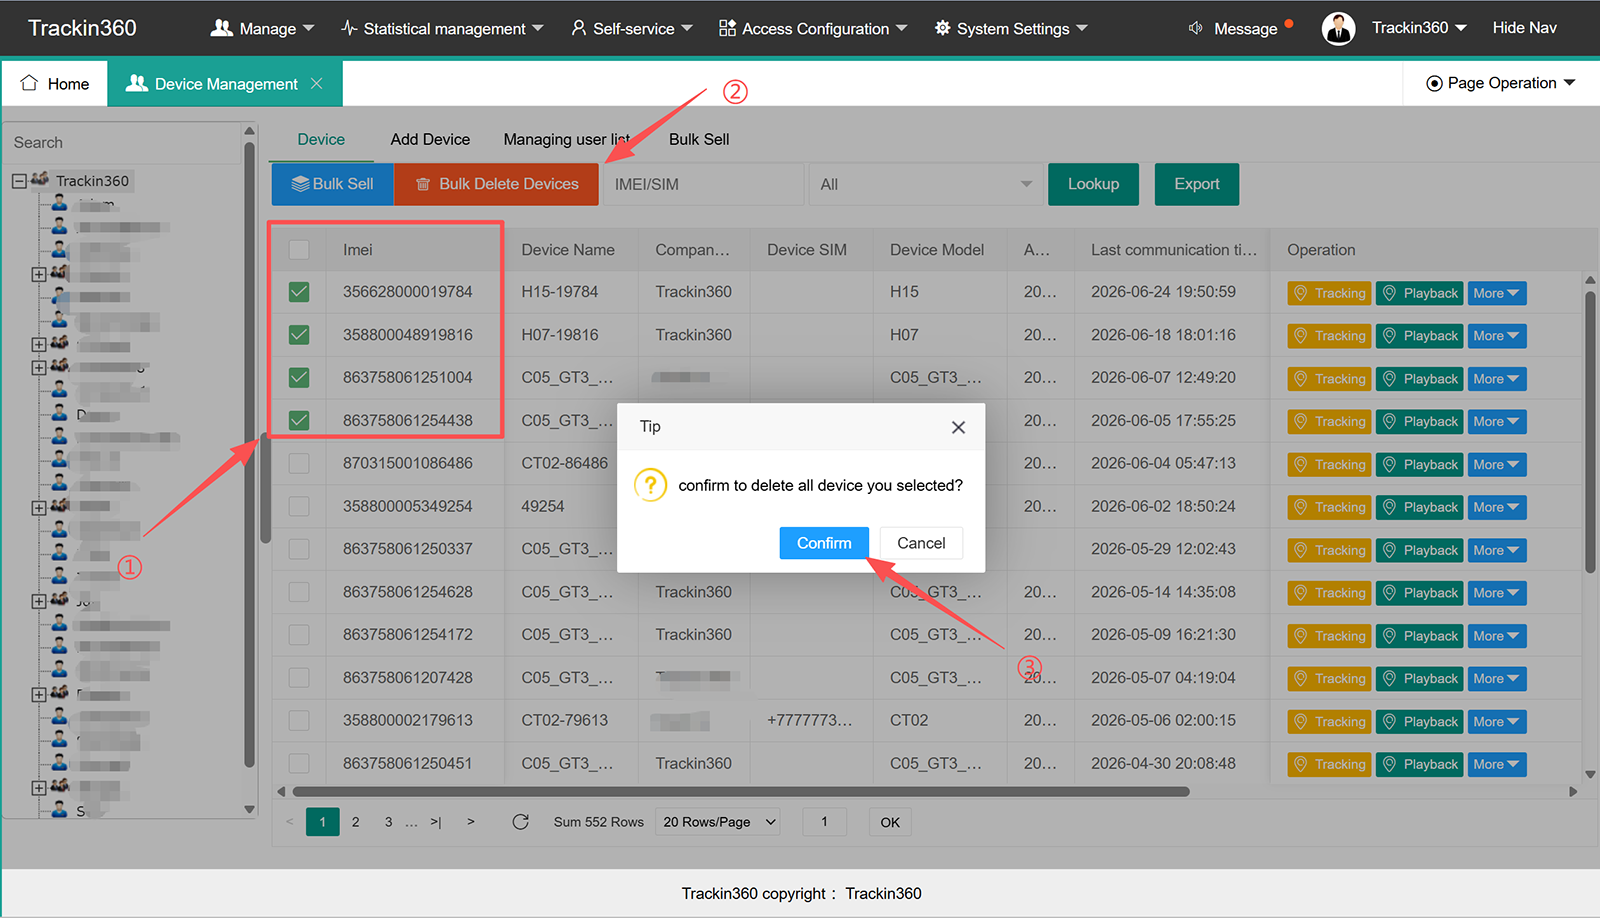
① Select the devices to be operated on from the list (you can select in batches).
② Click "Bulk Delete Device" to remove the devices.
③ Click "Confirm".
3.1.6 Add Device
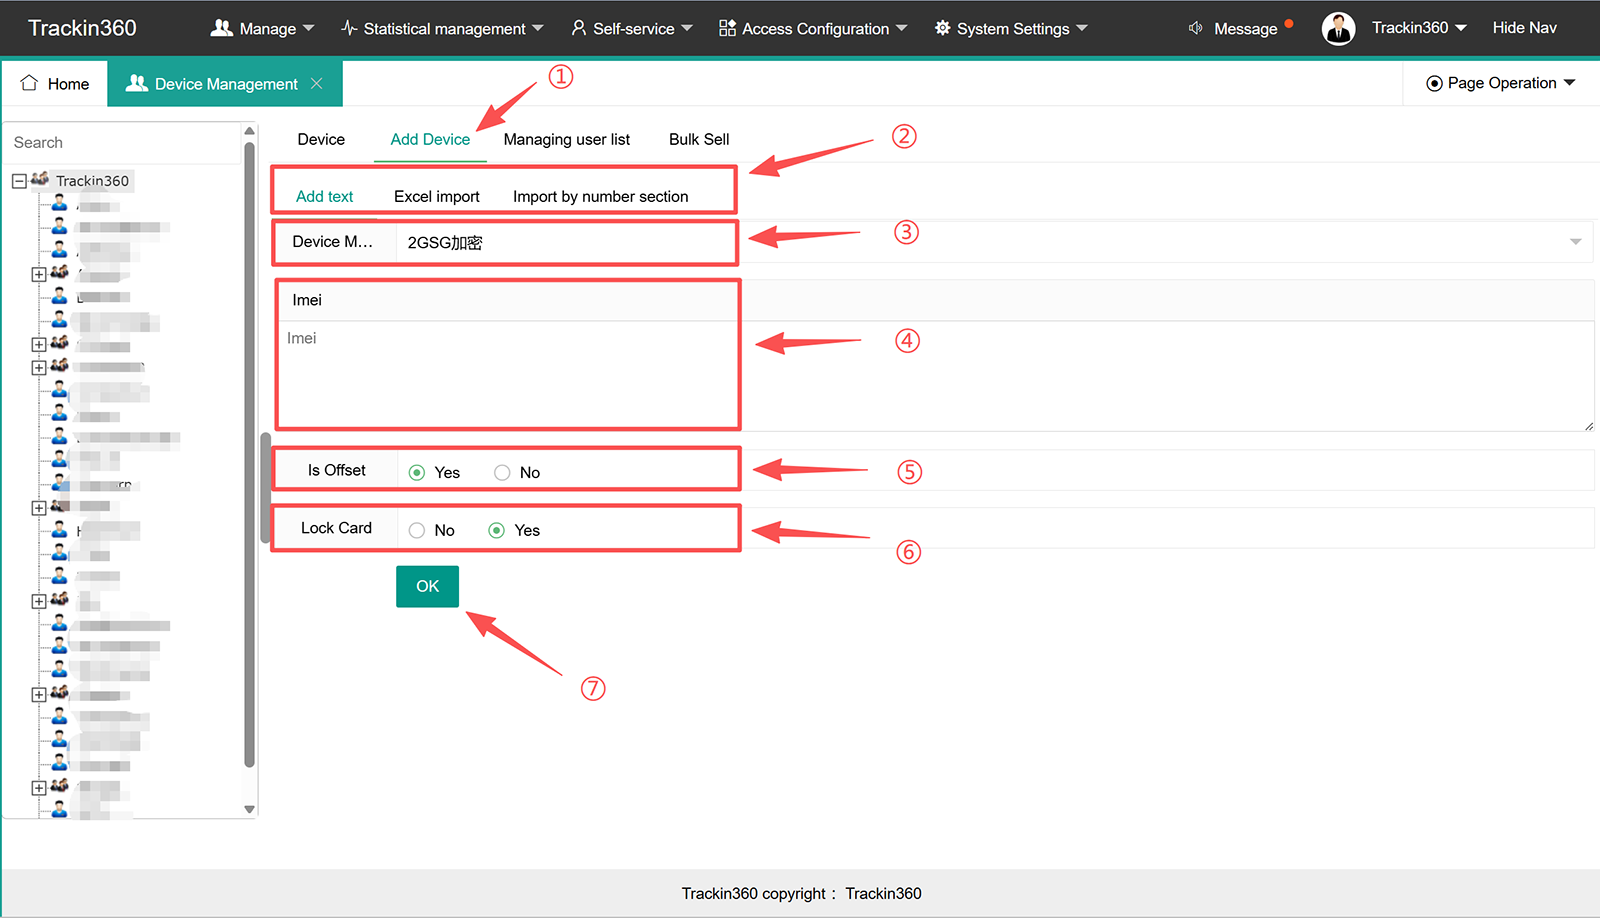
① Click "Add Device"
② There are 3 ways to add device
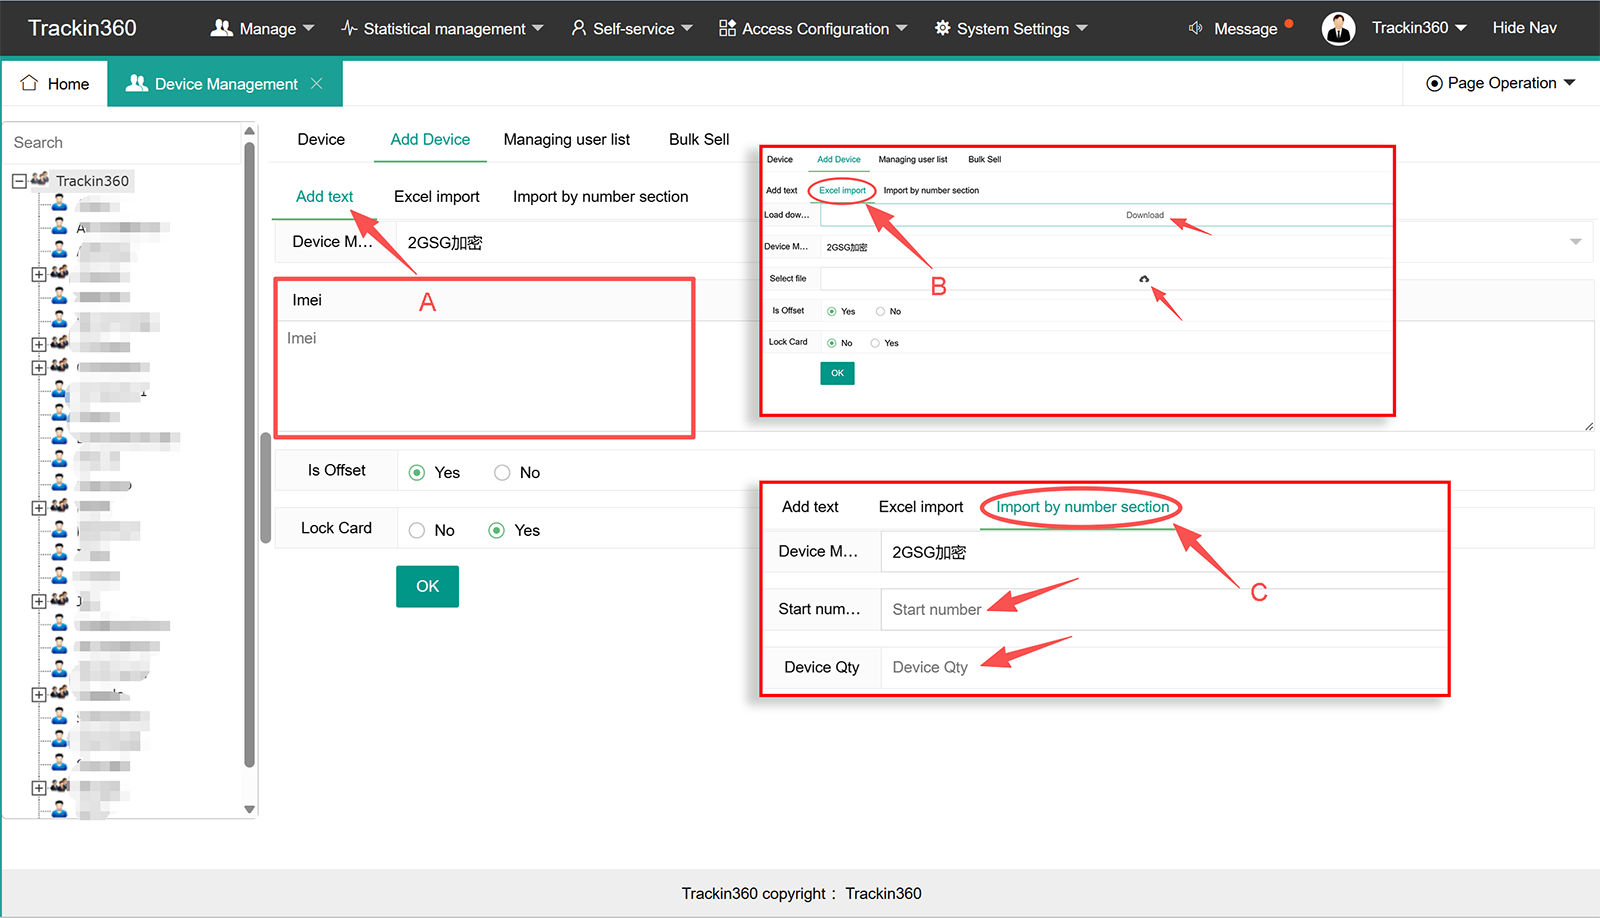
A. Text box addition: Enter the IMEI number or ID number, select the corresponding device model, and in the bottom column, select "Correction" (e.g., select "Yes" for domestic devices, "No" for international devices), and select "Card Locking". The default selection is 'No'.
B. Excel Import: First, download an Excel template . Enter your ID or IMEI number according to the template and save it as a document on your computer. When you need to add a device, select the edited document, choose the corresponding device model, and in the bottom column, you'll see options for error correction (e.g., select 'Yes' for domestic devices and 'No' for international devices) and card locking. The default selection is 'No'.
C. Number range import: Enter the starting number range, add the number of devices to be added, select the corresponding device model, and in the bottom column, select "Correction" (e.g., select "Yes" for domestic devices, "No" for international devices), and select "Card locking". The default selection is 'No'.
③ Select properly model
④ Input IMEI numbers
⑤ Select Offset (If device used in China, select "Yes", outside of China, select "No")
Note: For security reasons, China requires all digital map service providers to encrypt and apply offsets to map data to prevent the exposure of geographic information regarding sensitive locations. Consequently, the direct use of raw GPS coordinates (such as those in the WGS-84 system) is not permitted in China; data must undergo a correction process to ensure accurate positioning.
⑥ Lock card
⑦ Click "Ok" to add successful.
3.1.7 Management User List
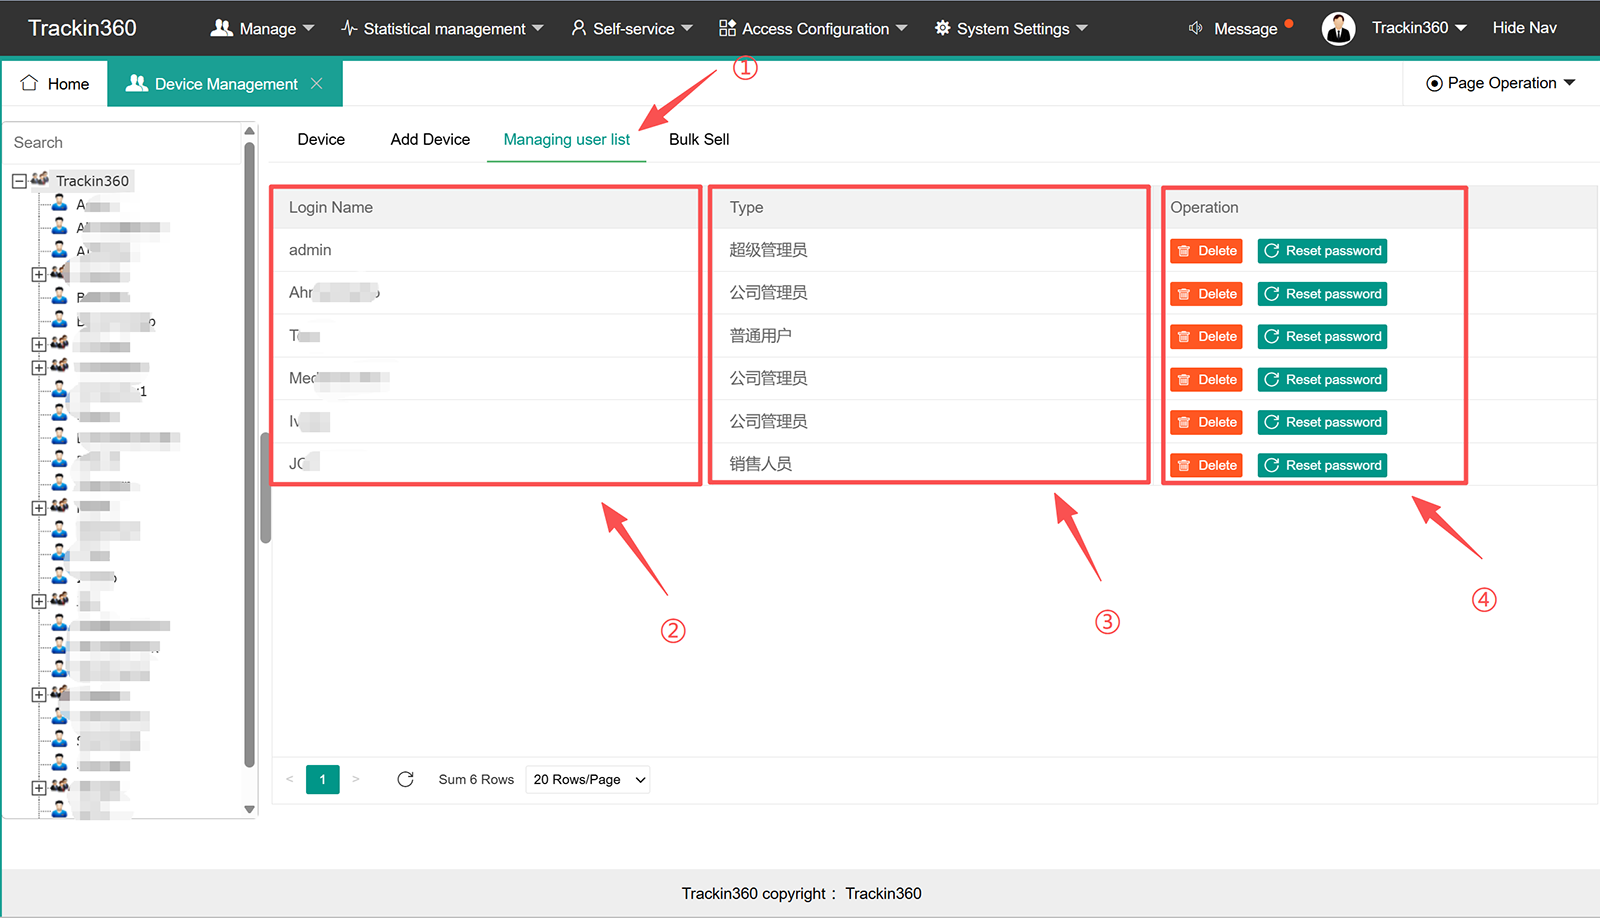
① Click "Managing user list"
② Showing all account name which has management right
③ Role type
④ Operation by Delete o reset password
3.1.8 Bulk Sell
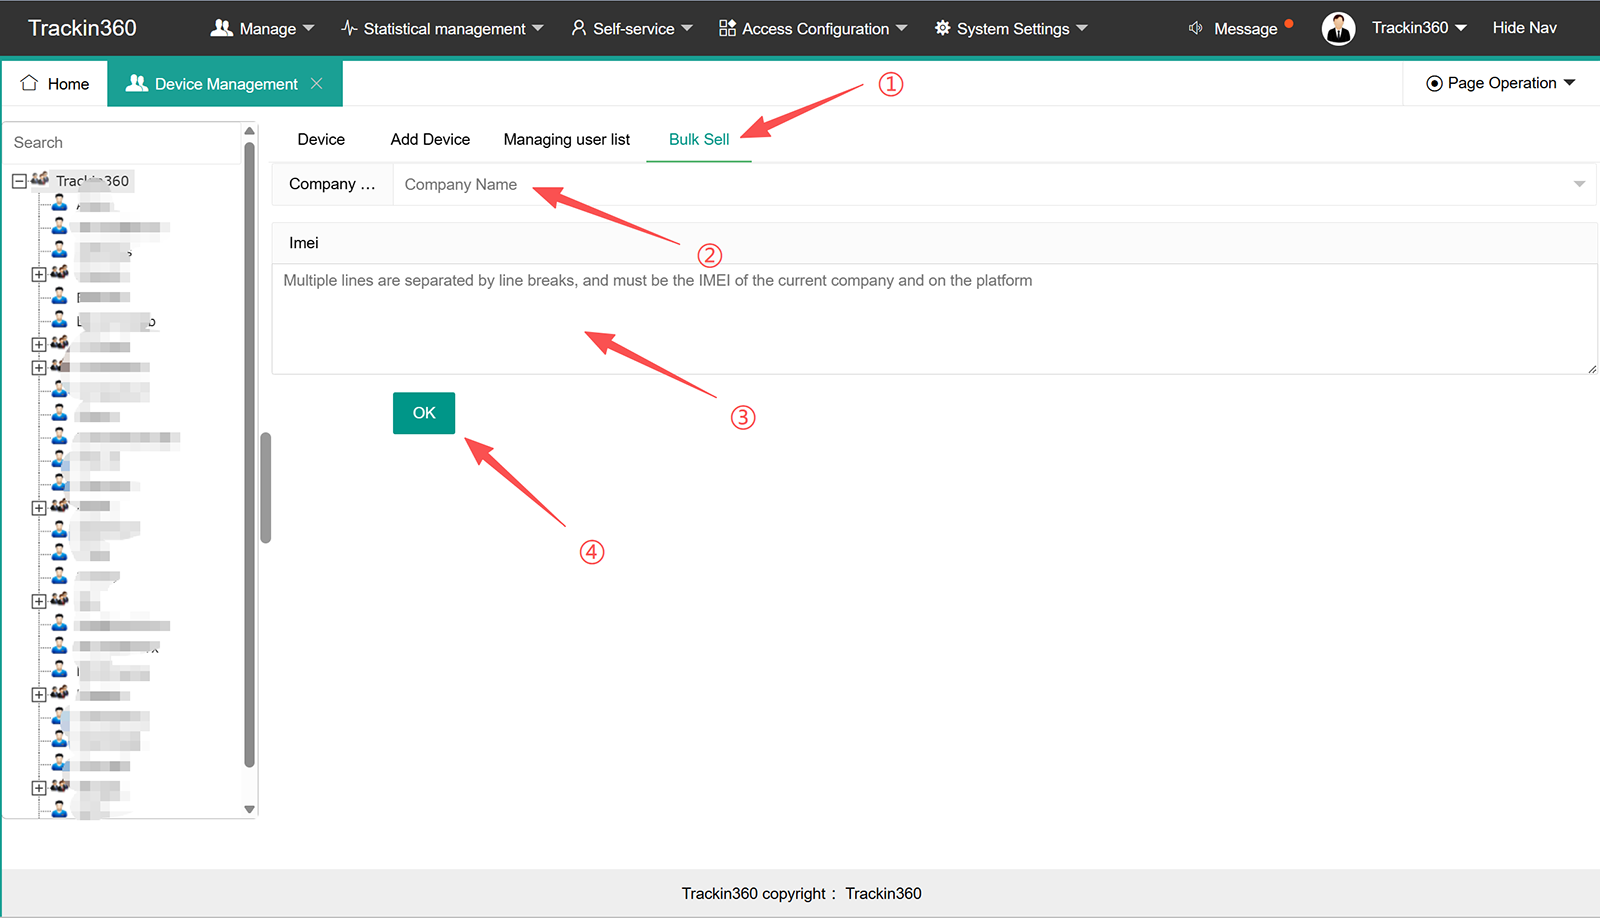
① Click "Bulk Sell"
② Select the account you want to sell into
③ Input already exist IMEI number which you want to sell
④ Click "Ok"
3.1.9 Real-time Tracking
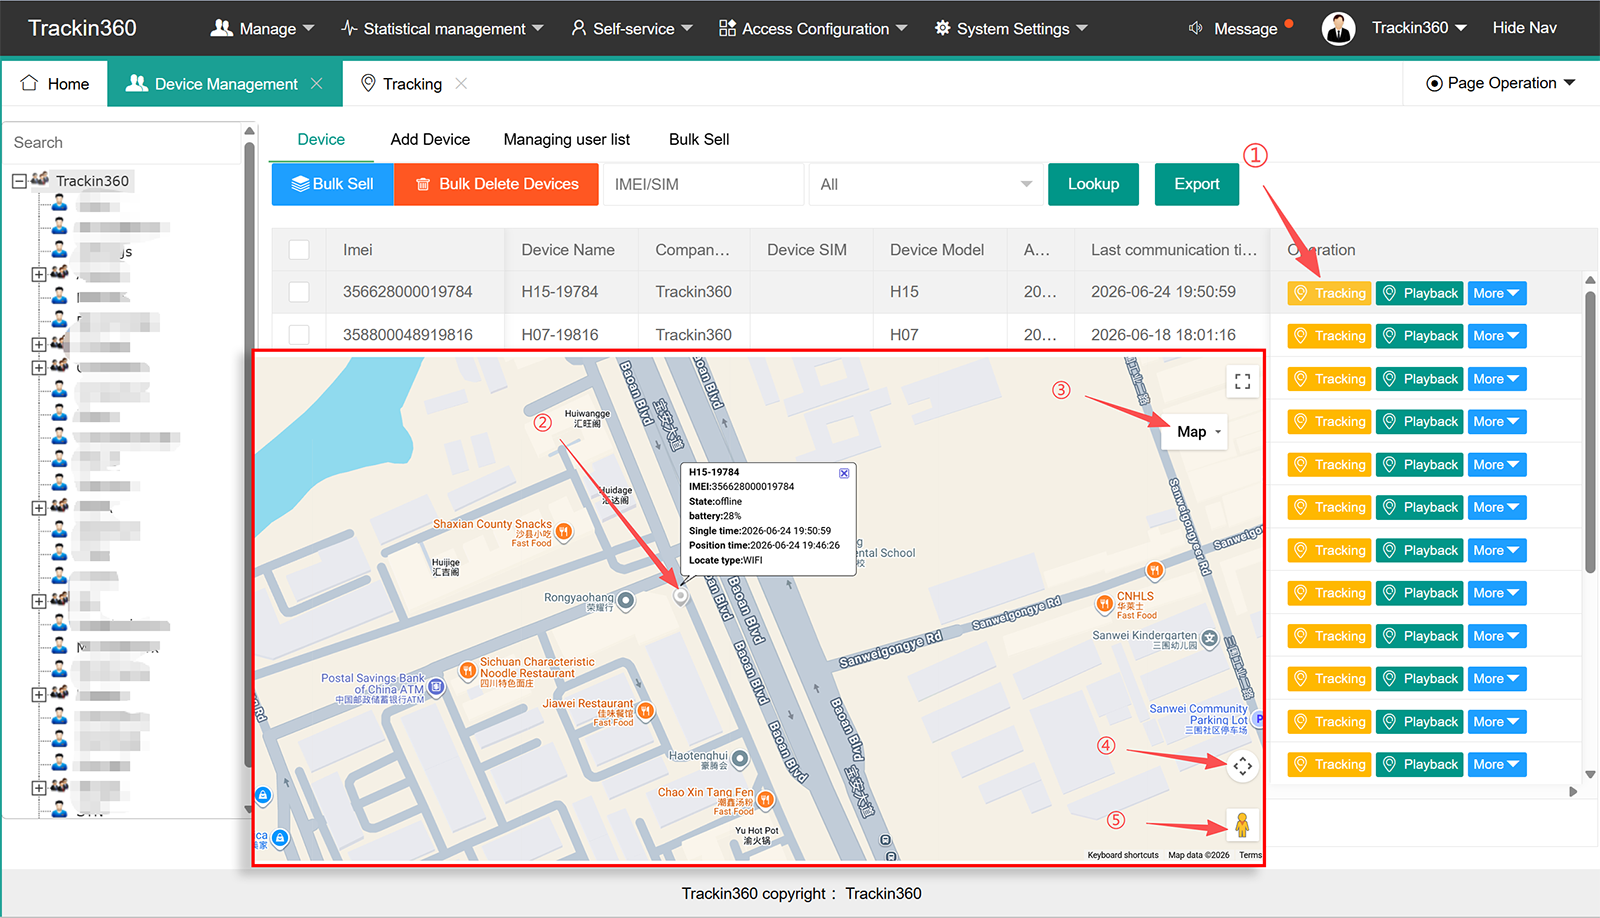
① Select the device you want to view.
② Click "Real-time Tracking" to enter real time location map page (default is Google Map).
③ Check the device location icon, showing the current location and status information.
④ Click the "Map" to select Satellite or Terrian.
⑤ Click to move the map.
⑥ Click and move to enter Google 3D Map.
3.1.10 Historical Playback
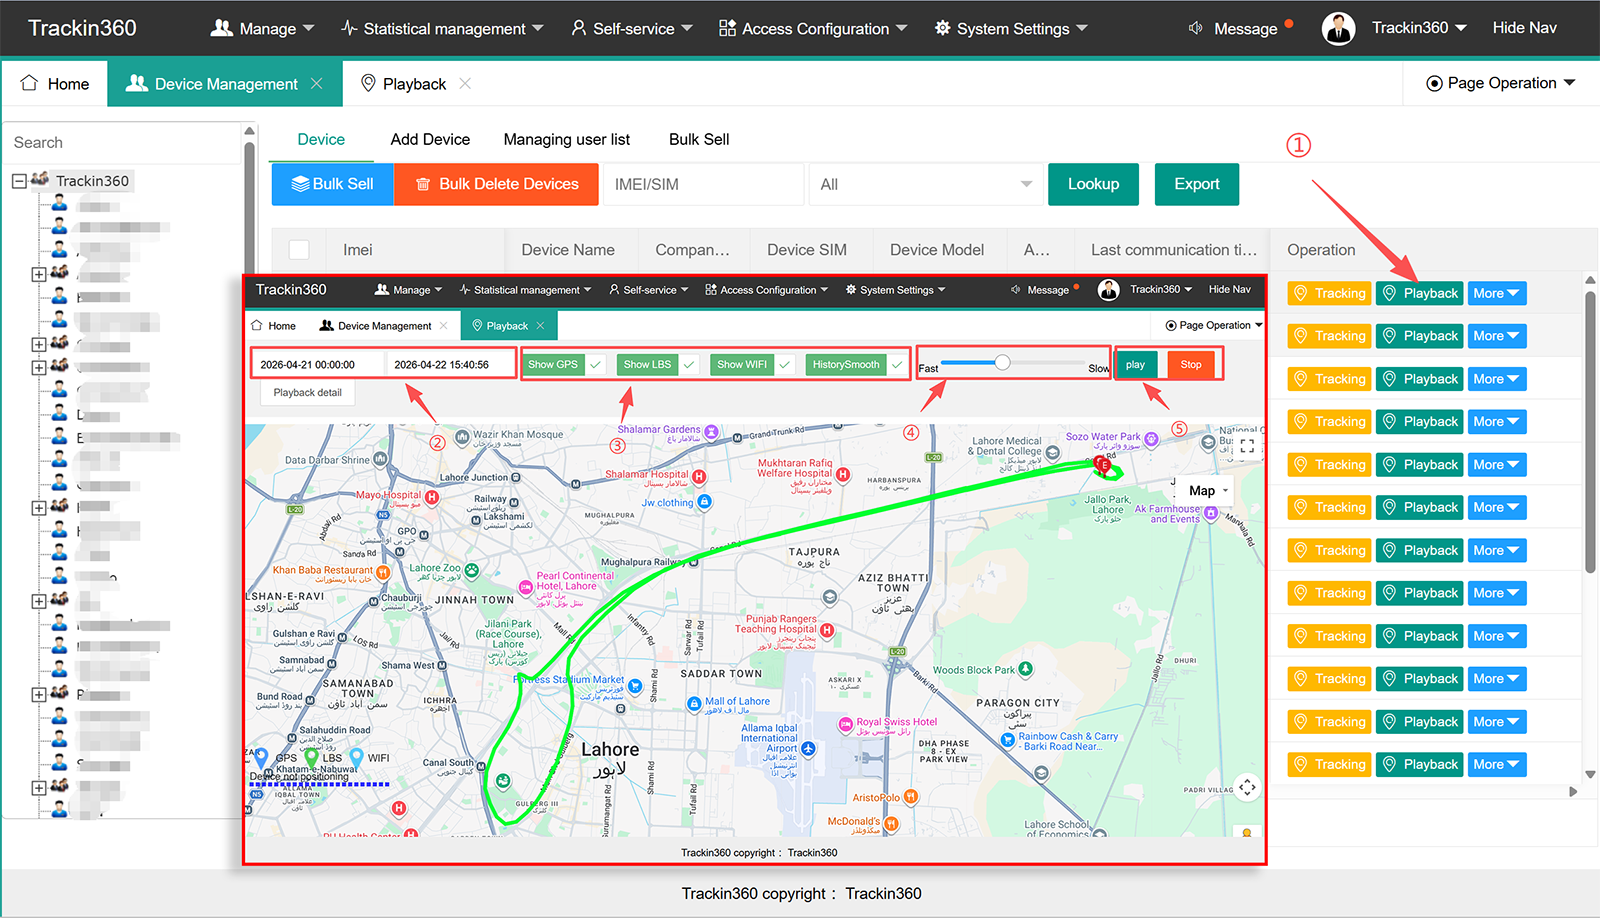
① Select the device you want to view and click "Playback".
② Select the start time and end time of historical data you want to review (save 3 months historical data).
③ Select display GPS and/or LBS and/or WIFI, history smooth or not.
④ Adjust the play speed.
⑤ Click play or stop.
3.1.11 More
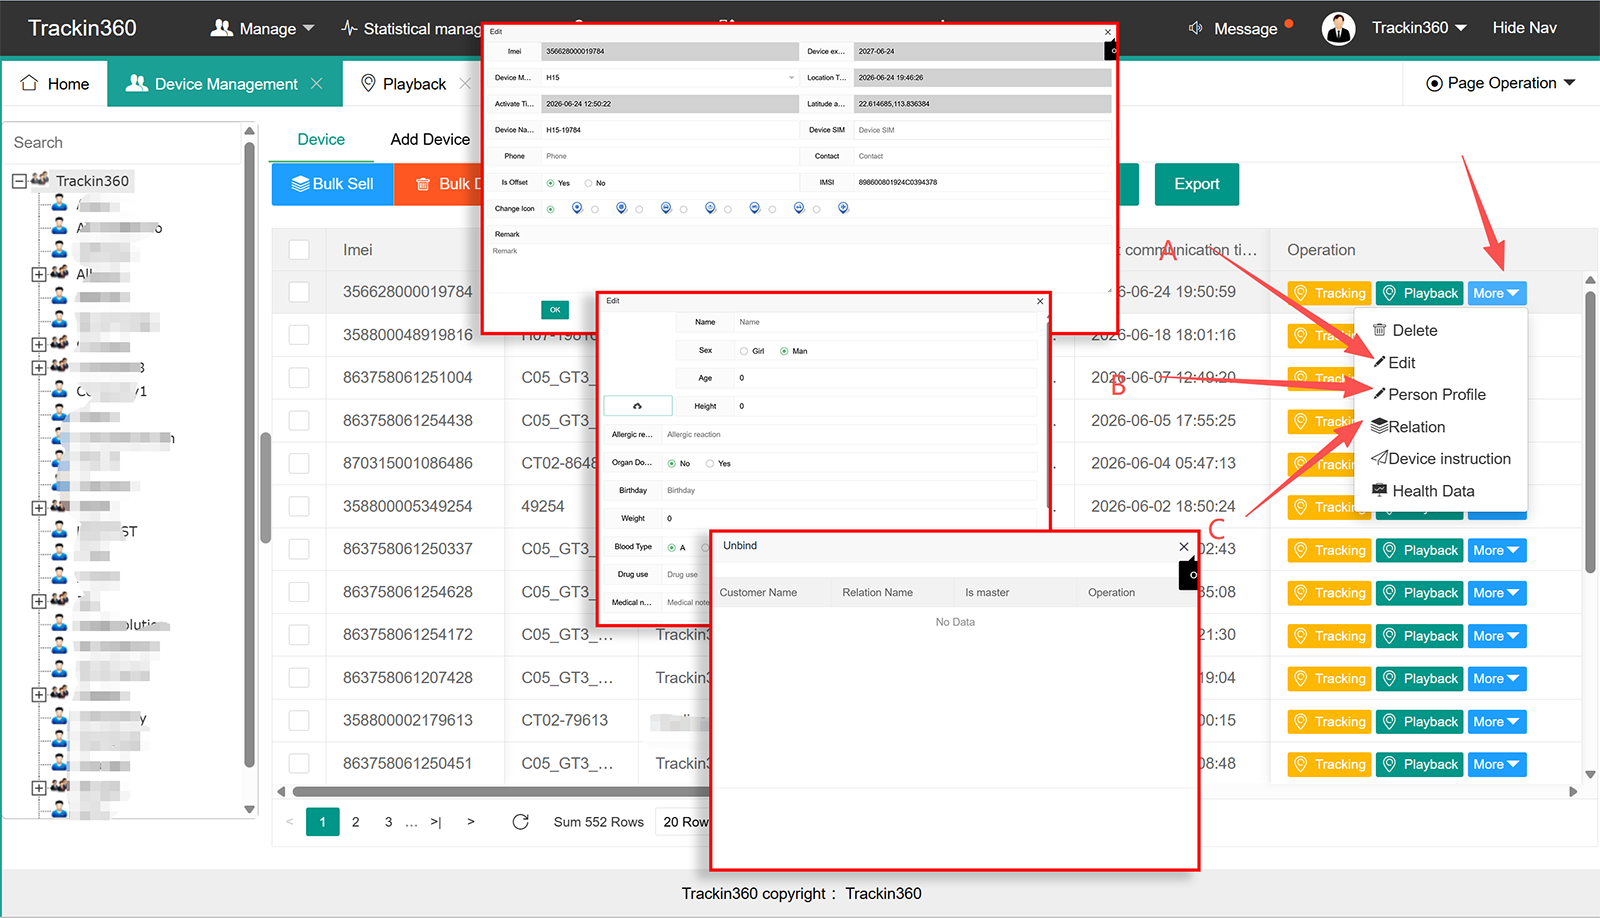
A. Edit: Content can be edited according to device requirements. The device name is the system default and can be edited manually. The device phone number should be the phone number of the SIM card in the device. The contact number and contact person can be the app user or a friend/family member. For domestic devices, select 'Yes'; for international devices, select 'No'.
B. User Information: Please fill in your real information according to the device requirements, including height, weight, gender, age, address, etc.
C. Relationship: Can be unbind as needed.
3.1.12 More - Device Instructions
Device commands, also known as app commands, allow for the remote issuance of relevant device commands for tasks such as querying and setting.
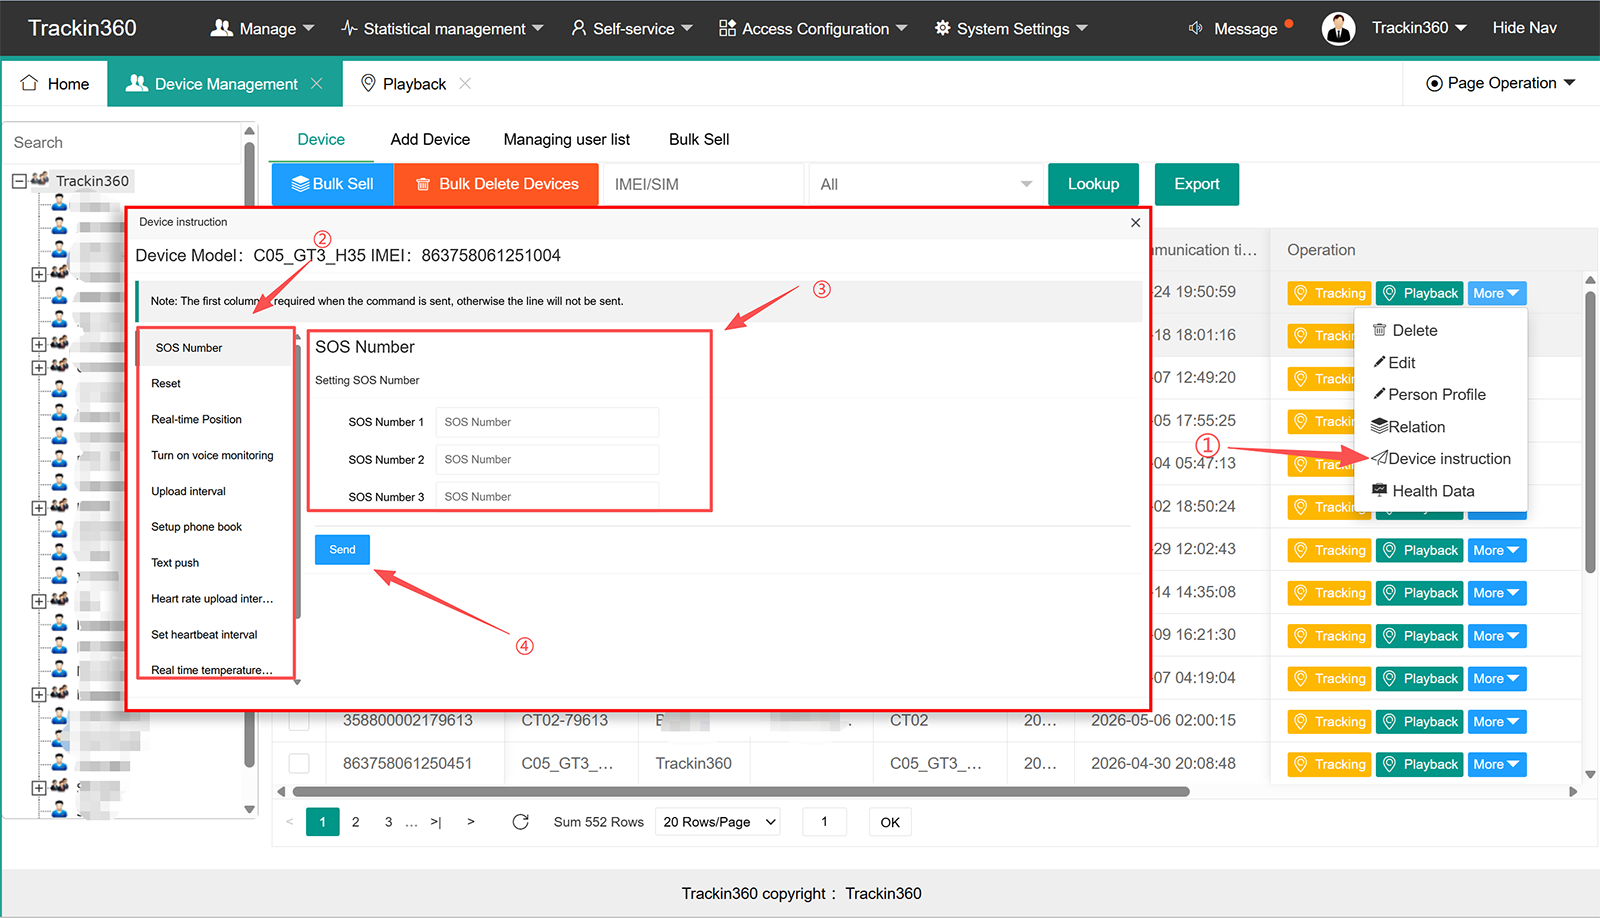
① Click "Device Instruction"
② Select the setting you want.
③ Select or input the parameter you want.
④ Click "Send" to issue the command (will notice "succeed" or "failed" or "timeout").
3.1.13 More - Health Data
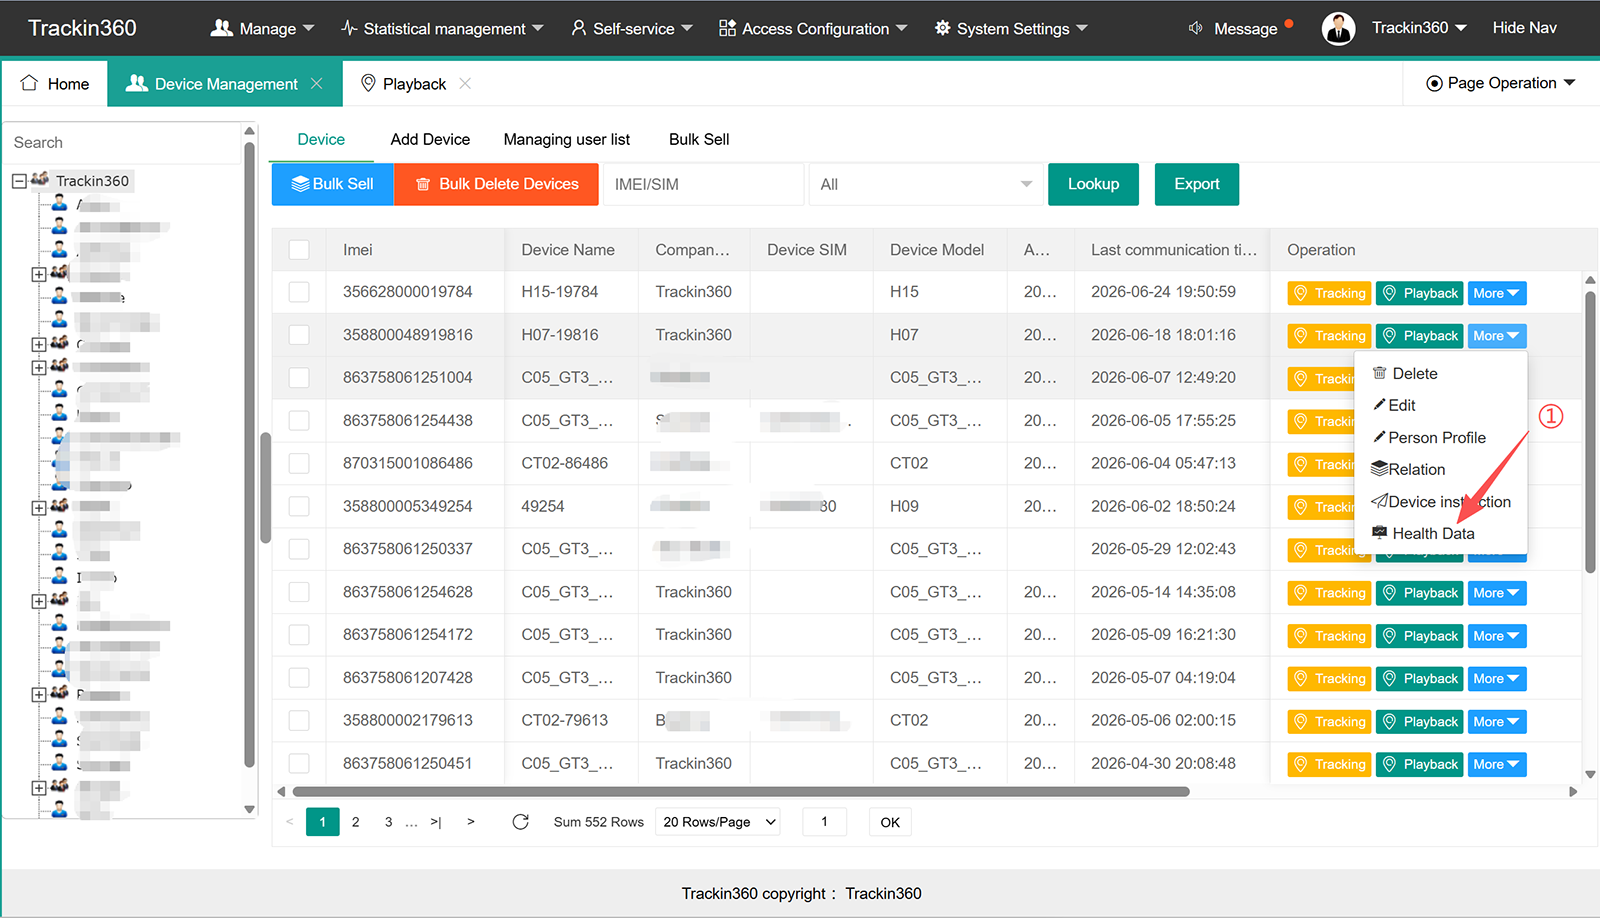
① Select the device you need to query from the device list, and then click on Health Data Query.
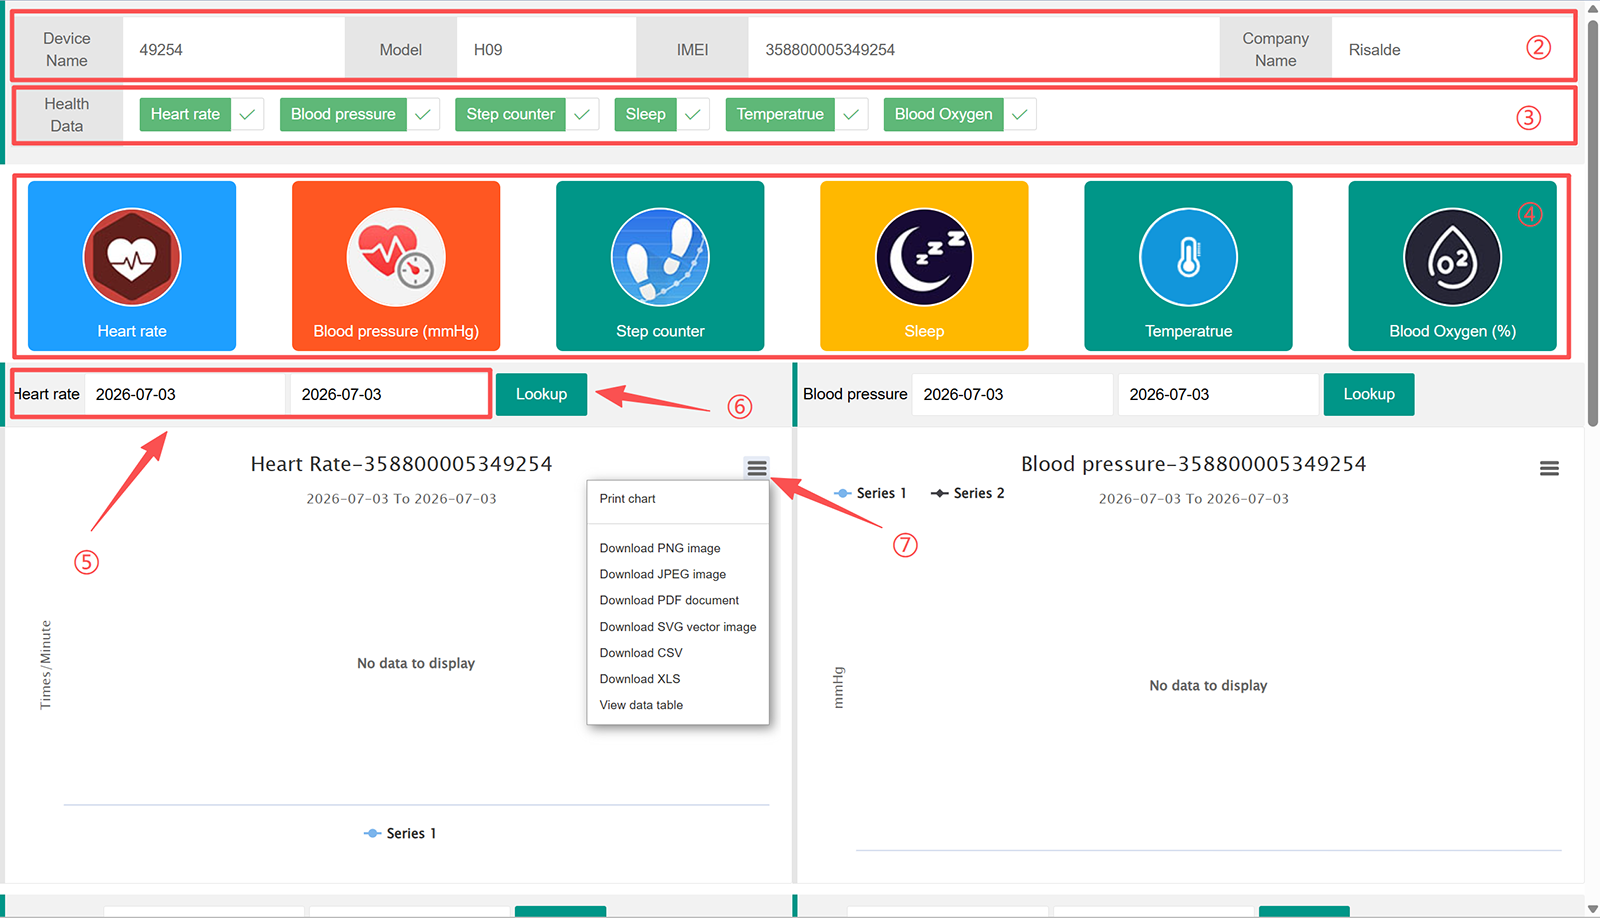
② Device information: Device name, model, IMEI number and company name.
③ Showing all health functions support (6 months log data available)
④ Select the date range you want to check.
⑤ Click "Lookup" and confirm.
⑥ Click icon to down with properly file or format.
3.2 Management - Monitoring Center
On management interface, click "Monitoring Center", and you can view the company's location in real time.
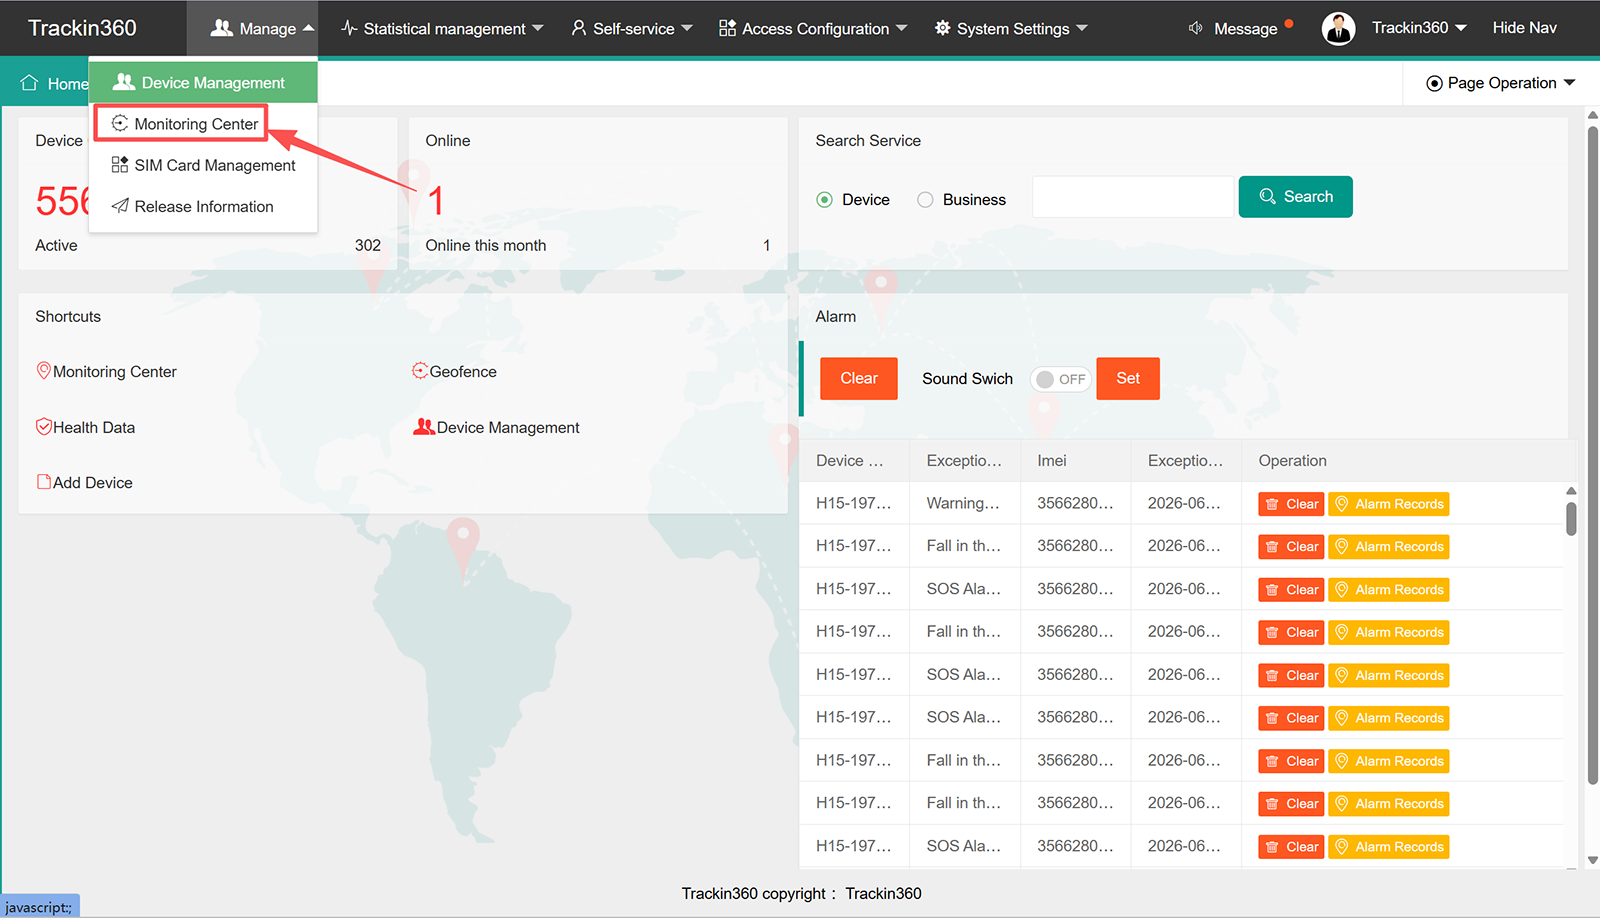
3.2.1 Monitor Center homepage
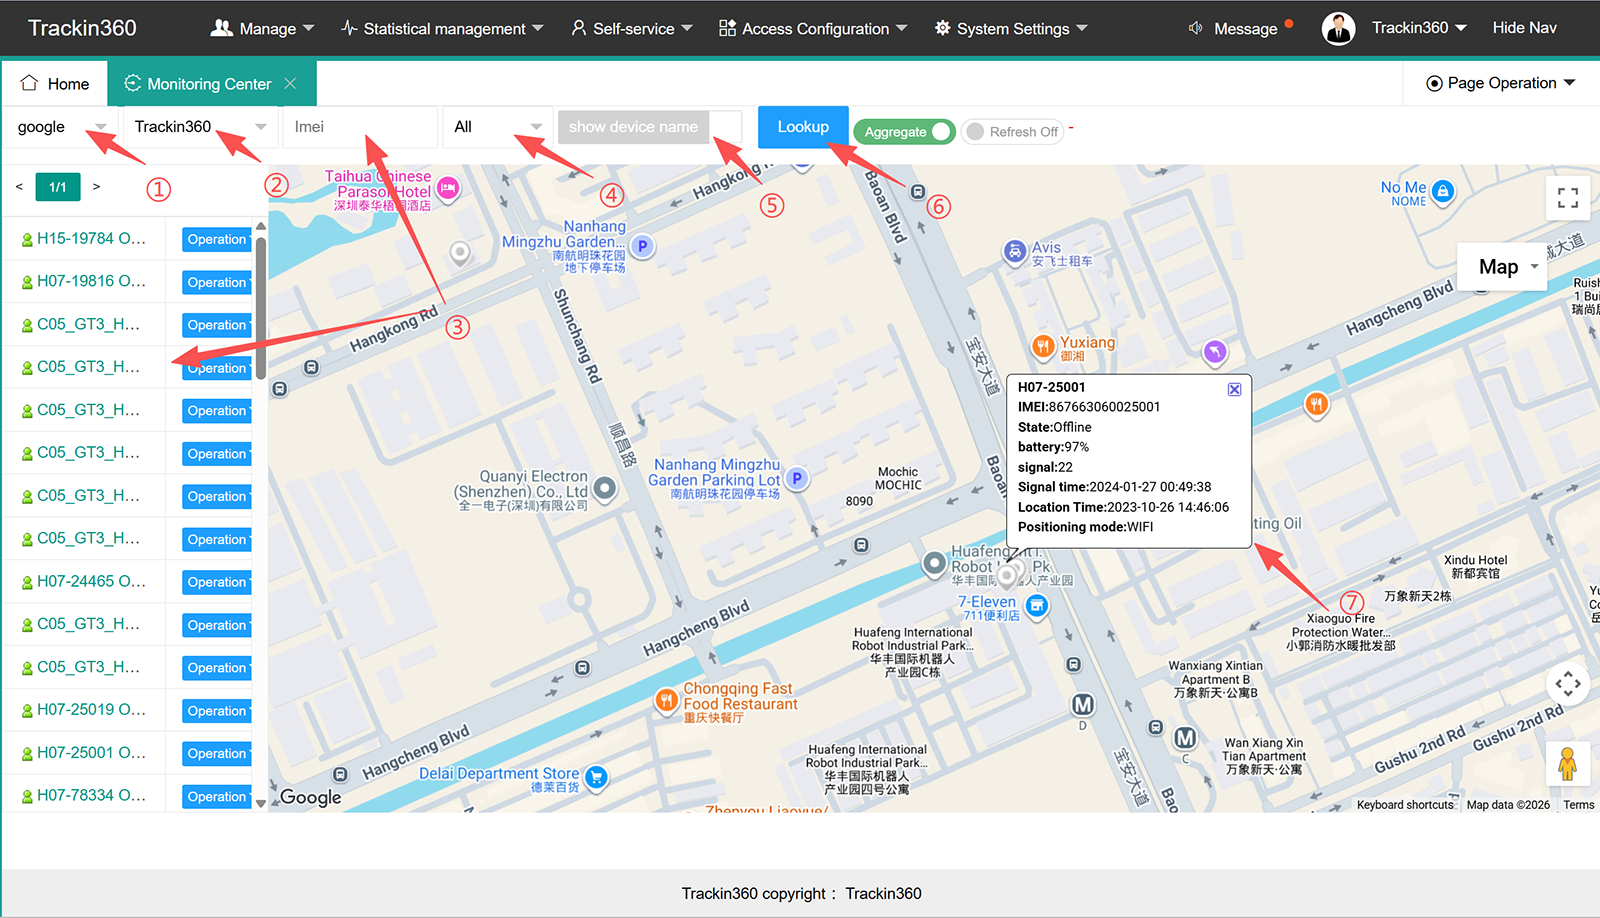
① Select the map type, Google and OSM map available.
② Select the account name
③ Input IMEI number or select the device IMEI number from the left list.
④ Select the device status, All, Online, Offline and Not active 4 options.
⑤ Select show or not show the device name
⑥ Click "Lookup" to start searching.
⑦ Showing the selected device information.
3.2.2 Operation
Select the relevant menu functions to perform operations such as real-time tracking, historical trajectory viewing, setting up electronic fences, device information, and device commands.
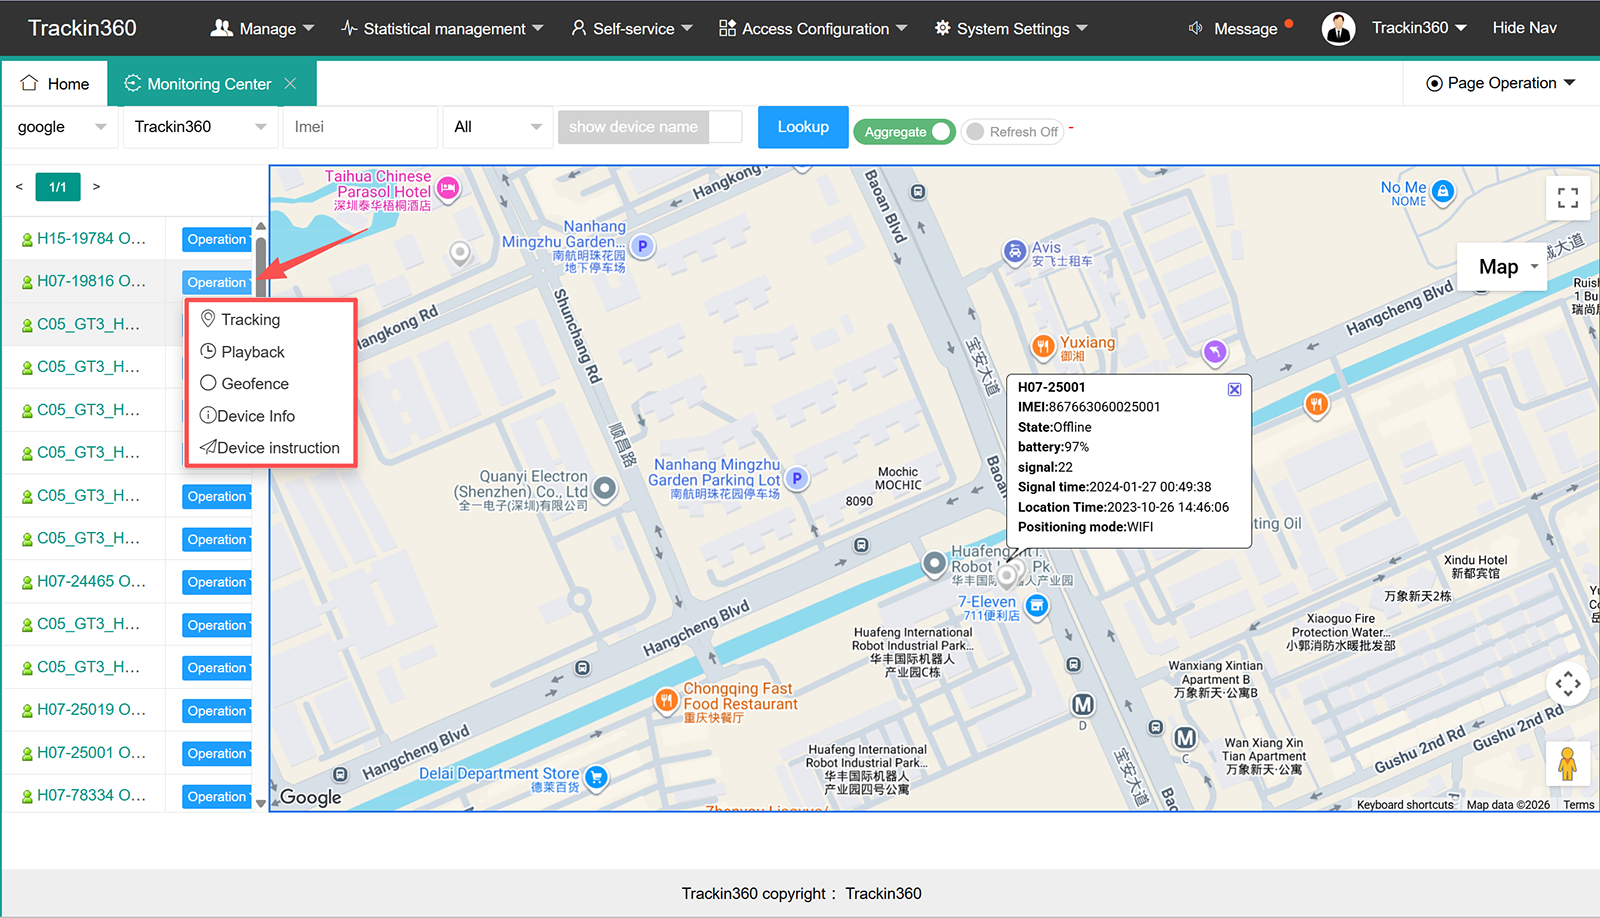
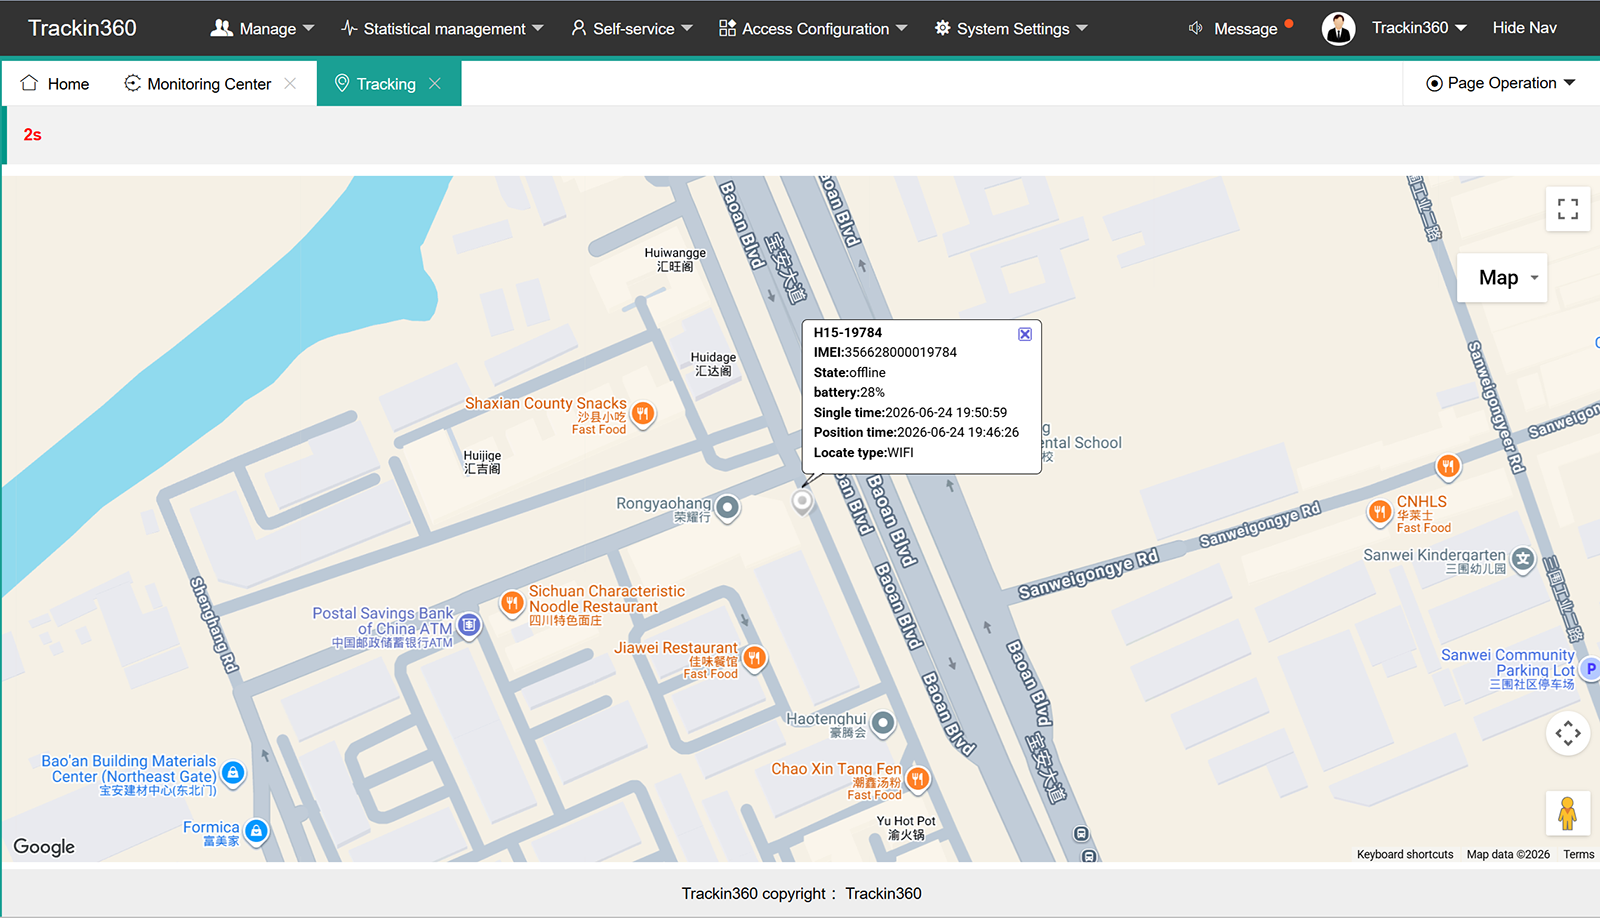
3.2.3 Tracking
Click corresponding devices' "Operation" -> "Tracking" will enter to real-time tracking page
3.2.4 Playback
Click corresponding devices' "Operation" -> "Playback" will enter to playback page, same as 3.1.10 Historical Tracking
3.2.5 Geo-fence
Click corresponding devices' "Operation" -> "Geofence" will enter to Ge-fence page
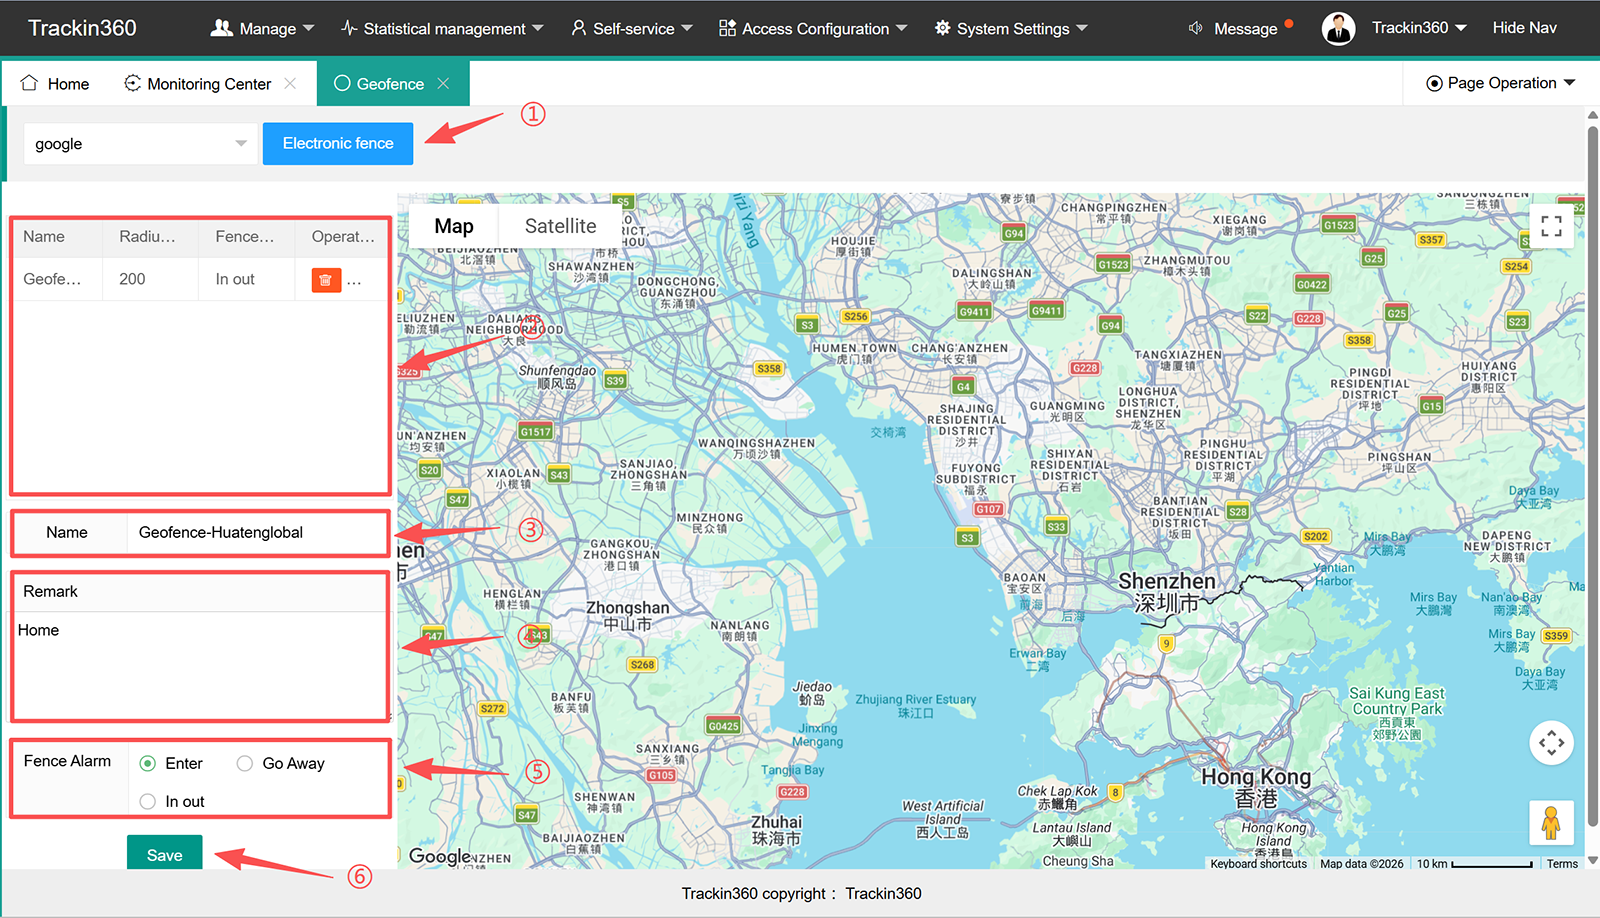
① Click "Electronic fence", set the fence radius according to your actual needs.
② Showing exist geofence, you can delete.
③ Input the Geofence name
④ Input the remark if need
⑤ Select the geofence alarm type, only enter, only out or in and out.
Note: Setting on web platform only supports setting circle geofence, setting on application supports polygonal geofence.
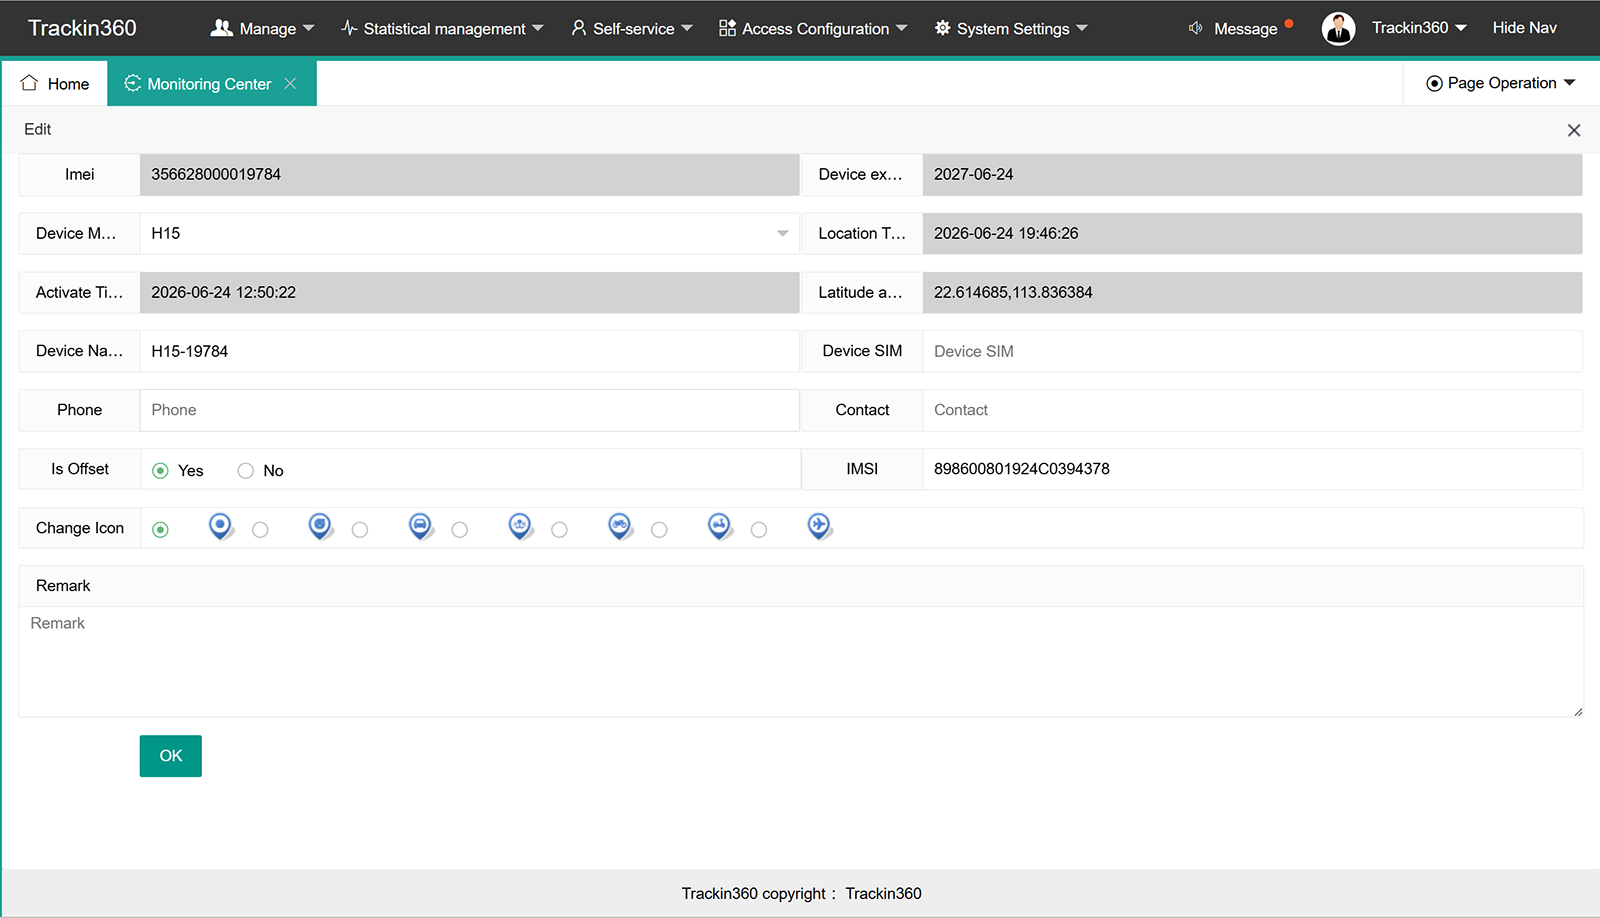
3.2.6 Device Info
Click corresponding devices' "Operation" -> "Device Info" will enter to device information edit page.
3.2.7 Device Instruction
Click corresponding devices' "Operation" -> "Device Instruction" will enter to command setting page.
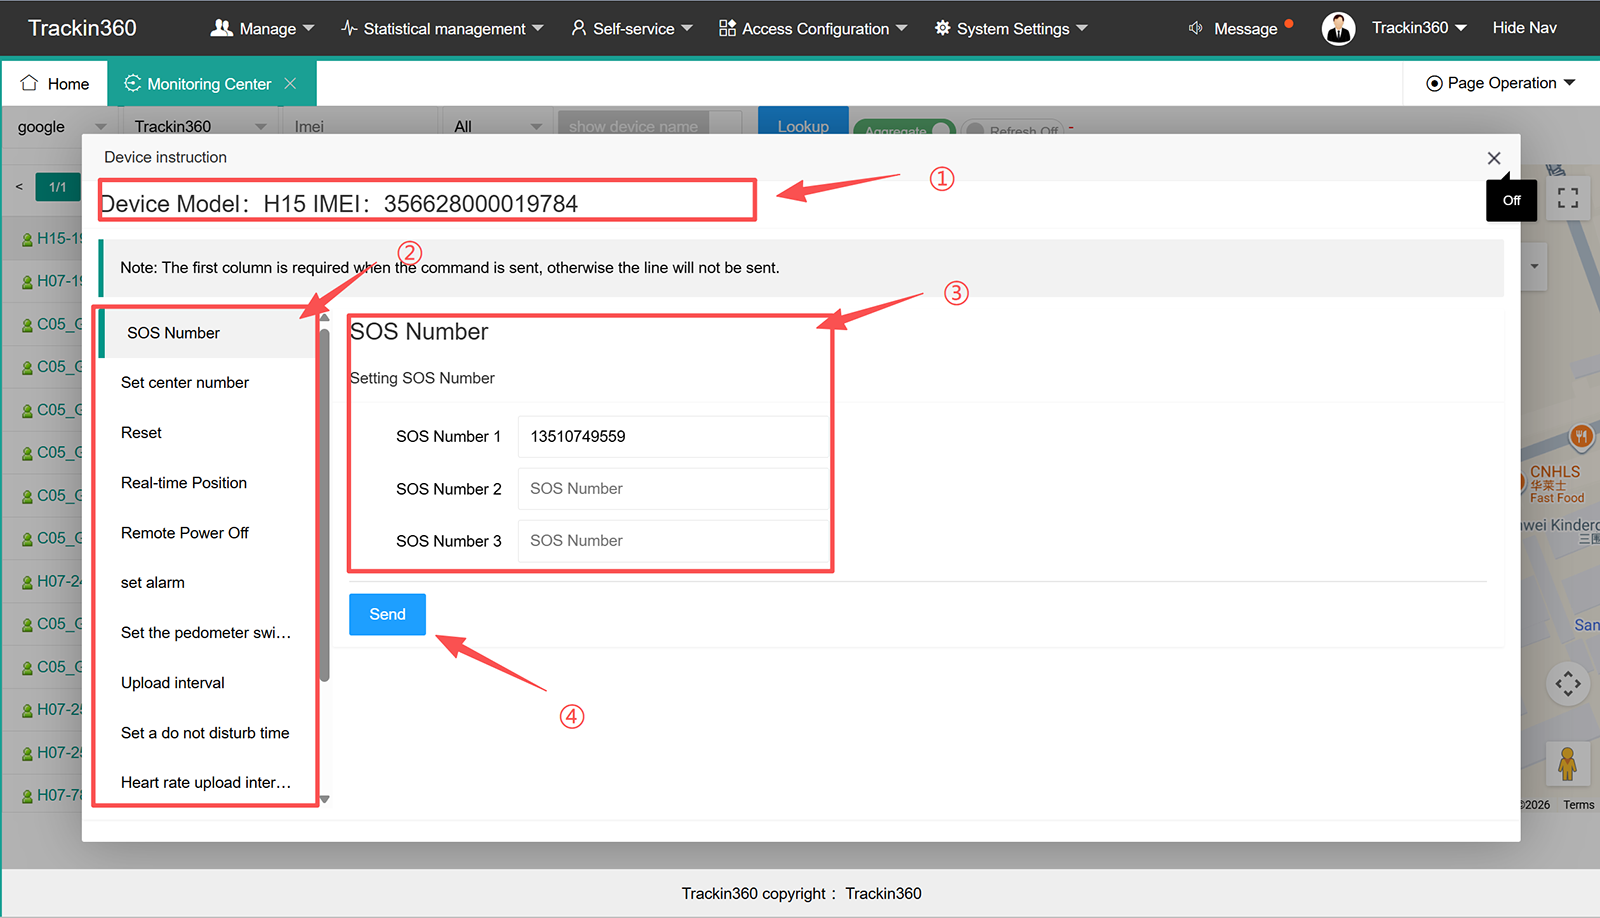
① Selected device model and IMEI number.
② Commands supported list.
③ Parameter select or input.
④ Click "Send" to release command.
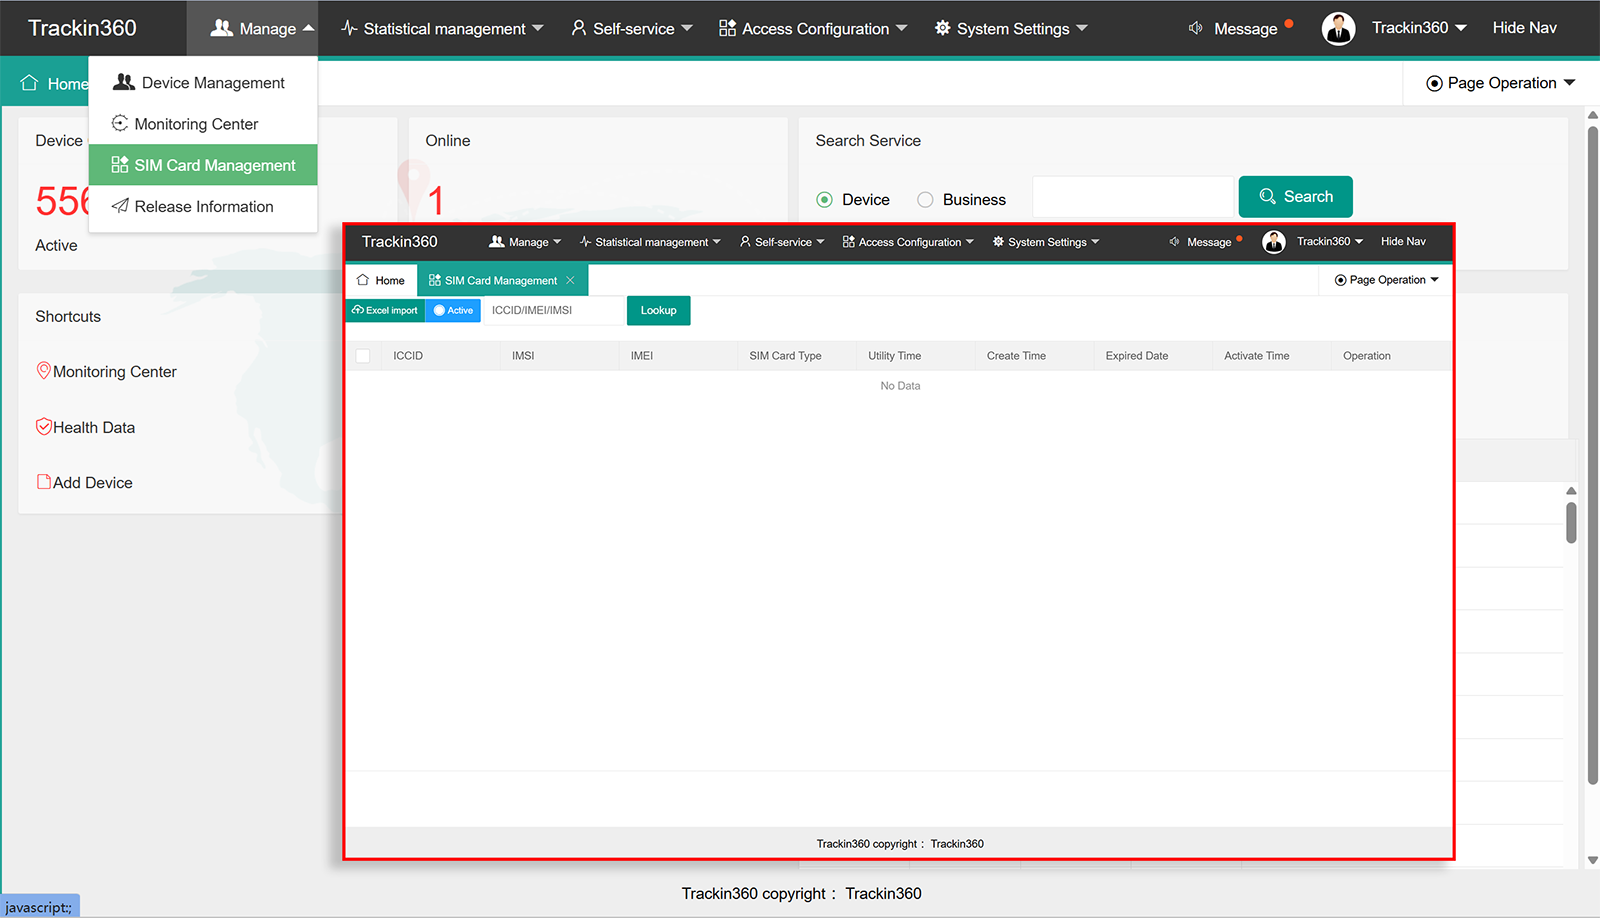
3.3 SIM Card Management
This for distributor who has bind the device to IoT SIM card, it is useless for end-users.
Ⅳ. Statistical Management
This section showing all statistical includes alarms, devices and users.
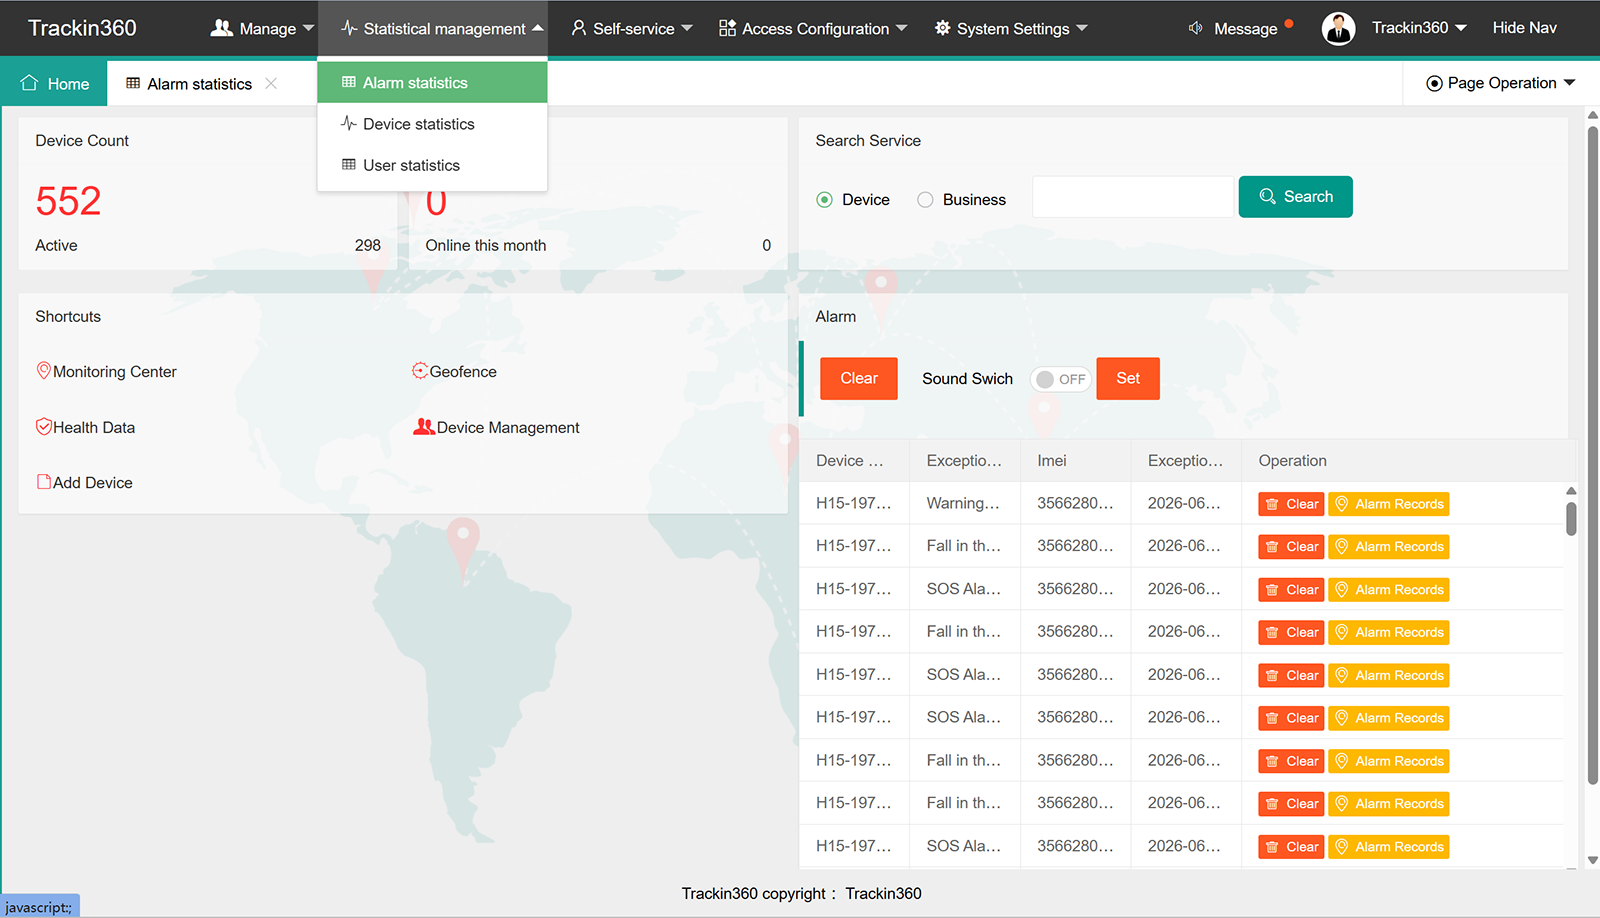
4.1 Alarm statistics
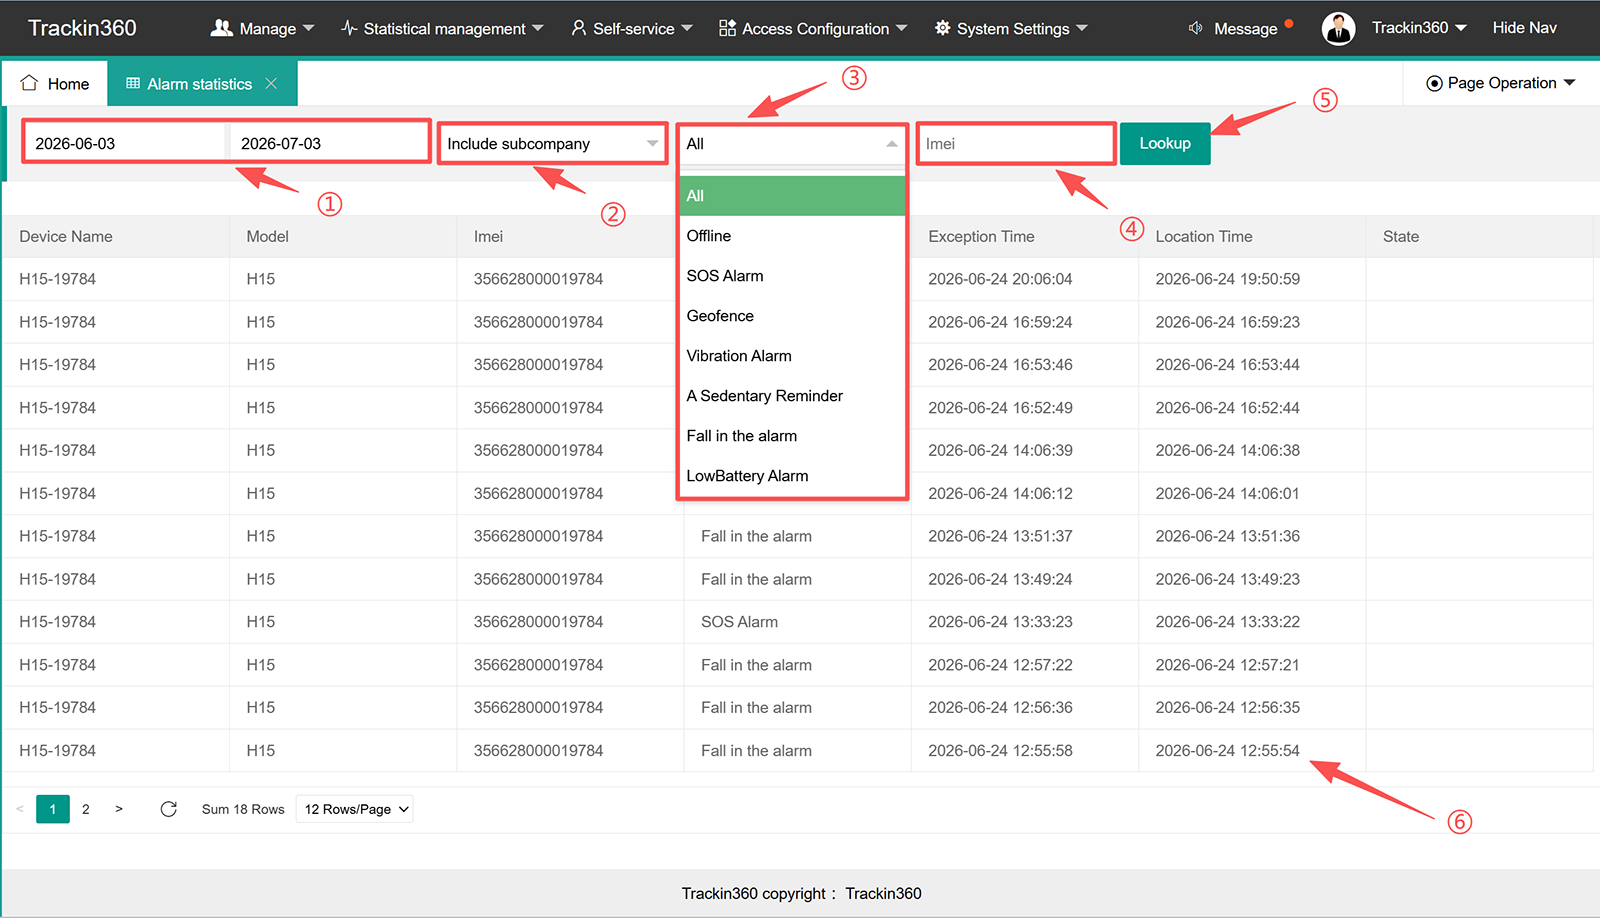
① Select time period you want to check
② Select the sub-distributor or end-user under management
③ Select the alarm type, supports All, Offline, SOS alarm, Geofence, Vibration alarm, Sedentary Reminder, fall in alarm, low battery alarm.
④ Input the IMEI number if need the specific device.
⑤ Click "Lockup"
⑥ Showing up all the alarms as you select.
4.2 Device Statistics
To view statistics on the number of all devices, you can select the corresponding company name and device model to export the devices.
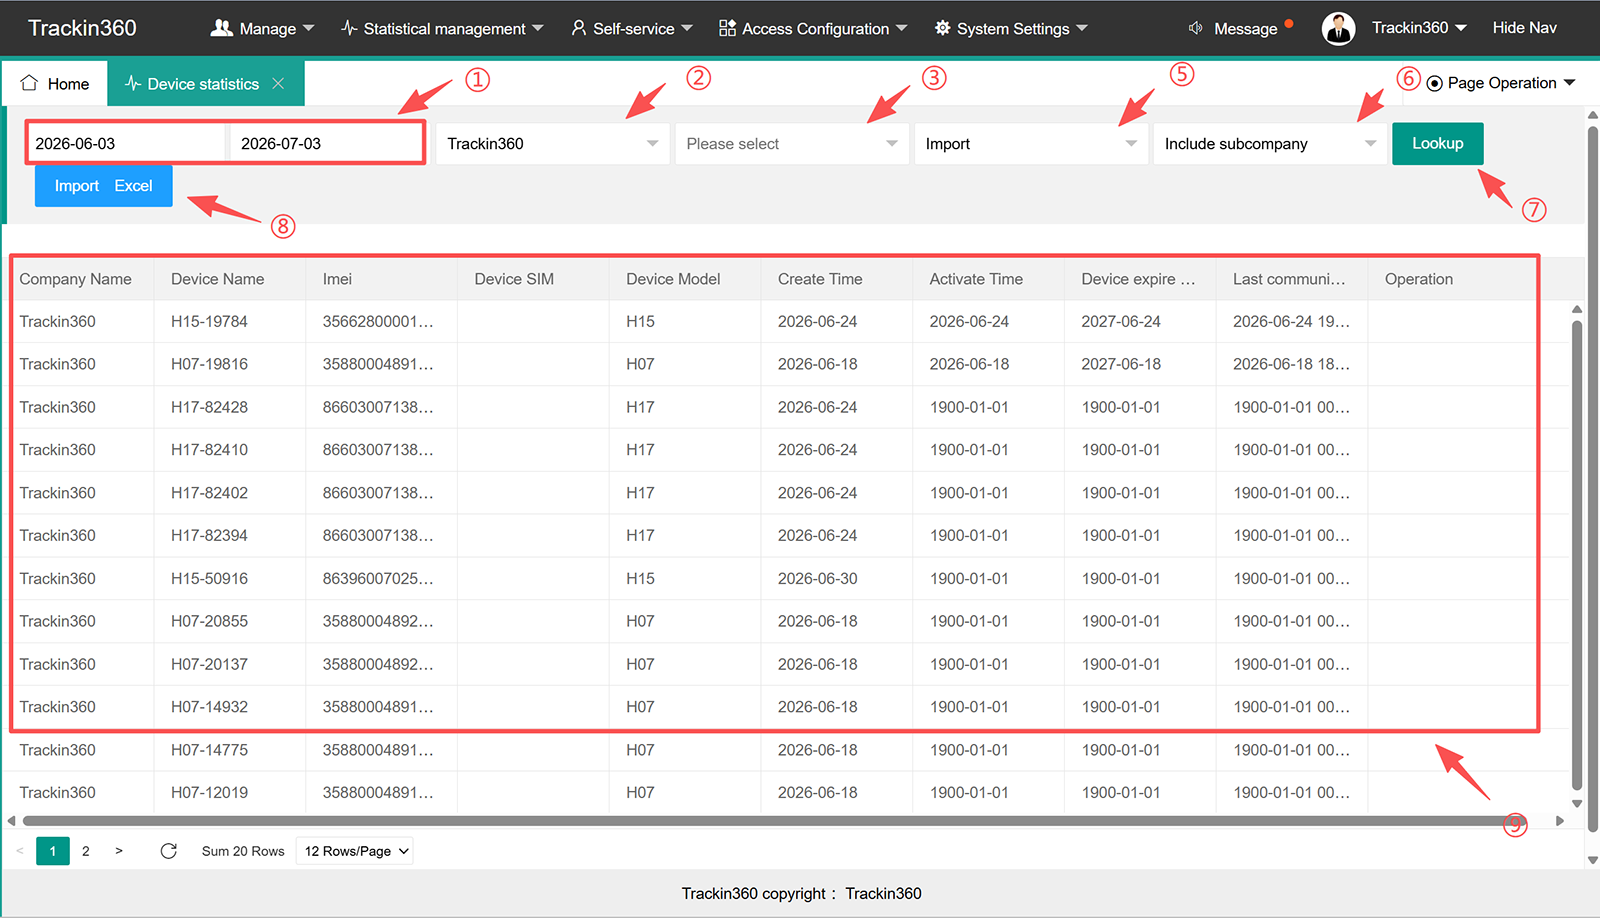
① Select time period
② Select account
③ Select protocol
④ Select status
⑤ Select scope
⑥ Click "Lookup" to display all device
⑦ Click "Import Excel" to export list
⑧ Showing all device details
4.3 User Statistics
You can view user count statistics in real time and export the entire user list.
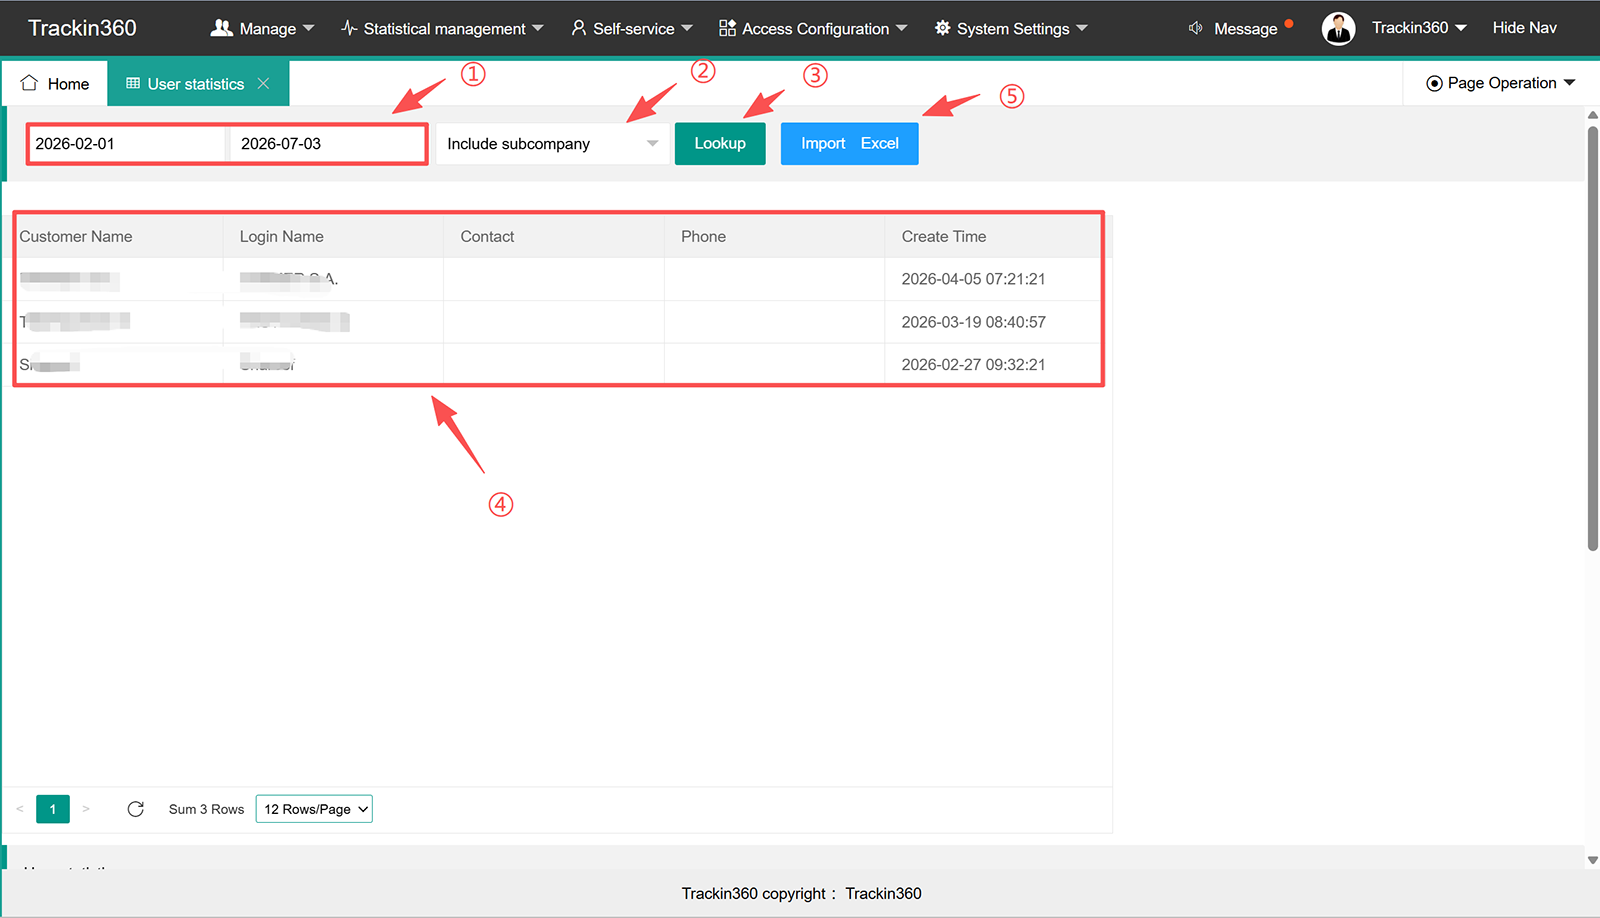
① Select time period
② Select the only self or include sub-company
③ Click "Lookup"
④ Showing all the user details
⑤ Click "Import Excel" to export data.
Ⅴ. Self-service integration
5.1 Self-Integration
This not support for distributor or end-user, need to special development and open for special project.
5.2 Redeem Voucher
This not support for distributor or end-user, need to special development and open for special project.
5.3 App Push Setting
This not support for distributor or end-user, need to special development and open for special project.
Ⅵ. Access Configuration
There are Role Management, Menu Management, User Management and API Access.
6.1 Role Management
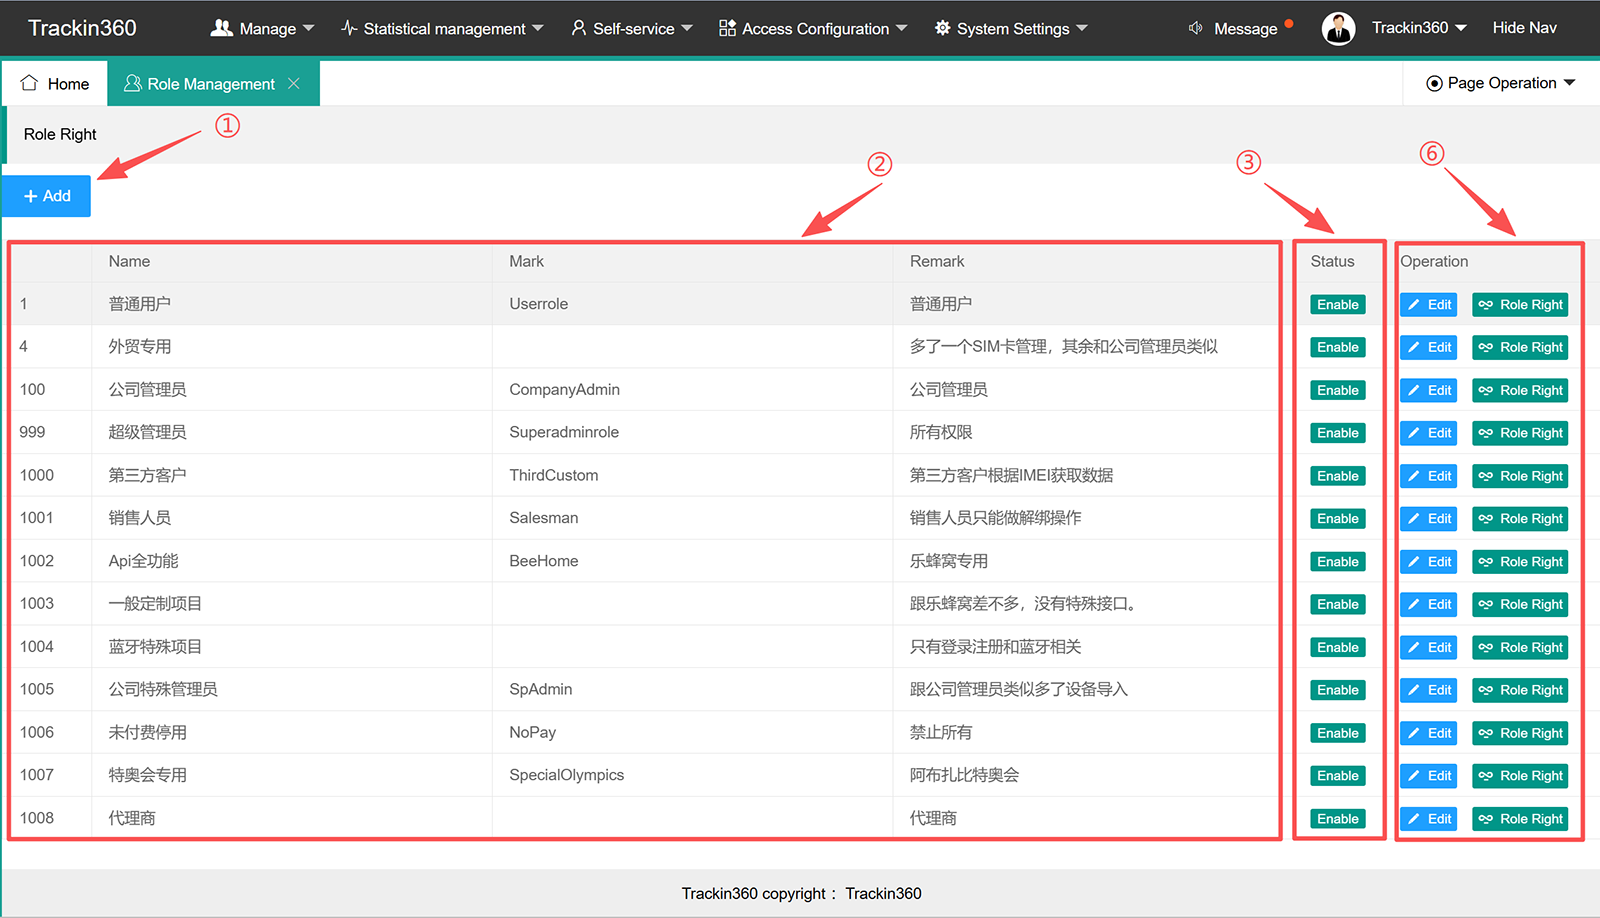
① Click "Add" to add new role and do the permission configuration.
② Exist role name, mark and remark details.
③ Status
④ Operation
6.1.1 Add new role
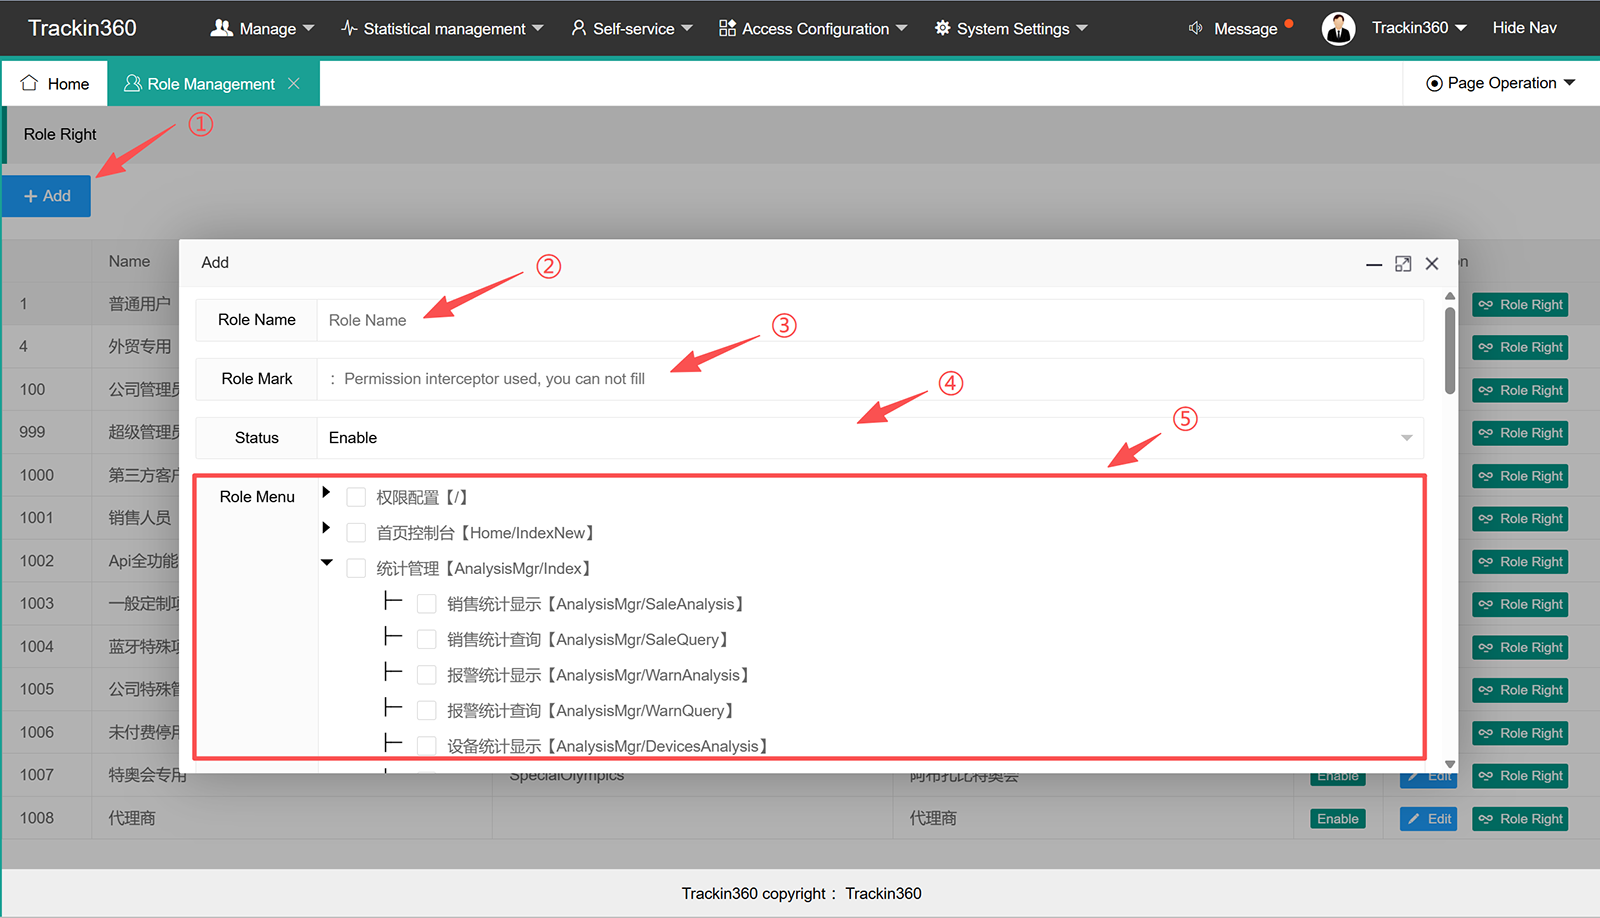
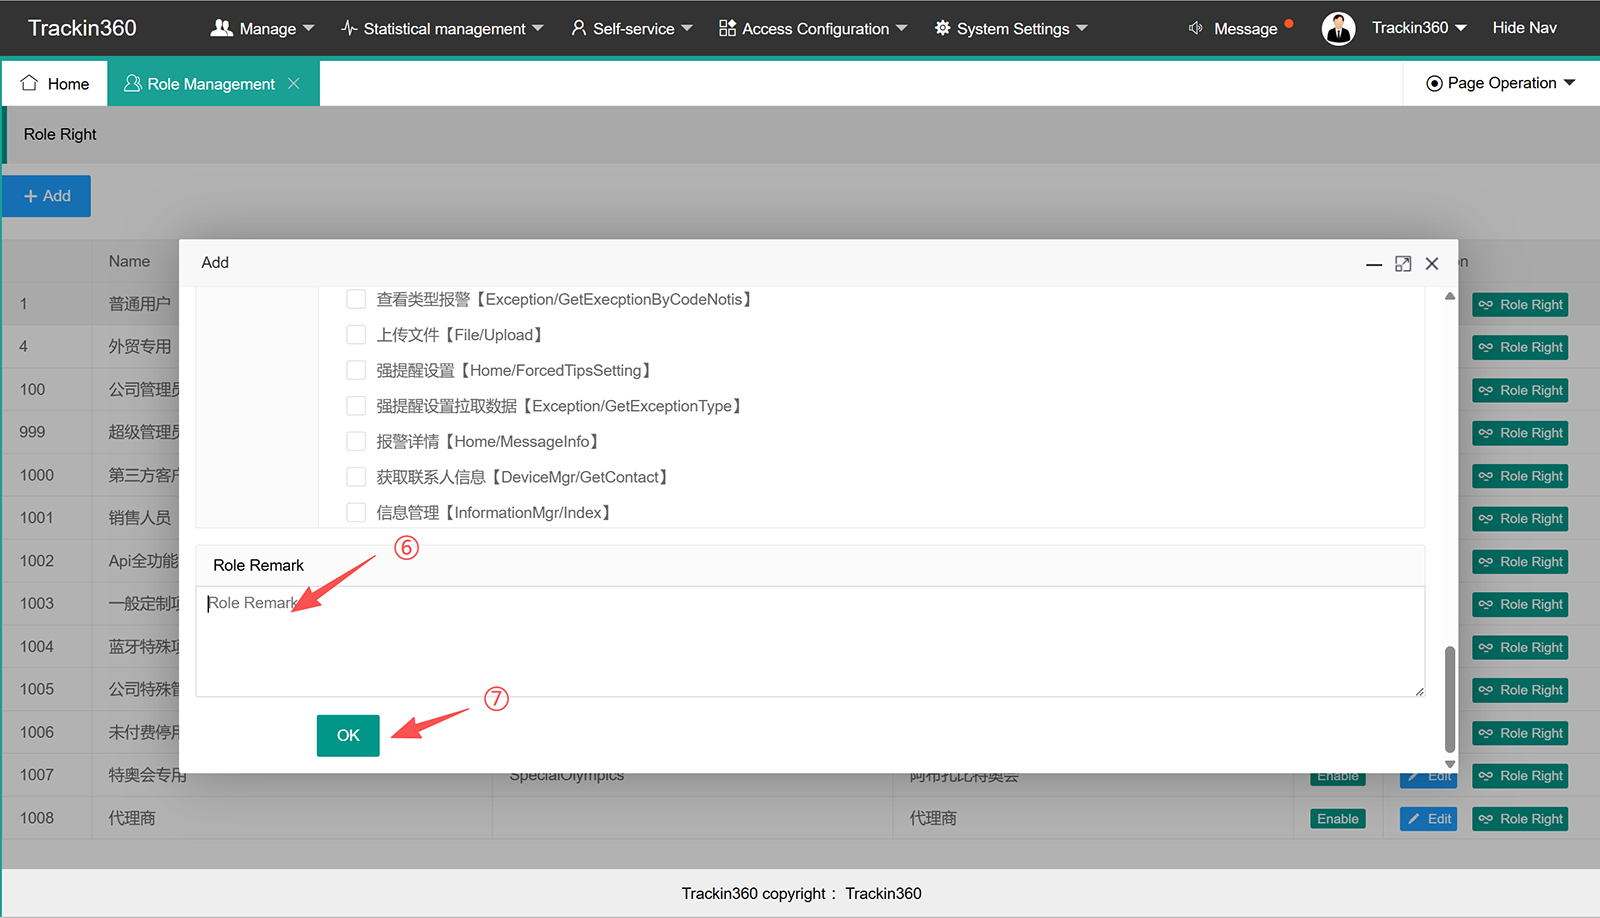
① Click "Add" to add new role
② Input role name
③ Input role mark
④ Select the Status enable or disable
⑤ Select detailed permission configurations for the role.
⑥ Input remark details
⑦ Click "Ok" confirm to create new role.
6.2 Menu Management
This section only for admin role and deploy on client own server.
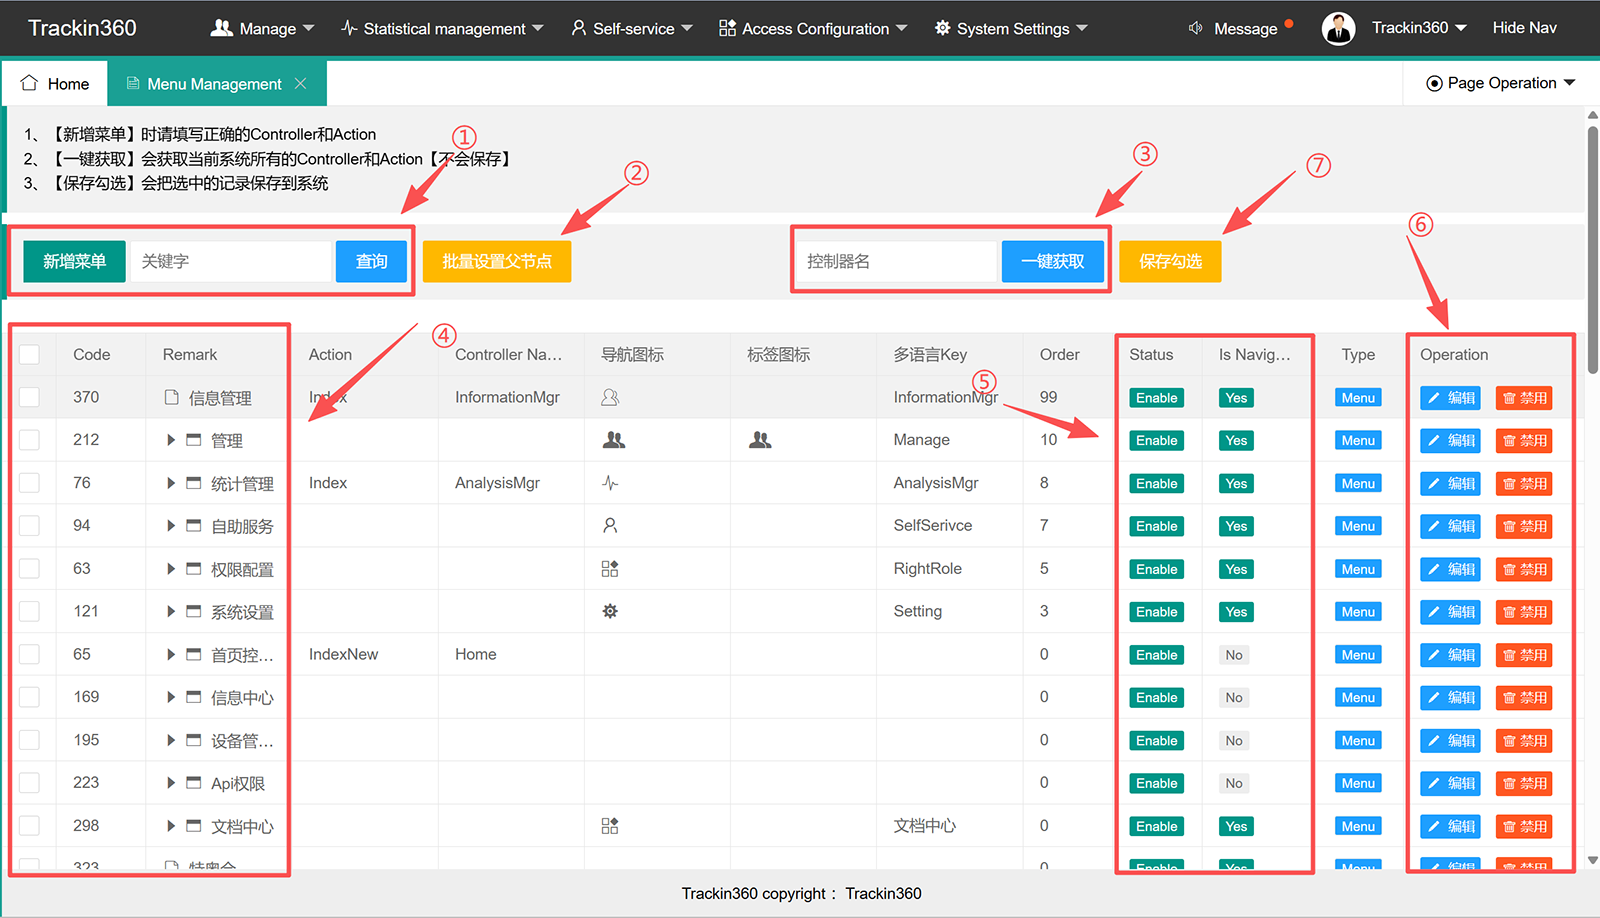
① Enquiry and input new menu
② Batch set parent nodes
③ Select the control name
④ Showing and select main menu list
⑤ Status and setting navigation or not
⑥ Operation to edit or disable
Note: This no need to set after deploy well system, our engineer will maintenance for you.
6.3 User Management
This section only for admin role and deploy on client own server.
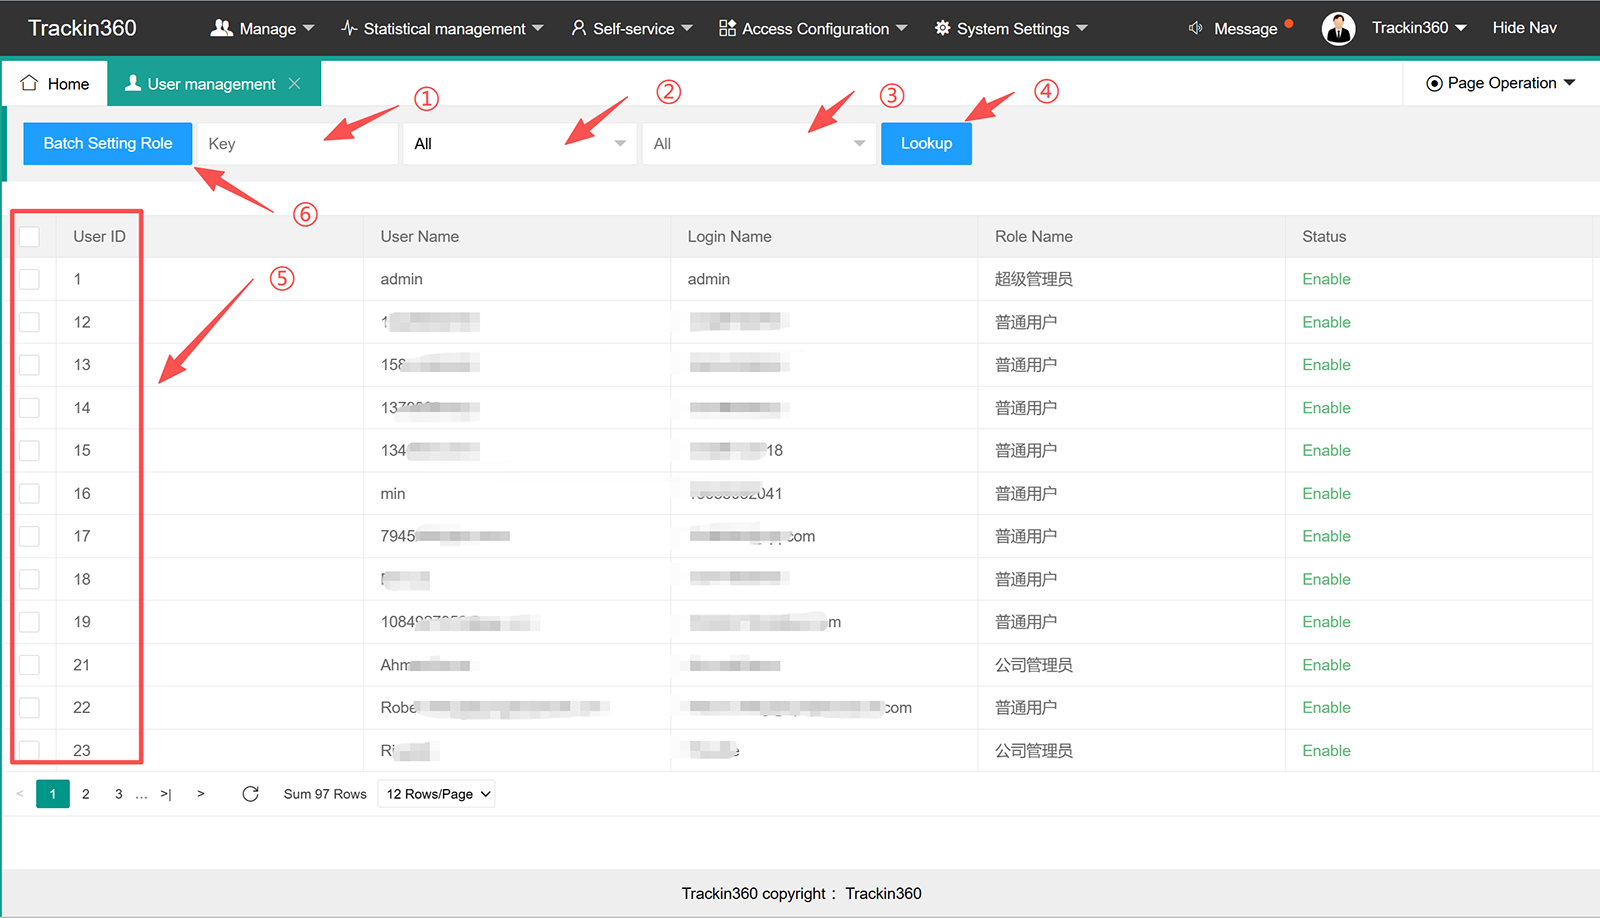
① Input key words
② Select roles type
③ Select account name
④ Click "lookup" to searching for condition selected
⑤ Select any user account you want to change permission
⑥ After select the accounts, then click "Batch Setting Role" to set or reset role permission.
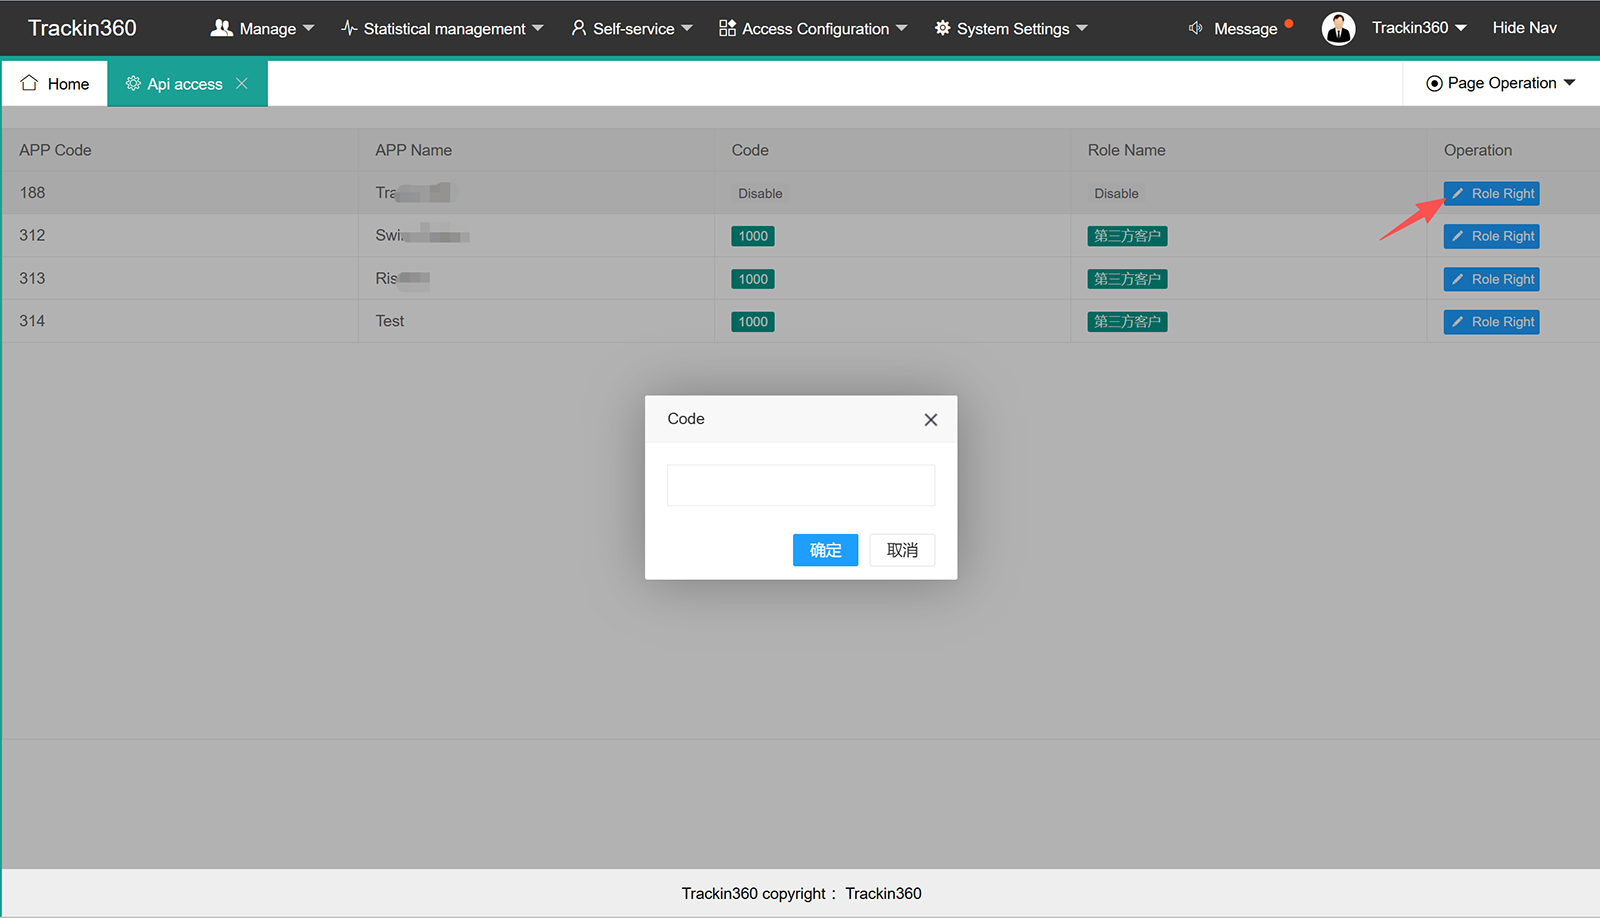
6.4 API Access
In this section shows all authorized API account information
Ⅶ. System Settings
7.1 Device Model
Management and add new model.
Note: This section we will provide technical support, please do not do any change without confirmation.
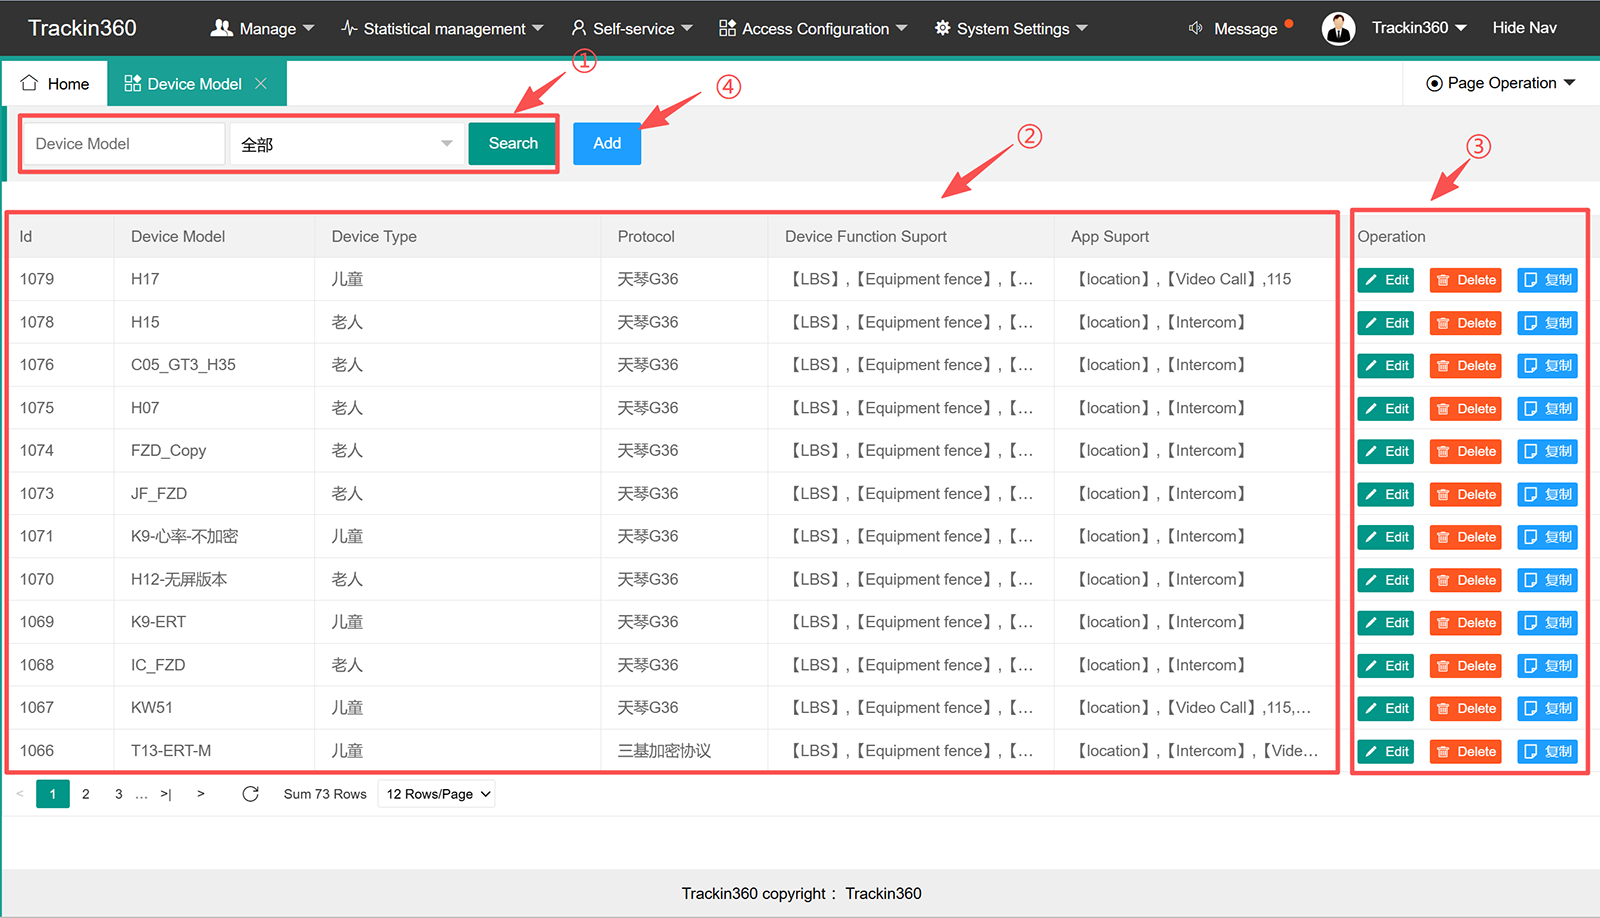
① Input or select type, then click "Search" to find out model
② Display all models supports in system
③ Operation supports Edit, Delete and Copy the model
④ Click "Add" to add new model
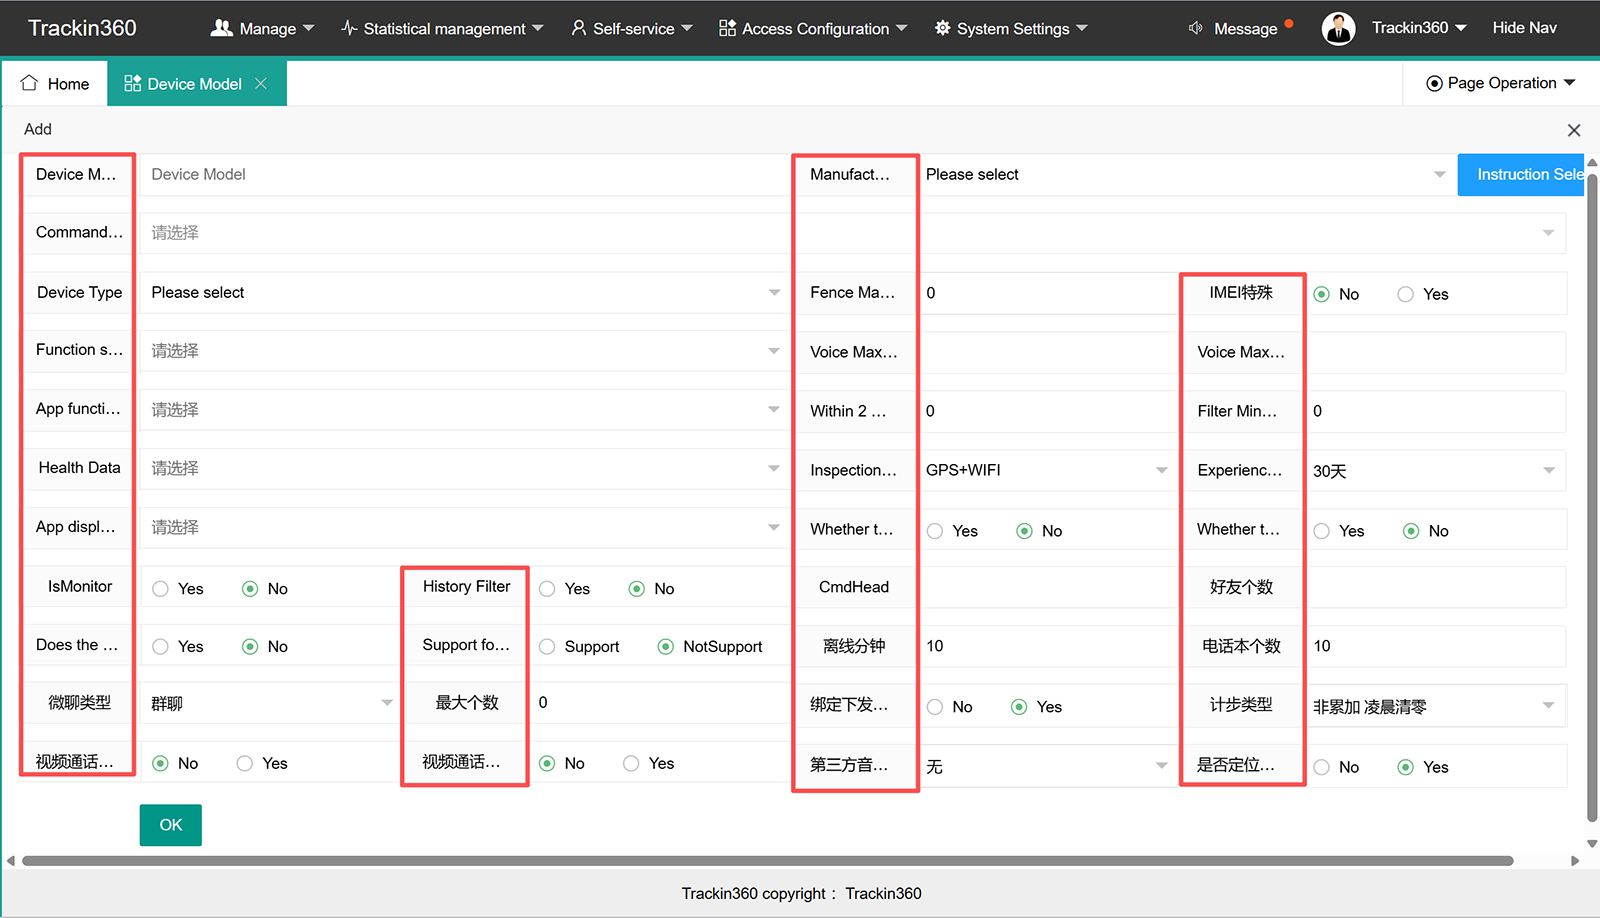
7.1.1 Add Model
Input model name and select correct parameters.
Note: This section we will provide technical support, please do not do any change without confirmation.
7.2 Protocol
Management all platform support protocols.
Note: This section we will provide technical support, please do not do any change without confirmation.
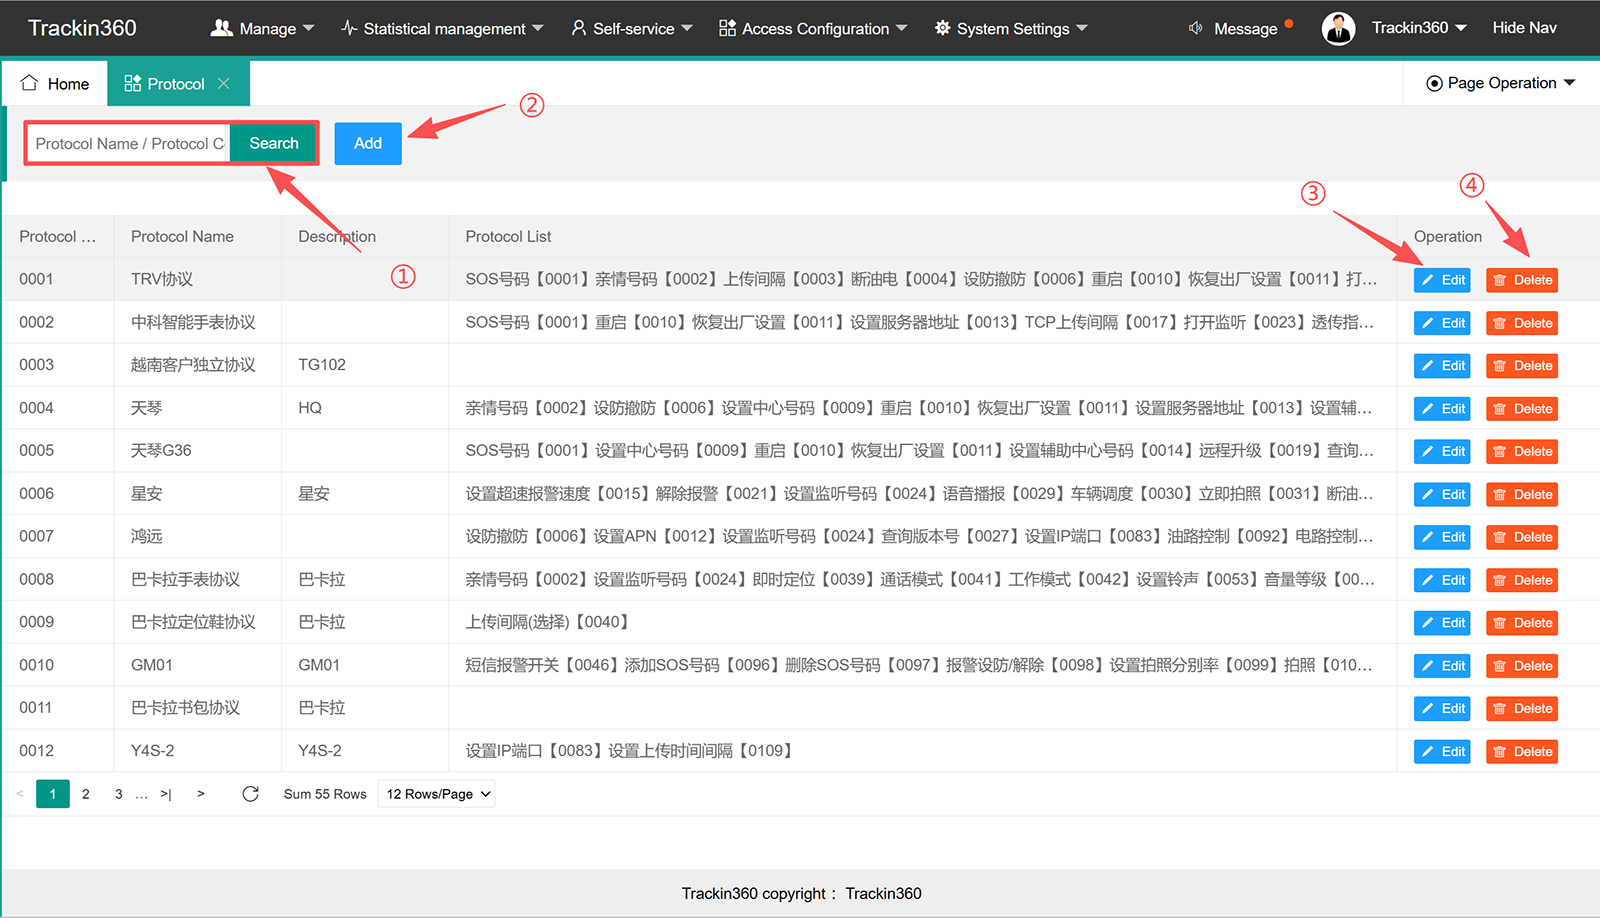
① Input or default protocol name then click "Search" to find protocol.
② Click "Add" to add protocol
③ Click Edit to modify the exist protocol
④ Delete protocol
7.2.1 Add protocol
Note: This section we will provide technical support, please do not do any change without confirmation.
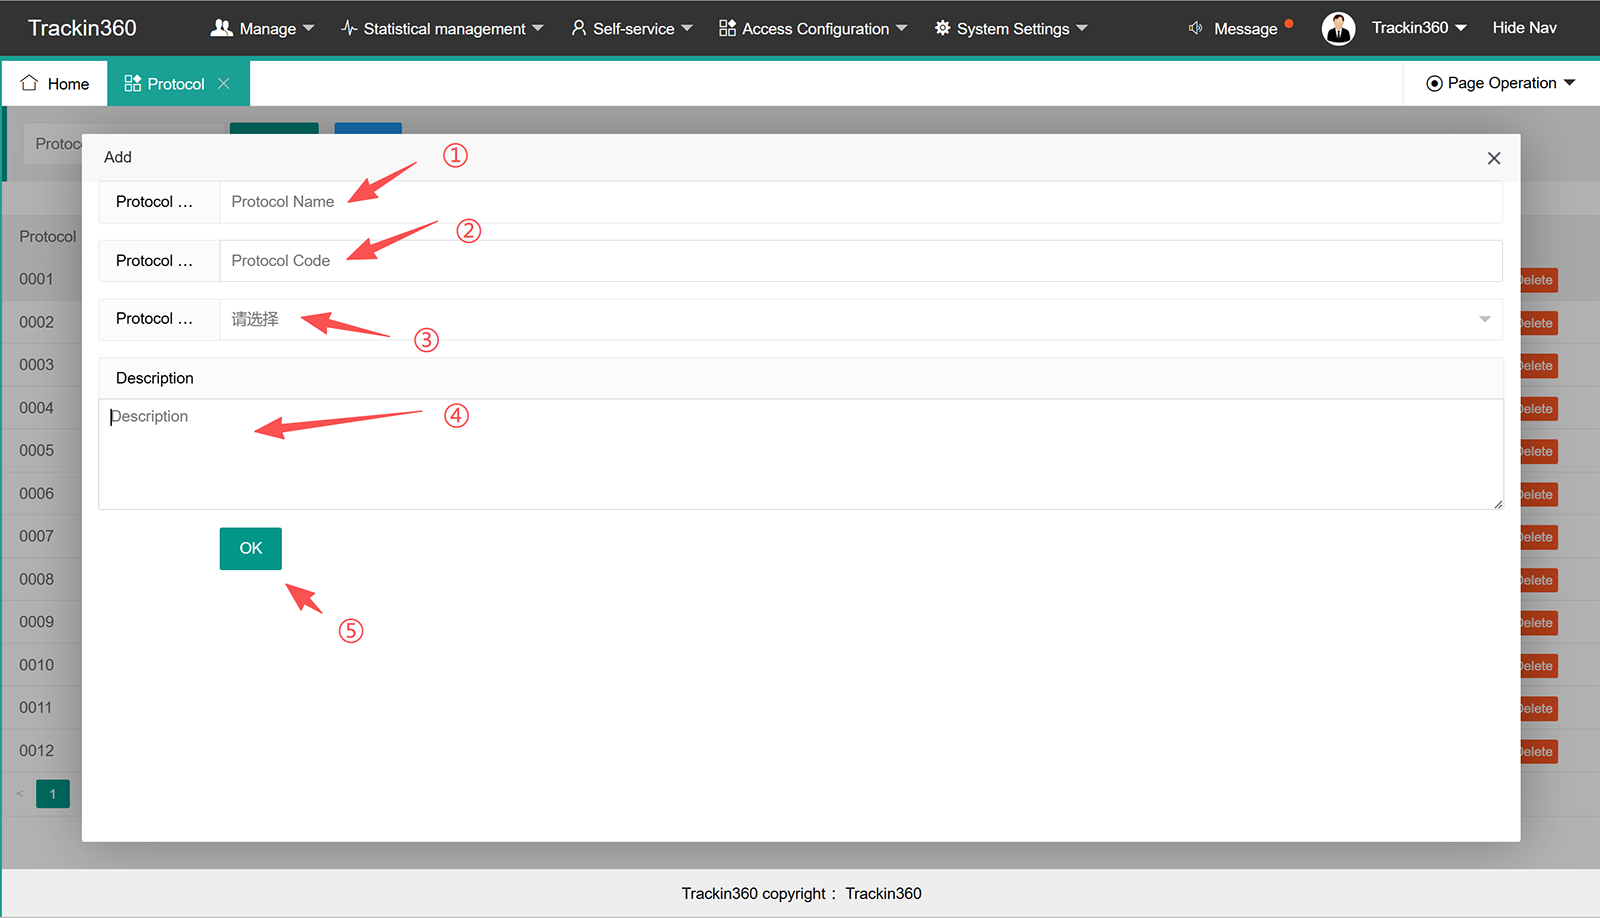
① Input protocol name
② Input protocol code
③ Select protocol
④ Add any description if you want
⑤ Click "Ok" to set.
7.2.2 Edit exist protocol
Select protocol and click "Edit" enter editing page
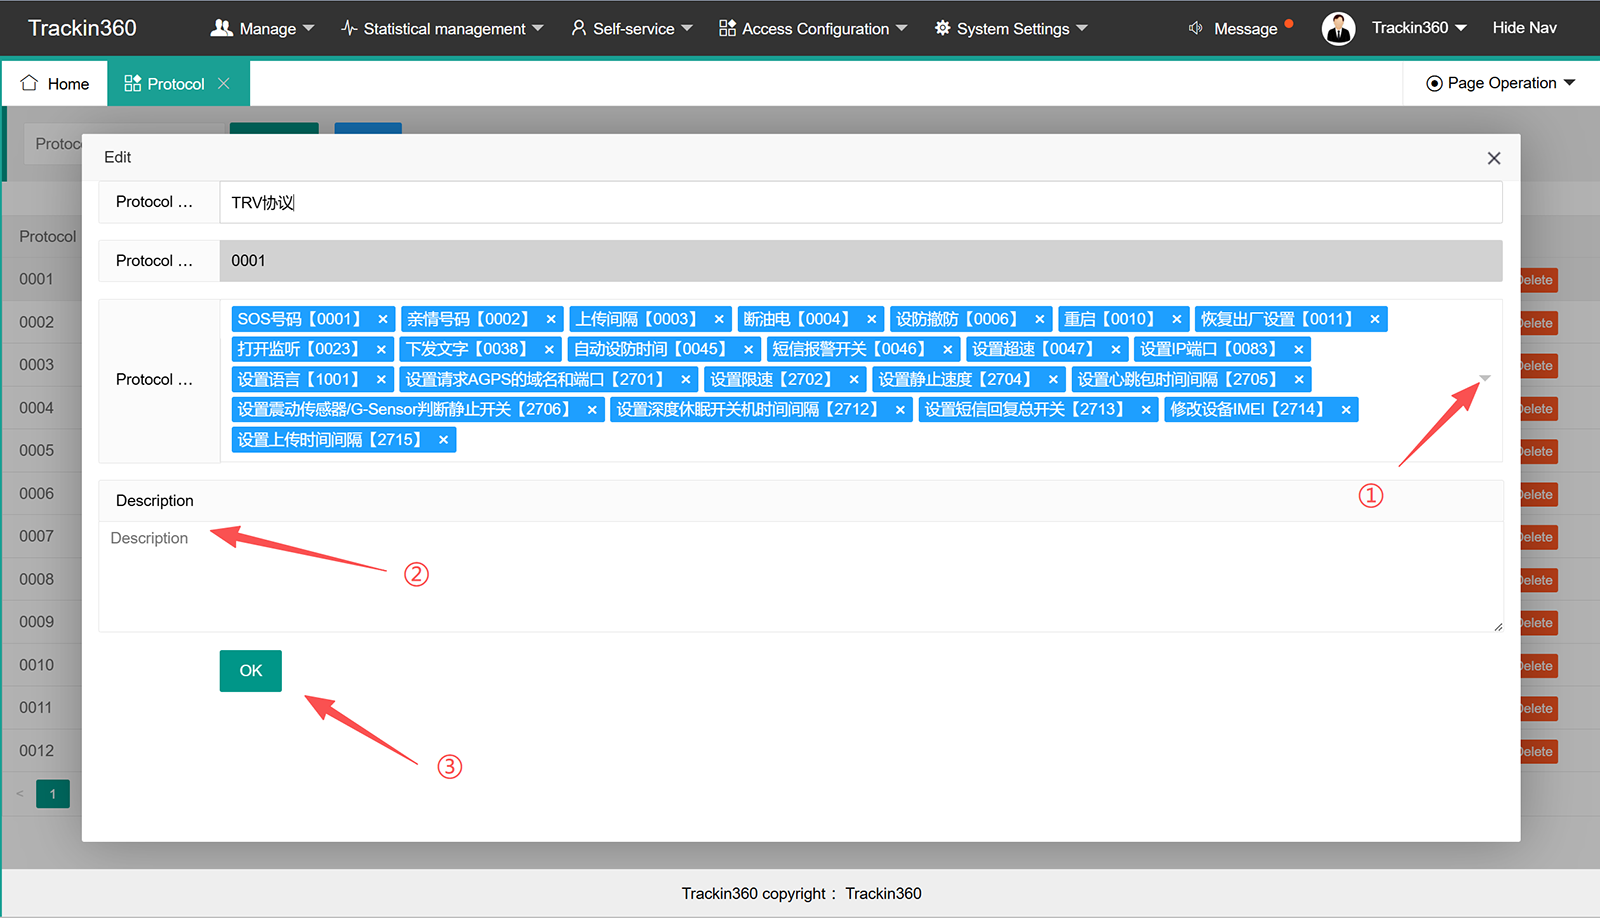
① Click to add or delete features
② Add description if required
③ Click "Ok" to set
7.3 Command
Management all platform support command list.
Note: This section we will provide technical support, please do not do any change without confirmation.
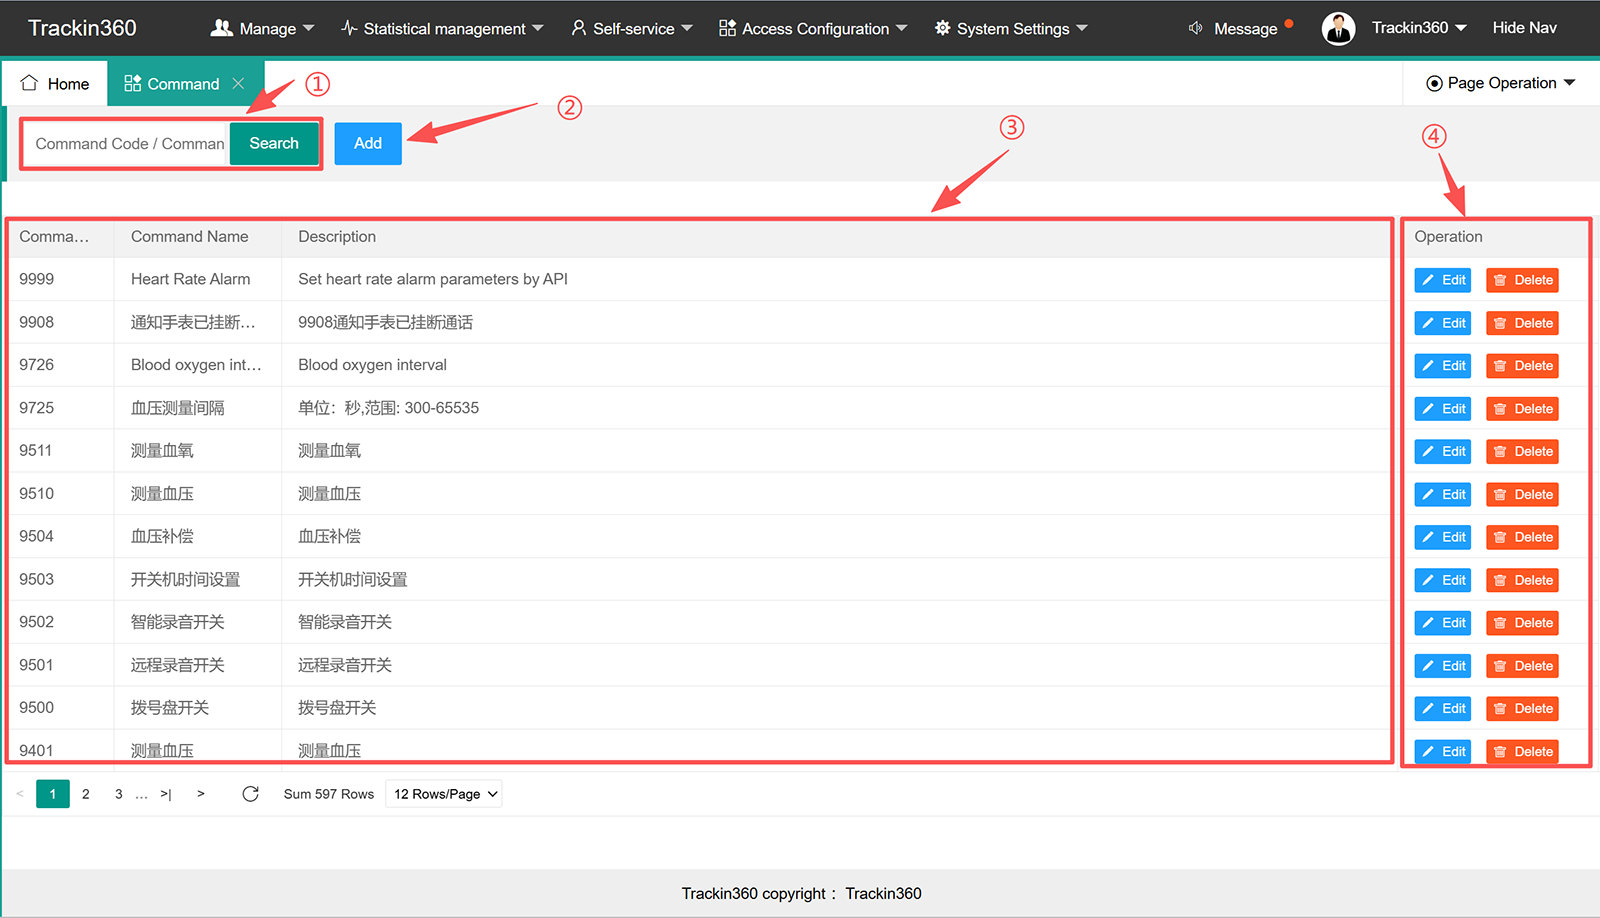
① Input command code to search, shows all command if no any input.
② Click "Add" to add new commands
③ All command supports
④ Operation to edit or delete command.
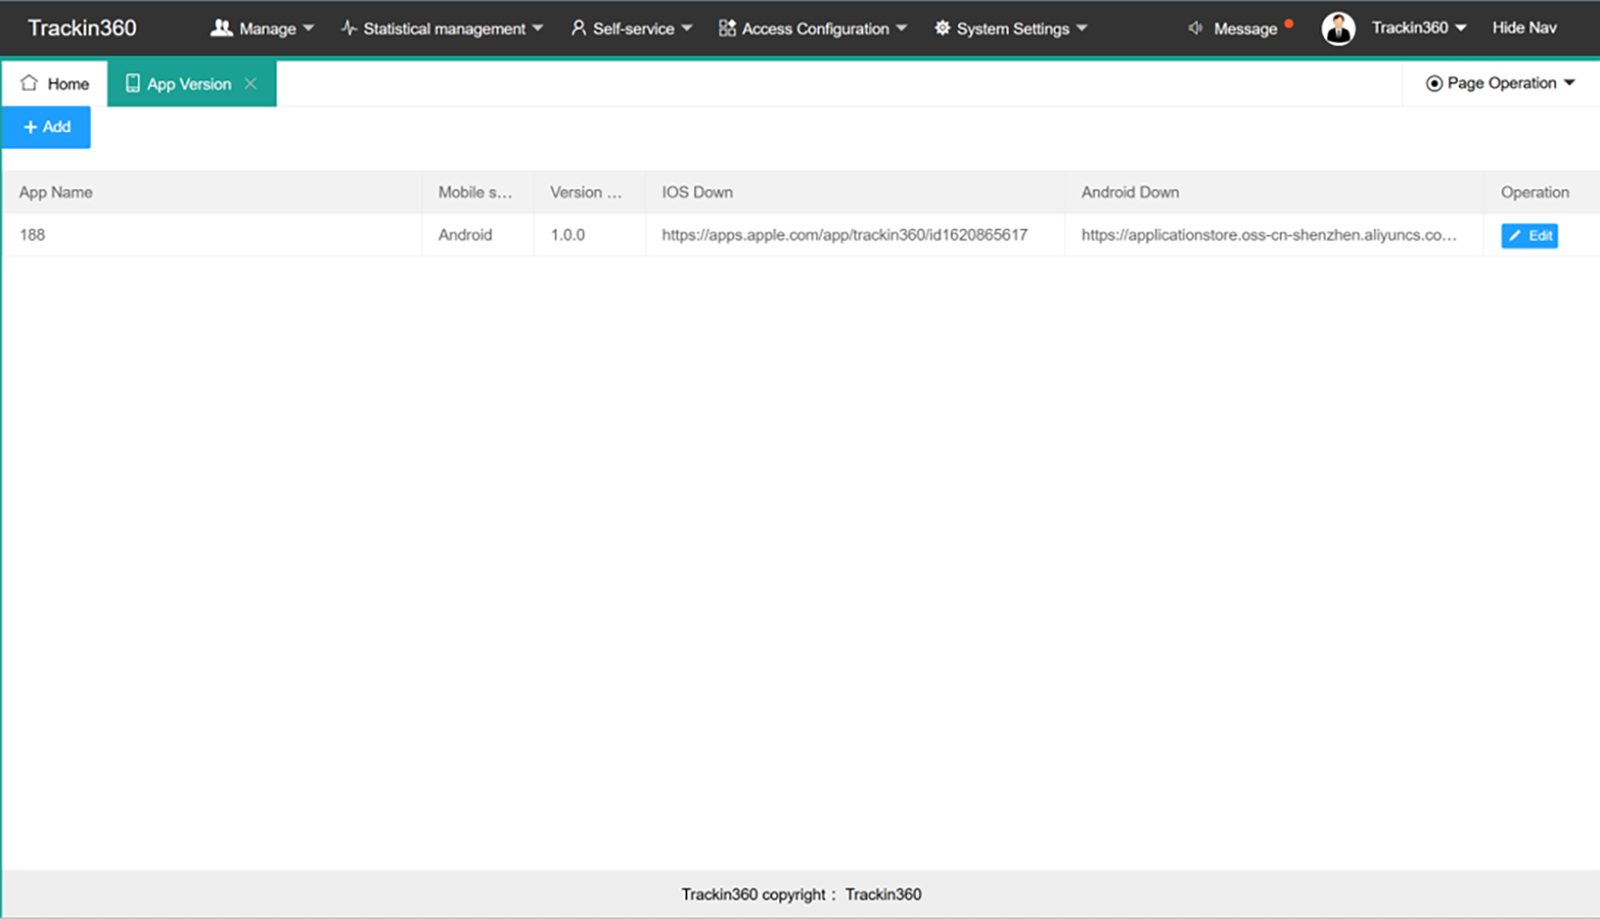
7.4 App Version
Add or edit correspond Apps.
Note: This section we will provide technical support, please do not do any change without confirmation.
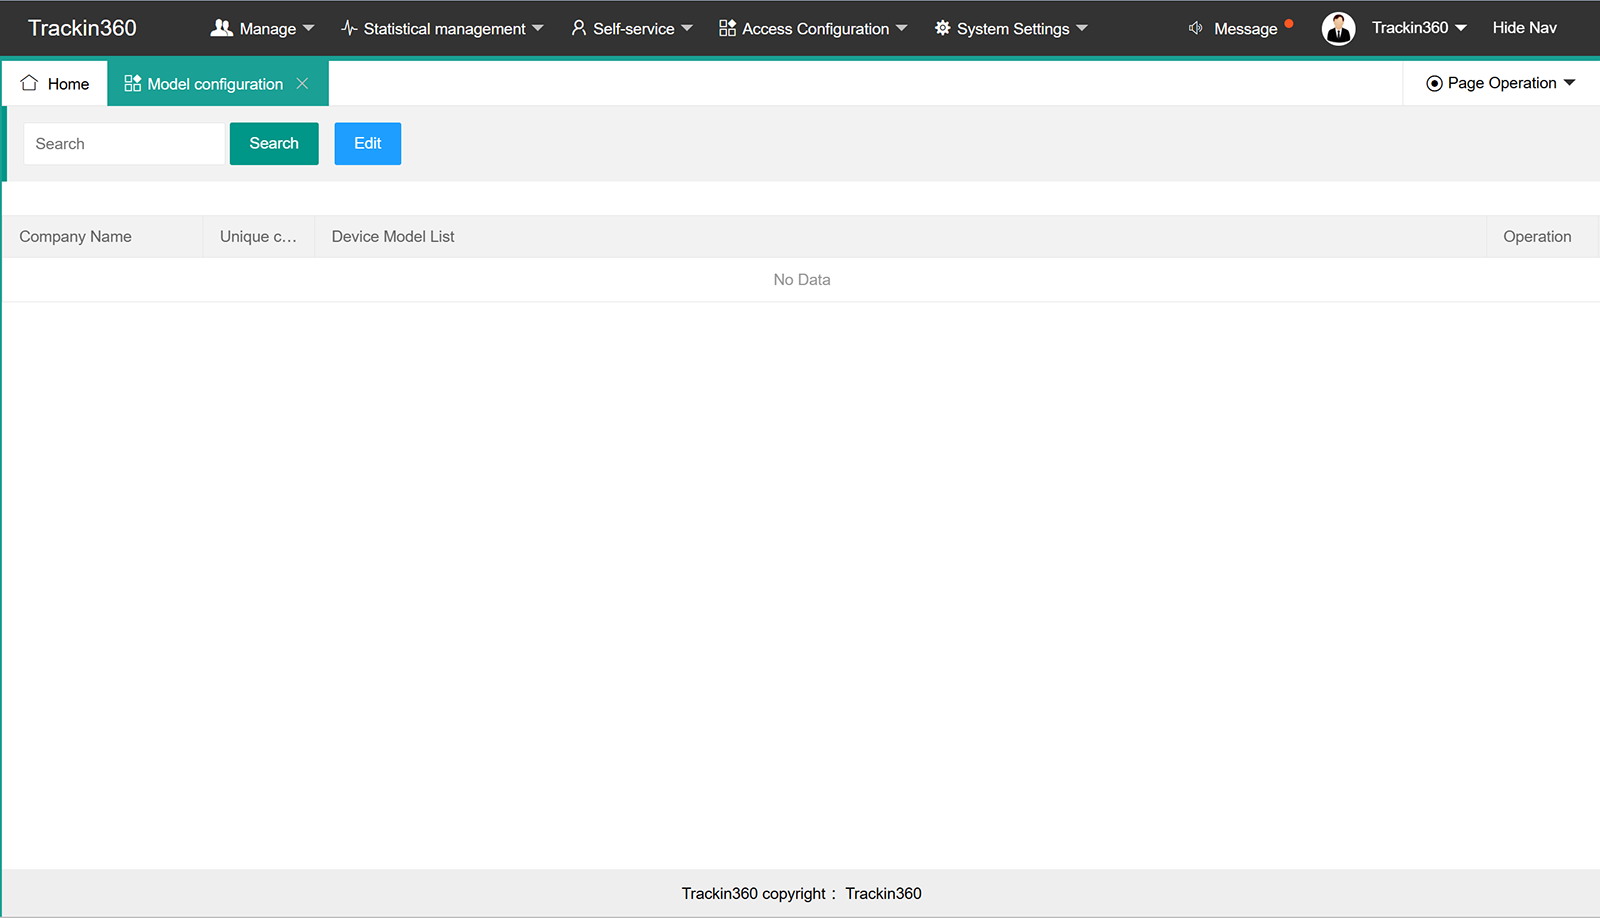
7.5 Model Configuration
Search or edit platform supports models.
Note: This section we will provide technical support, please do not do any change without confirmation.
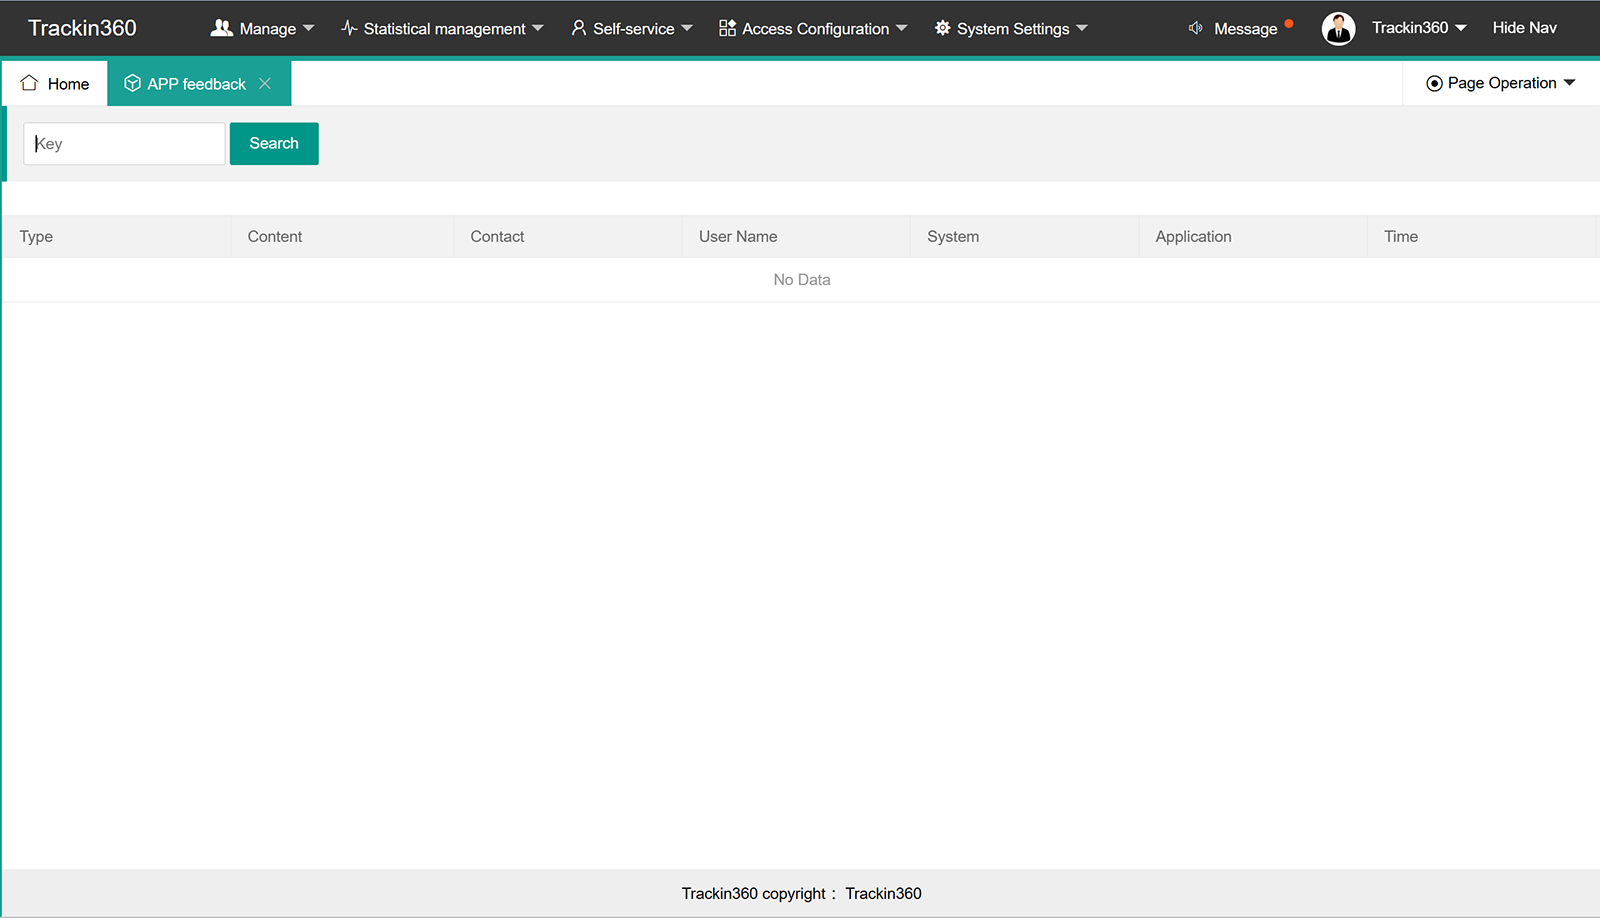
7.6 APP Feedback
Note: This section we will provide technical support, please do not do any change without confirmation.
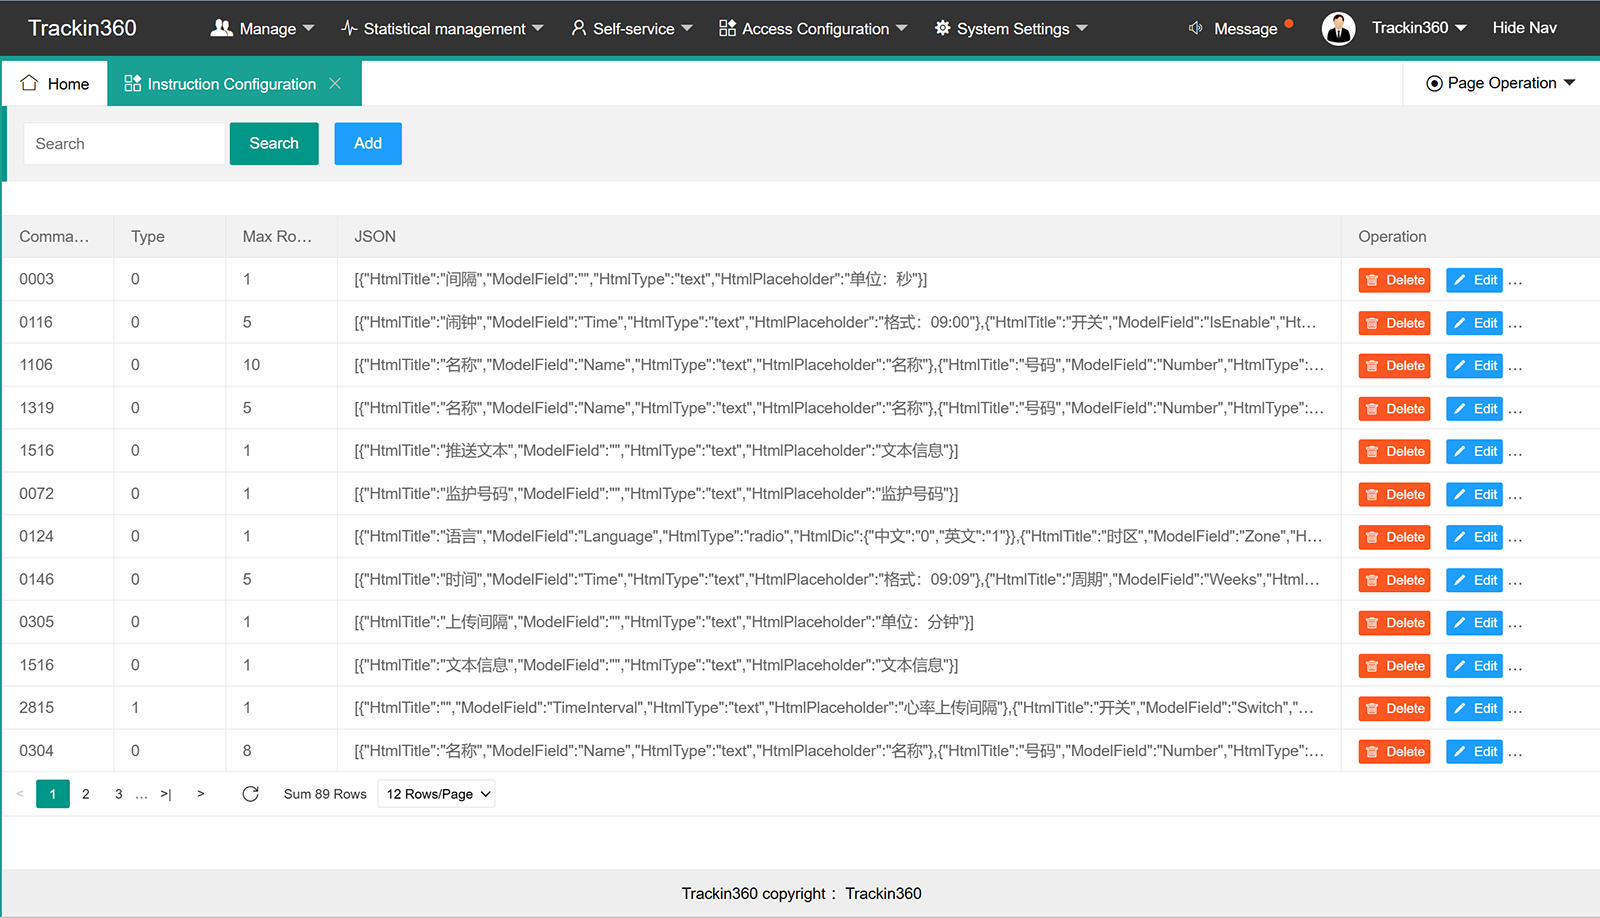
7.7 Instruction Configuration
Note: This section we will provide technical support, please do not do any change without confirmation.
7.8 Upload the bin file
Upload bin file for corresponding device firmware upgrade.
Note: This section we will provide technical support, please do not do any change without confirmation.
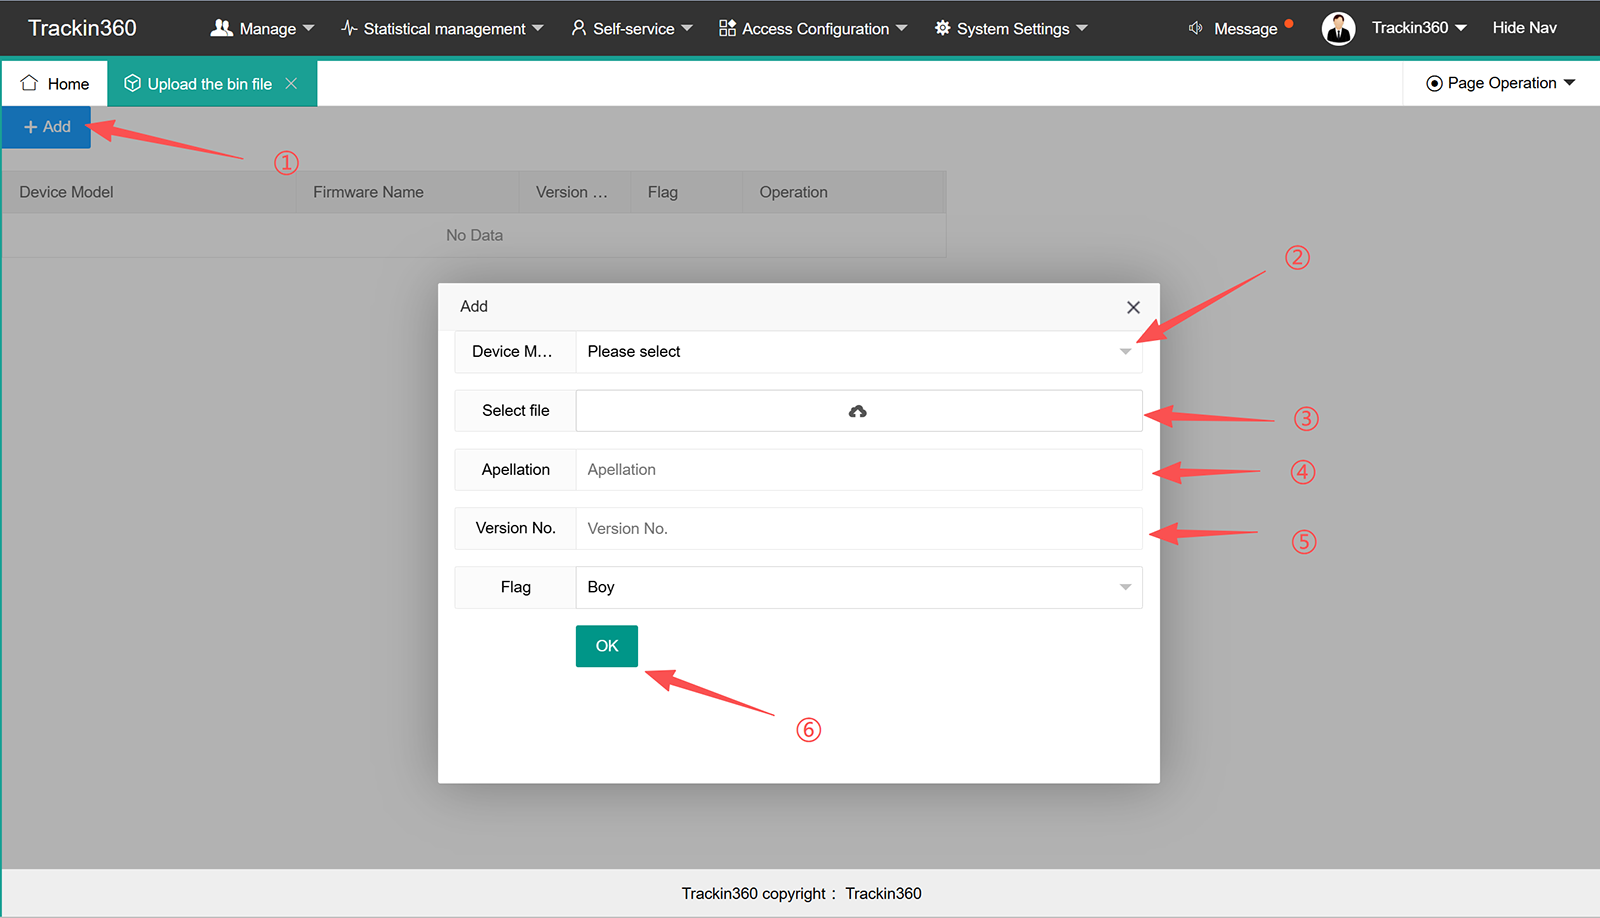
① Click "Add"
② Select model to upgrade
③ Select and upload the bin file
④ Input Apellation
⑤ Input version number
⑥ Click "Ok" to start uploading
Ⅷ. Information Center
Record alarm logs for all devices, view the alarm status of devices in real time, and enable audible alarms. The platform will receive alarm notifications from the honeybee.
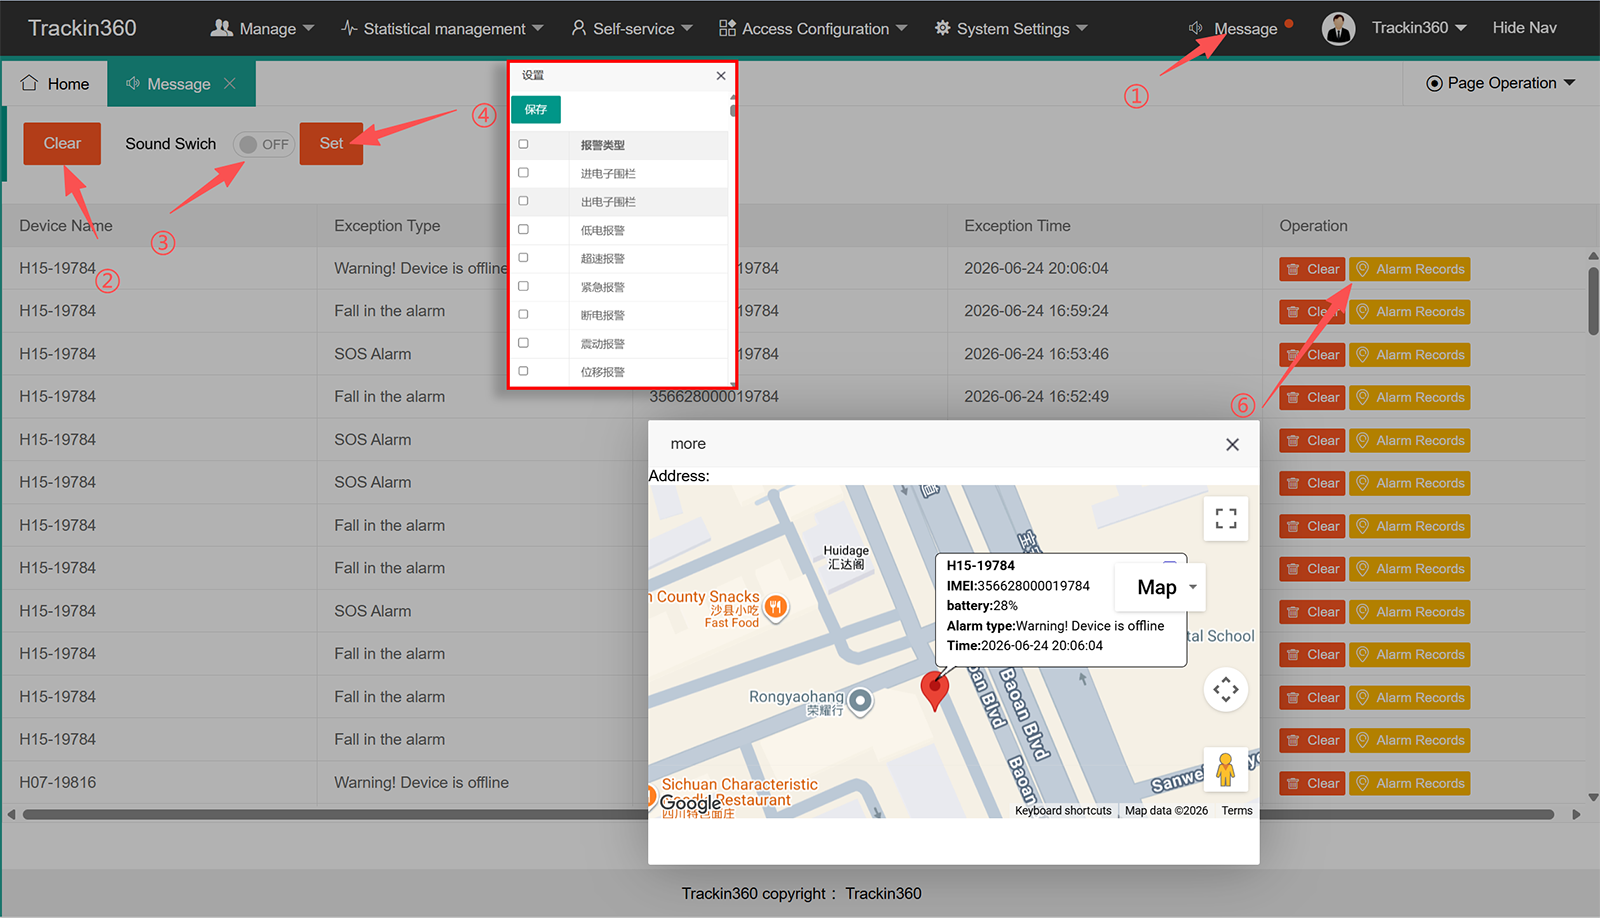
① Click to enter message section
② Click to clear all alarm
③ Click to turn on and off the alarm sounds
④ Click to enter setting
⑤ Click "Clear" to delete this message
⑥ Click "Alarm Records" will showing the alarm triggered location.
Ⅸ. My Account
9.1 My Account
Access my account, you can change your login account information at any time as needed by your company.
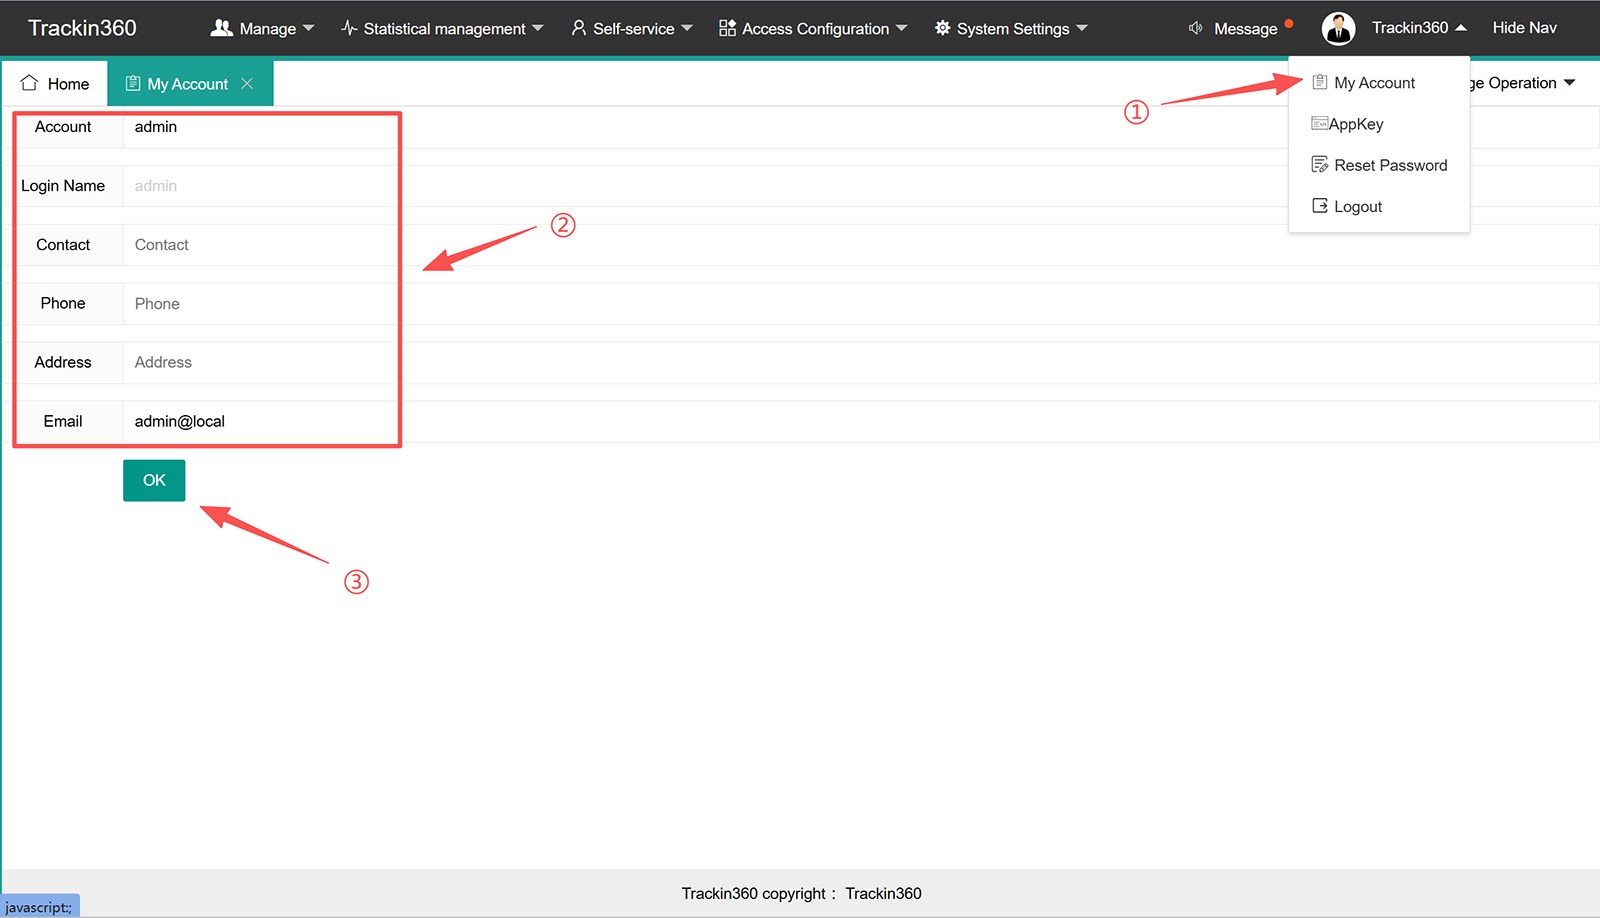
① Click "My Account"
② Showing and able to input account information include login name, phone, address and email
③ Click "Ok" to save setting
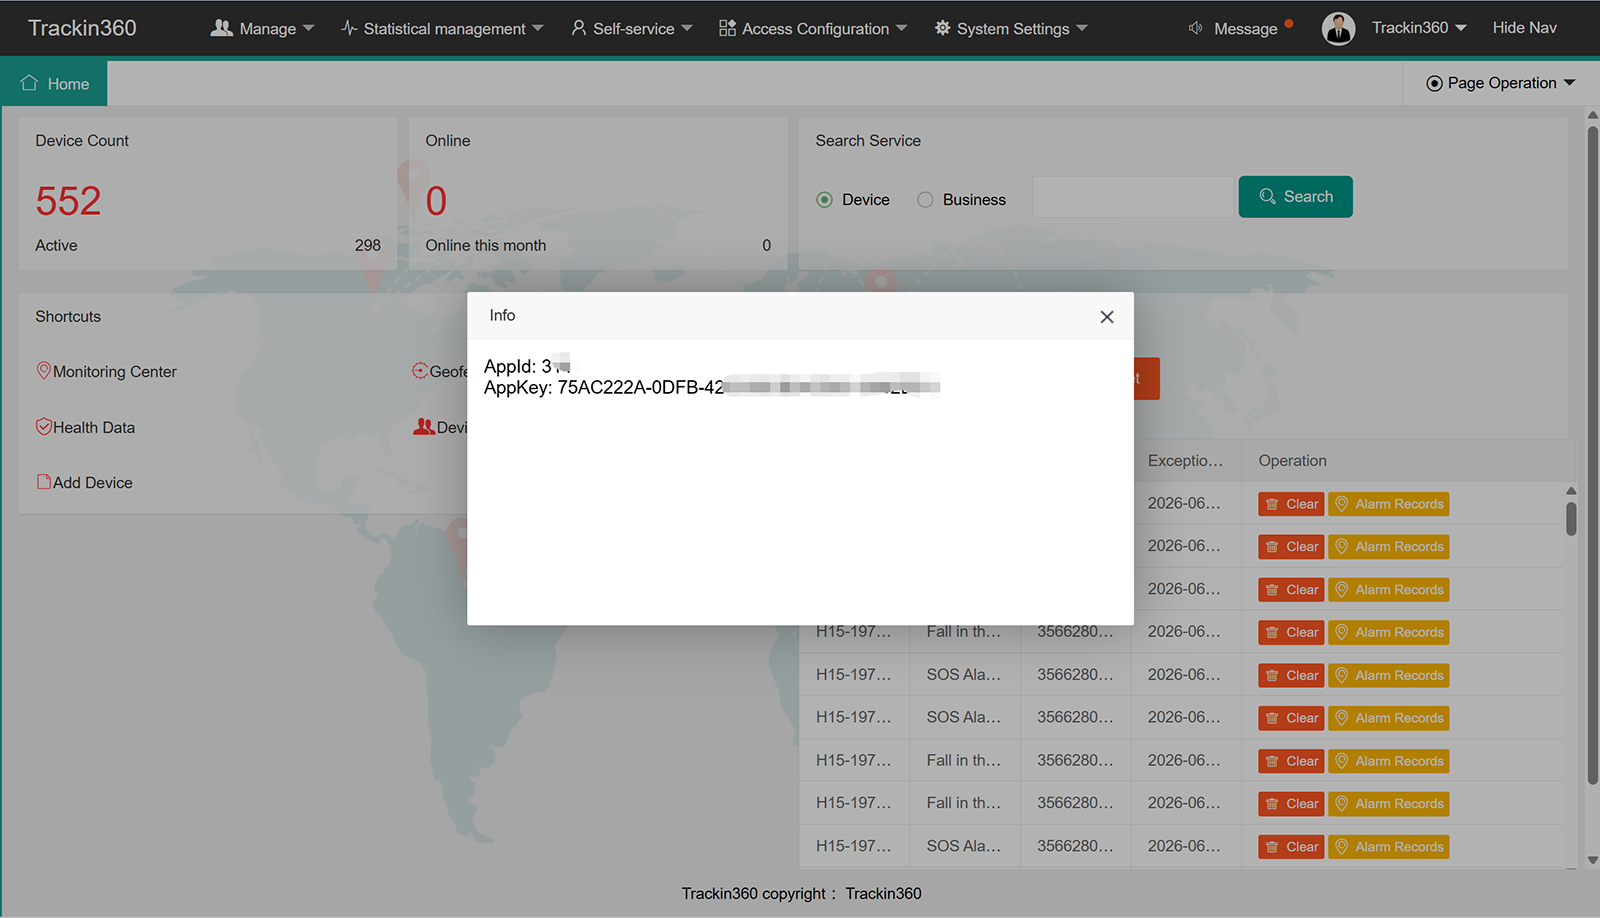
9.2 Apply for App KEY
Currently, two types of permissions are supported:
1) APP API: This permission is used for customized app usage, using the same user system as this system and following the corresponding procedures.
2) Open API: Open API permissions are used to call data and do not require using the same user system as this system. This is typically used for inter-platform integration.
Note: Generally not applicable unless for customized clients and extra technical cost advance.
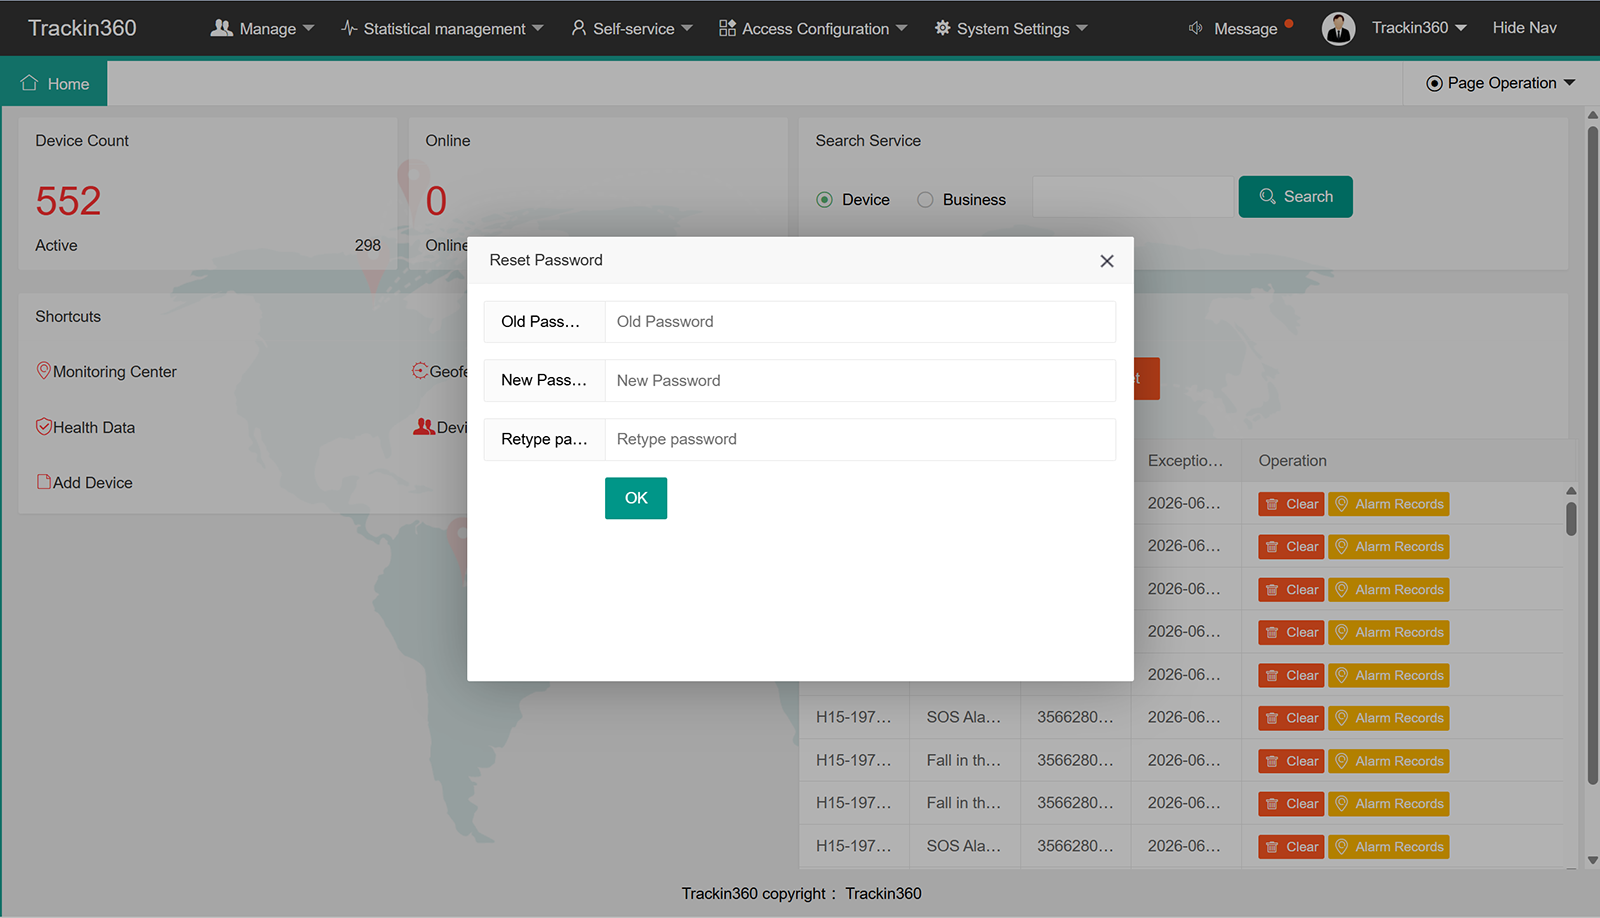
9.3 Change Password
For account security, you can change your account password at any time.
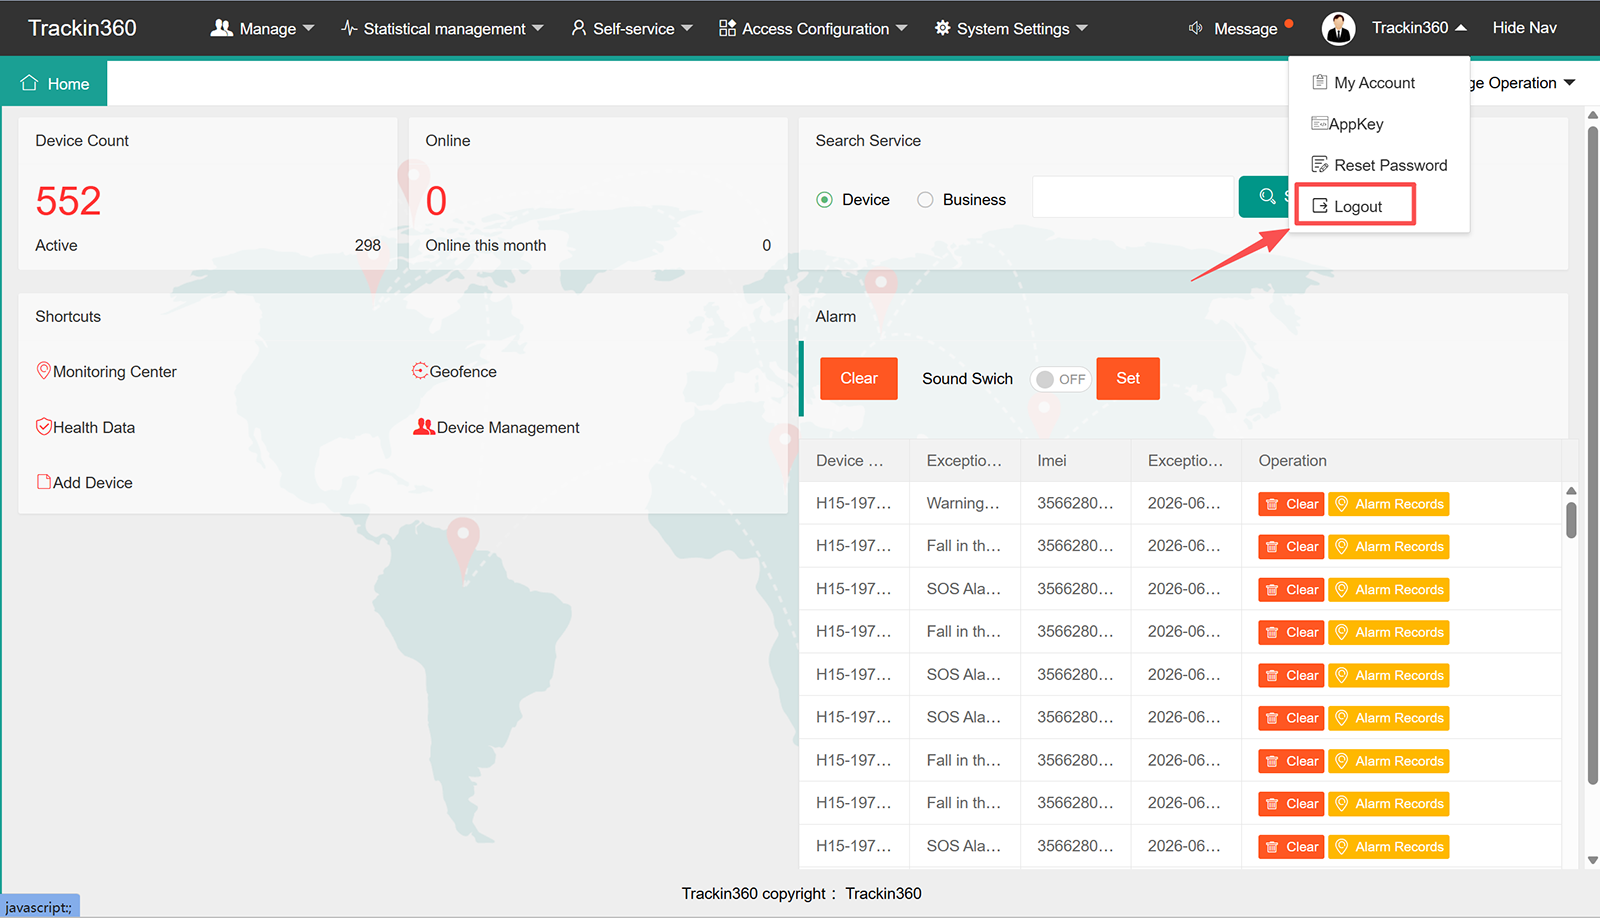
9.4 Log Out
For account security, remember to log out of your account each time you log in.
Thanks for your reading, please contact with us if there are any more question or doubt, thanks.